|
|
Post by scooby on Nov 4, 2013 15:06:52 GMT
|
|
|
|
Post by scooby on Nov 4, 2013 15:01:09 GMT
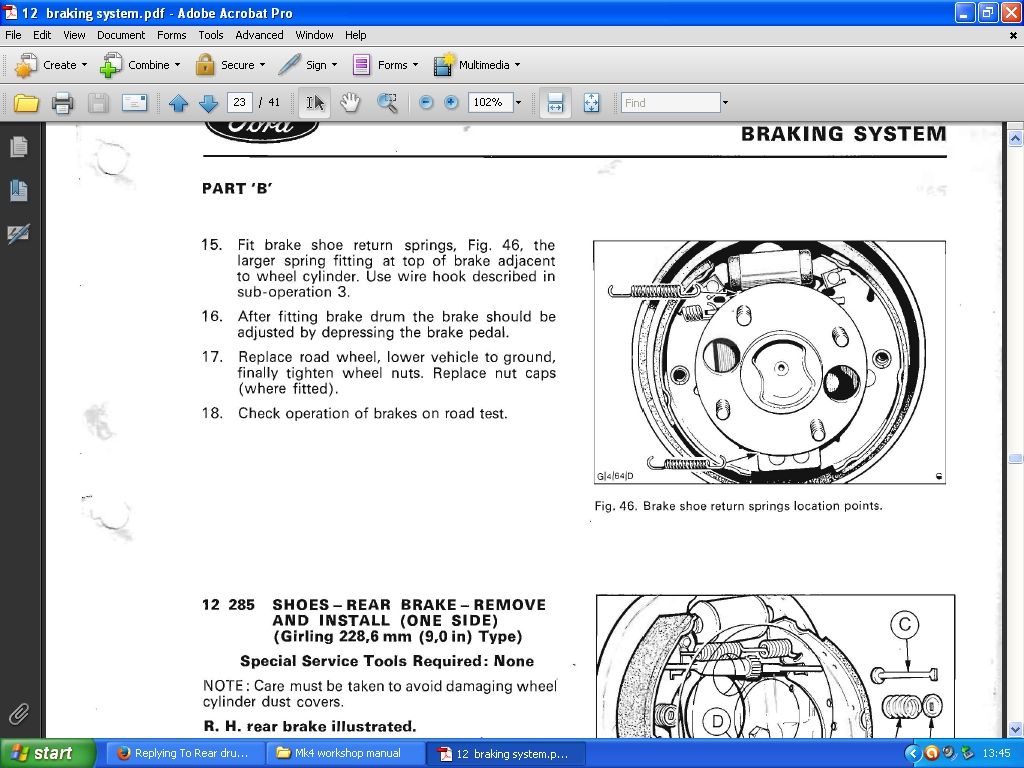
AAAAAARRRGGGHH!!!STOP Derek! Don't re-do your springs! Just had confirmation from a Cortina forum that the smaller springs go on t'bottom! So you got it right - geee, I'm sooo pleased for you  (I'll try and add a pic from the Ford manual later...)
|
|
|
|
Post by scooby on Nov 3, 2013 23:15:19 GMT
Thanks Trike. So, assuming the stronger springs are the smaller diameter ones (they felt that way when I tried bending them), then - for once - I've done summat right. (  Derek  ) Many thanks for the plunger info, Derek - just what I needed. If you do swap your springs, try the method I used. Everything assembled off the car (except for the bottom spring), adjuster wound down to min, get the top spring into place using the 'thin-bladed screwdriver method', connect the handbrake cable, and offer it all into position. You do need to watch out for the top shoe ends damaging the rubber piston dust seals as you then lever the shoes into place on the cylinder - I used two large screwdrivers, one on each shoe; lever one over the piston, and then keep that screwdriver in place to stop the shoe slipping off again whilst you repeat for the other side. (At least I think that's how I did it...) For the easier bottom spring, pull both shoe ends forwards and clear of the hub seat (making sure you don't pull the top ends off the piston again!), and allow them to get close together so's the spring is an easy fit. Then lever them into place one at a time. |
|
|
|
Post by scooby on Nov 3, 2013 0:13:28 GMT
Thanks Derek and Gary. ( I didn't reply sooner as we've been away - Alton Towers in the pouring rain wooo-hooo!) That's how my handbrake cable is set up too, Gary. It hadn't even occurred to me that the back entry was a change from the Cortina, although I did wonder what was going on when I saw the cable crossed-over at the handbrake lever! The reason I fitted the smaller diameter spring at the top is - that's the way they were when I started the job! I've no idea if that's correct, and Haynes - typically, as I'm beginning to realise - overlook such vital info. (My thoughts are that, since the smaller dia spring seems to be the much firmer one, it probably does make sense for it to be at the top; that's where all the action is. All the bottom one does is just hold the shoes tucked in against the bottom pivot point. But I've no idea for sure.) Can anyone confirm which spring goes where, please? (I'll ask on a Cortina forum too, and post back here if I get a definitive answer.) Derek, if you could tell me how far the plunger protrudes into the hub, I'd be very grateful  . |
|
|
|
Post by scooby on Oct 31, 2013 14:58:01 GMT
The only way I could do it was to assemble the brake shoes and adjuster off the car, and fit the top spring too (that's the real problem I had - that spring) before offering it all up to the hub.
Handbrake cable on first, and then shoogle the whole lot and the horizontal adjuster bar just manages to 'slip' between the back of the hub and the front of the brake cylinder, and the shoes fall into place. NO way whatsoever could I pull that spring into place with the shoes fitted first. I couldn't even remove the darned things at the start of the job - I had to remove both shoes, adjuster and spring in one piece!
Fitting the bottom spring - which is larger diameter and 'weaker' - was fairly easy.
(Someone will now tell me I got the 2 springs the wrong way around...)
And the only way I could get the top spring into place (and you should have seen the things I tried!) was to set the assembled shoes & adjusters on the floor, fit the spring loop into the RH slot, and then use an electrician's screwdriver (narrow shaft, flat blade) to lever the other hoop into place. By slipping the screwdriver through the hoop - so that the hoop lies around an inch up from the screwdriver tip - and then placing the actual tip into the receiving slot, I was able to lever the hoop over until it was above the slot, and then carefully manipulate the spring down the shaft until it was over the slot. A little more shoogling, and in it went in pretty much first time. I couldn't believe it.
(This was after about an hour of trying other things; I even screwed both shoes down to a plank of wood to keep them still, wrapped a wire around the loose spring end, and tried to use a lever to pull this wire - and spring - over the slot. Didn't work! Why? Because the brake shoe side keeps the wire and spring away from the slot surface... Grrrrrrr.)
|
|
|
|
Post by scooby on Oct 30, 2013 1:25:34 GMT
The 8" shoe set-up?
Enjoy....
|
|
|
|
Post by scooby on Oct 23, 2013 23:09:18 GMT
Another RV! ![love[1]](//storage.proboards.com/658221/images/WB905yHTE4BG54DShTfw.gif) |
|
|
|
Post by scooby on Oct 12, 2013 17:35:23 GMT
Hi Matthew.
Does your RV have a reg number and/or V5 document? If so, what does the V5 say for 'make' and 'model'? And, if there's a reg plate, is it a 'Q'?
If you don't - or if it hasn't - then it may be worth working out the likely cost of getting your car through the (almost certainly) required IVA test before you splash out on new engines, etc.
I don't know if anyone on here has put an RV through an IVA test - so can tell you what's required - but my suspicion is that it'll cost a few £100 at least.
As for your engine options, if you want to keep insurance costs as low as possible, then - again I'm guessing - you'll want the smallest practicable engine possible, and I guess that's the 1.6L Pinto. I'd suggest the best way of getting hold of one of these is to buy a late-model (circa 1990) MOT-failure Sierra, which has low miles. You may have to wait a bit for one of these to come along! (But this way you'll have an engine, 5-speed 'box and all the ancillaries you'll require, and will also have a lot of bits you'll be able to sell on on ebay for a fair amount.)
First step, tho', find out if your car has been registered as a 'kit'. That'll make the world of difference...
|
|
|
|
Post by scooby on Oct 8, 2013 19:22:41 GMT
Still very cheap for a V5. |
|
|
|
Post by scooby on Oct 7, 2013 22:29:06 GMT
|
|
|
|
Post by scooby on Oct 1, 2013 20:18:15 GMT
Thanks Peter.
I should be fine, then, as the track rods are nigh-on level.
I guess what I'm experiencing on bumpy roads is a bit of chassis-shake?!
|
|
|
|
Post by scooby on Sept 30, 2013 22:45:19 GMT
My RV currently has 205-width tyres on 16" Weller rims.
I managed to get a nice set of 17" alloys at a fair price on t'bay, so will be looking to tidy them up and hopefully fit wider tyres to them in the future.
Currently looking at either 235/70s or 245/65s, as these seem to be fairly common sizes so part-worns can be picked up for not too much. (I'd go for even higher profile, but they seem more rare).
Although the alloys have a smallish offset - ET 17 - I'll still need spacers to get them sitting where the current wheels are.
The car drives pretty well at the moment, with little bump-steer unless the road surface is really bad. Does anyone know how the wider tyres might affect this? Will it more obviously 'tram-line' for instance?
(Bearing in mind it'll very rarely go above 50-odd mph!)
|
|
|
|
Post by scooby on Sept 25, 2013 1:22:01 GMT
How do you alter the colour of the anodising if you want, say, red?
(One of the few experiments I remember from back in Secondary school was when our chemistry teacher sunk a piece of aluminium plate in a pool of mercury and scratched the ali's surface a few times. He then removed the ali plate and we watched amazed as oxide grew from the scratches like ferns. The mercury somehow prevented the oxide layer from forming a skin as it normally would, so it could carry on oxidising to its heart's content. We think of aluminium as being a corrosion-free metal, but it's its own oxide skin that seals the metal underneath and prevents further 'rusting'. Did I read somewhere that mercury isn't allowed on aircraft for the same reason - in case it spills and...)
|
|
|
|
Post by scooby on Sept 25, 2013 1:10:08 GMT
That search could apply just as much to the original Cortina as it could an Eagle, I guess.
BUT, your V5 says 'Eagle'? That is excellent news - you will almost certainly be ok.
What does it say for 'Model' on the V5? And, what is the chassis number on there?
|
|
|
|
Post by scooby on Sept 20, 2013 20:41:03 GMT
That's a cheap windscreen...
Cough
|
|
|
|
Post by scooby on Sept 20, 2013 20:34:08 GMT
Hi Mell0rman. No such thing as 'cheating' in the kit car world! (Well, I guess buying a wrecked-but-correctly-registered car to transfer just the ID to and get past the IVA test might be 'cheating', but can you be surprised some people do it?!) It doesn't matter if someone else finishes your kit - why should it? I built a kit from scratch when I were a lad (and had the time...), but since then have only bought 'runners', but which need a bit of going over to finish. So, now I drive a kit that I didn't build myself - is that cheating?! If so, I don't care.  I'm really surprised that these build companies haven't got back to you, tho'. Strange. I saw one based in Scotland advertising on eBay very recently - where are you based? It doesn't have to be local, of course; as soon as you have to get a transporter to take your car anywhere, a 'few' extra miles shouldn't make that much difference... The companies you've already looked at - are they close to you? I do hope they are not being presumptuous about these kits. I wonder if they are making a mental calculation along the lines "How much are Eagles worth when completed? So, how much will the owner be willing to spend..." Perhaps they'd open their doors if you sent them a Dax Cobra...  Your idea of modifying the Eagle's bodyshell to fit an existing car seems, to me, to be fraught with problems to be honest. By the time you've chopped away enough bodywork from the 'donor', it'll be seriously weakened so will require bespoke tubing added - that won't interfere with the new shell. I can't help thinking you'd have to modify just about every major component in the donor - a nightmare. And what ID the car would keep afterwards, I've no idea. Your SS has been completed at some point, hasn't it, and now 'just' needs a 'rebuild'? In which case, everything theoretically 'fits', and that's a major plus. A couple of pro kit builders, free to work full days on such a project, should have it sorted within a week, easy. Surely? Or, do you have any car-lovin' mates or colleagues who could help out? Again, when I were a lad on a wee island in the Outer Hebrides - where every single kid was a car enthusiast! - I had to fight them off from coming to help; they just thought it the best project as it was one of the very first kits on the Island. (But, I didn't trust them to do a proper job so sent them packing!) Having someone else on board wouldn't just be to help out; the very fact of having someone else there will enthuse you and make you find the time! Whatever you decide on, good luck! |
|
|
|
Post by scooby on Sept 16, 2013 17:39:51 GMT
I said nuffink... |
|
|
|
Post by scooby on Sept 13, 2013 22:13:22 GMT
Jeepers, there has to be significantly more than 4, surely?
I mean, there's a steady trickle coming up on eBay, and a reasonable percentage are actually road-going. Ish...
Maaaan, that's sad.
|
|
|
|
Post by scooby on Sept 5, 2013 18:45:29 GMT
No, I'm not planning to stick these on the front of my RV, but I am very curious about them all the same These are combined LED lamps? How does this work - is each one multi-colour, or do only a few of the right colour light up as required? Very neat... |
|
|
|
Post by scooby on Sept 2, 2013 19:44:37 GMT
Blimey...  |
|
|
|
Post by scooby on Sept 2, 2013 0:22:32 GMT
New (recon) steering rack and track-rod ends fitted, and that has really tightened up the steering nicely.
It's slightly lacking in self-centring at slow speeds, tho' it's not really a problem. I set the alignment using a quickly-cobbled home-made device (a timber beam the length of the car's track, with an upright at each end to match the wheel centre heights, and a long screw going through each which can be adjusted until they touch the wheel rim) to fractionally 'toe-out' as stated in the manual. Anyone know if a 'tweak' of this measurement might help perhaps as compensation of the wider track and larger wheels? I understand that self-centring is mostly down to 'castor' angle and not alignment, but asking chust in case!
It might just be down to the new rack's slight 'stiffness' - it really is 'snug' feeling, so it should loosen over a bit of time.
Anyways, looking at how to approach my new dash. The Cortina cluster is squeezed in tightly above the steering wheel and the bottom of the windscreen frame at the mo', and I'd ideally like it a bit higher. I glanced into a Mercedes ML Jeep t'other day, and noticed that its binnacle is mounted in a pod sat above the rest of the dash, going a few inches over the screen. Do'h! It never occurred to me that it would actually be ok to go over the screen a bit - you never look that low through it anyway...
That leads to a potential problem, tho' - routing the speedo cable. So, I'm pretty much decided I'm going 'electronic' - but, as always, on a tight budget.
I've just bought an 'electronic' Mondeo instrument cluster on eBay (tho' I have suspicions the guy ain't going to honour the sale as it went pretty cheap...) which I'm going to experiment on. I'm hoping that the rev counter and speedo would both be operated by simple 'pulses' similar to the current Cortina's rev-counter, but have a horrible feeling that the dials on these electronic dashes are driven by stepper-motors, so will require the full electronic jobbies to operate them...
So, another idea is - use 'Cortina'-type rev counters for both the tacho and speedo. These tachometers are simply powered by yer usual +ve and -ve supply, with the 'trigger' signal being delivered - I think - by a pull to 'zero' (or -ve). On the car, the rev counter signal wire is connected to the coil's 'negative' side, and this is pulled to zero volts (earth) each time the points close. So surely that's it?!
So, my idea is to have the speedo cable terminate inside a 'podule' under the bonnet with a rotating magnet attached and as many reed switches mounted around the circumference as is needed to provide roughly the right amount of pulses (a number I've no idea about at the moment, as I don't even know how fast the cable spins!). These reed switch outputs will be pulled 'high' by a resistor in its normal state, but will be connected to earth when the magnet flies past and closes them. (I could go the route of having a single reed switch and a few magnets, but I think a single magnet and a few switches will give each switch less work to do!)
The pulses from this will then operate the 'rev counter' and, when I arrive at the 'right' number of reed switches to use to give a roughly decent full-scale, I'll print up a speedo dial to suit.
Complete with 'Eagle' logo in t'middle...
Does anyone know anything about modern electronic production-car speedos? Am I talking nuts? Am I just nuts?
All good fun, tho'...
|
|
|
|
Post by scooby on Sept 1, 2013 23:48:39 GMT
Um, hang on... (pats pockets to check...)
|
|
|
|
Post by scooby on Sept 1, 2013 23:46:53 GMT
Blimey, that's some progress  A glass company shouldn't have any trouble making you a screen should you need to go that route - every pane they make for low-mounted domestic doors and windows have to come with 'kitemarks', so adding this decal shouldn't be an issue. Mind you, if a Landie 90's fits, that's easier still, and will be very useful info if you confirm. Great info too for anyone wanting to fit an RV bodyshell on a Land Rover! Who'd have thought that moving the engine back a bit would mean the props could be left uncut! I doubt you'll have much trouble sorting the steering wheel issue; there are so many columns available on eBay for next to now't, most with UJs and all sorts on them too. Since you obviously can weld, that should be an easy one for you! Just today, as I was looking at dashboards on ebay, I came across steering columns for the Seat Ibiza of all cars, and noted that it was a neat unit with UJs at both ends - I made a mental note that, should I ever need such a thing... You have the world of production-car steering wheels available to you too. I just fitted a near-new Mondeo wheel on to the Cortina shaft by angle-grinding the 'boss' from the Cortina item, hole-cutting out the Mondeo's, and then bolting the two together with SS bolts. It's a decent sized wheel (14.5" I think) and feels really nice - and looks the part too. Total cost was less than a tenner. Is your bodyshell a Mk1 or 2? If the latter, I might be selling off my own hardtop and solid doors later on if that's of interest. I haven't fully decided yet, tho', but it's just an item I'm very reluctant to use - I like being topless regardless of the weather...  Looking forward to seeing some photos! |
|
|
|
Post by scooby on Aug 29, 2013 23:16:45 GMT
Definitely not bling (the lights ain't that bad in reality  ) but not roughty either - hopefully just a neat, well-finished, relaxed runabout which my wife will also be happy to use. The side zorts will be going...
|
|
|
|
Post by scooby on Aug 29, 2013 10:18:59 GMT
"Valance"! That's the word Yes, the lights are a bit loud, but tone down quite a bit with the wheel rack back on to fill that space. If they're still too 'noticeable' when the car is resprayed (haven't chosen colour yet...), then they could always be 'smoked'. I do love how clear the light output is, tho', especially after the seemingly weak glimmer of the old units. |
|
|
|
Post by scooby on Aug 28, 2013 23:50:53 GMT
No major changes yet. Just been tweaking and tidying bits and pieces, especially the wiring as it's been giving me a real headache... The original Cortina harness at the rear was a mass of terminals, splices, tape, blocks and additional wires. (No reflection on the previous owner - it looks as tho' it was like this from its first build!) Since I was planning to replace the rear light clusters, I thought I should sort this out at the same time, so I cut the whole loom shortly after it emerged from the bodyshell at the back, and this squirming mass of cables was re-bound and pushed into a waterproof JB tied to a chassis member. One single hefty earth cable was then bolted to a single chassis point and brought to this JB too - all the rear earthing requirements will now go through this single wire. Whilst trying to figure out which wire was which in this snake's pit of a loom, I left the indicators running so's I could trace the voltage. After a few seconds, the flash rate began to slow right down, finally stopping with the flasher relay emitting only a weak asthmatic wheeze as it tried in vain to 'click' one last time. Hey-ho, I'll sort that later... From the new main JB, there now emerges a single, neat, 'trailer light' cable (with just 7 cores) which daisy-chains to the 2 new light clusters and a new trailer socket. Bizarrely, the indicator problem was traced (days later...) to a lack of earth to the warning lights in the instrument binnacle. That took some head scratching, but my suspicions fell on the instrument cluster when I decided it was time to rip off the whole dashboard ( , AndyEx-RvMac...) and I discovered the indicators started to flash ok when the 'clocks' weren't in place... Leccy is well strange stuff! The lack of earth here seems to have caused the leccy to find a path via the other circuits, such as the headlamp filaments, and this drain was enough to cause the flasher relay to say 'Non'. Trying to operate the indicators would get the main beam warning light coming on, and other strange things. Anyways, all the dashboard wiring loom has now been tidied too, with just the basic requirements left behind. The sad Cortina cluster now sits alone in a wide open space, held in place with gaffa-tape. Nice...The rear light units are Mazda RX7 units, strangely enough. Why them? Because they looked nifty in the eBay ad, were of the type they describe as 'Lexus Jewel' (which means they're sparkly and chromy - well bling...), looked fairly 'flat' (which you need for the Jeep's back) and - oh yeah - I got them brand new for 99p + delivery from an after-market light specialist... Ok, they needed around 3" cut off from the 'bottoms' (or the 'outsides' when fitted on the RX7), and also a little bit more fettling - and a darned big hole cut in the back of the car: 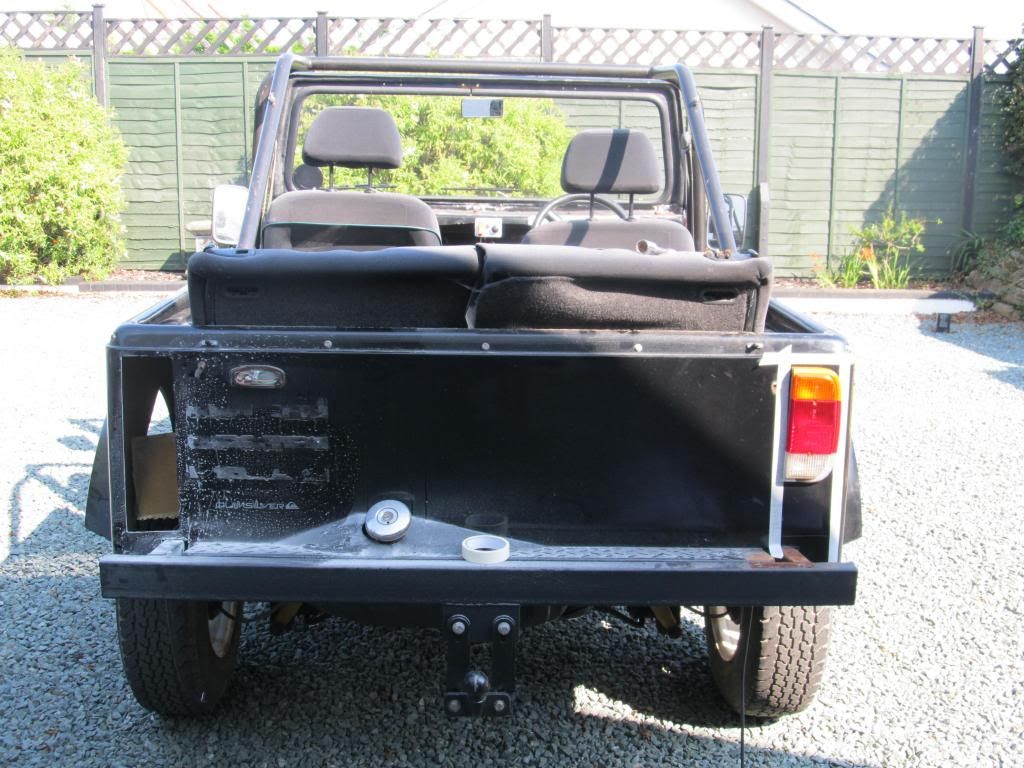 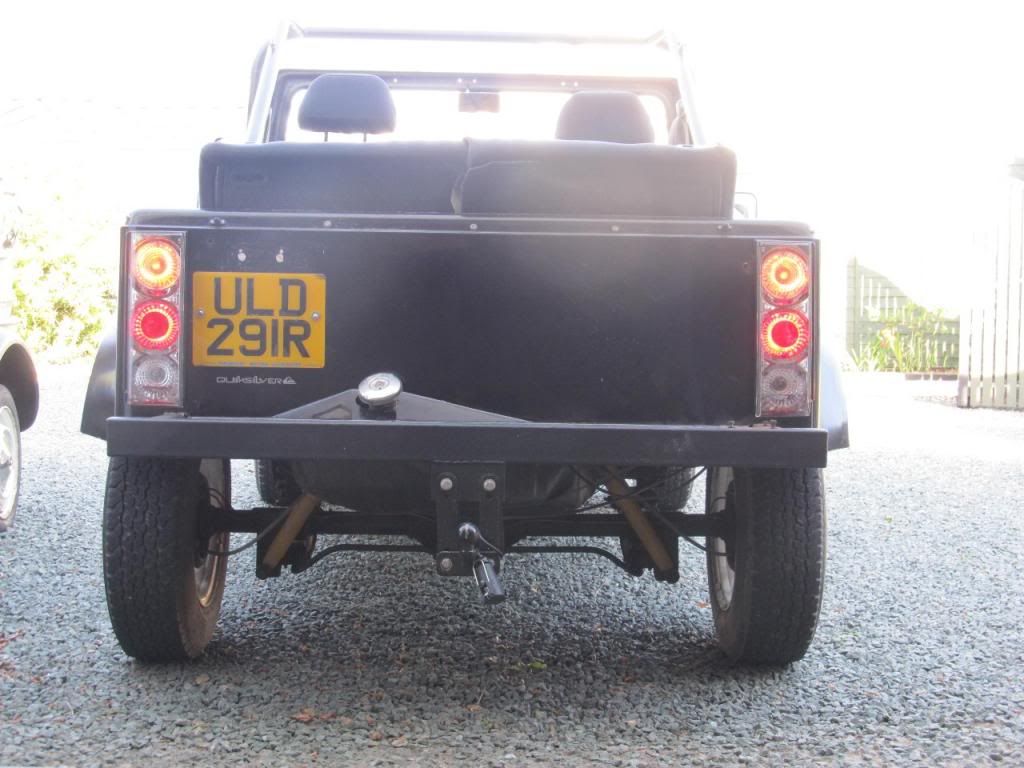 An electronic flasher unit and full quota of LED lamps are winging their way from China as I type. By using electronics and LEDs, running the trailer shouldn't cause any problems, and I'll also welcome the large fall in current draw. The rear end still looks a bit bare with the spare wheel rack temporarily removed, but another aspect of that view I'm planning to improve is by adding some 'bodywork' below the existing so's it hides the fuel tank and a bit of the suspension; I think it looks too much like a 'kit car' at the moment... Anything else? I tightened up the steering column as it was a bit shaky, bought a nice 'Mondeo' steering wheel of eBay (which I fitted by cutting off the Cortina wheel's 'boss' and bolting it to the Mondeo's after cutting the existing fitting of that wheel too...), and this makes a huge difference to the overall 'feel' of the car - both literally, and in it's appearance. I'm not really a fan of after-market steering wheels as they often look like they don't quite 'belong' - well, certainly not in a Jeep-style vehicle - and the quality of modern car wheels is pretty hard to beat. If it's good enough for a Mondeo... (This also means I have an air-bag detonator sitting in my garage, which I'm looking forward to firing... It has two little electrical plugs - I wonder which terminals I wire my battery to...?) Oh, and there's a 'new' (reconditioned by Delco Remy) steering rack (only £44) and track-rod ends sitting waiting to be fitted. There's a goodly half-inch of play in the existing, so I look forward to feeling the difference there too! Hey-ho. I'm loving the RV! It's so nice to have the SPACE inside after having to cope with the tiny cockpit of the Marlin and 2CV. It's so practical; everyone - and the dawg - just jumps in and offski. Come winter time, it'll be the same - no roof is going on. You put a coat on to go for a walk, so the same will apply here... |
|
|
|
Post by scooby on Aug 23, 2013 12:17:18 GMT
C'mon guys! Spill... Pretend you've just had a pint placed before you in t'pub ![cheers[1]](//storage.proboards.com/658221/images/HTahwjnPNRnE0X3XkViD.gif) |
|
|
|
Post by scooby on Aug 20, 2013 23:29:39 GMT
I understand laminated is the way to go these days. In the days of toughened glass, one chip got you an exploding windscreen!
But, your local windscreen/ glass company will be able to advise.
|
|
|
|
Post by scooby on Aug 19, 2013 18:59:03 GMT
Hi Gaz. I don't know whether the screen is available from a 'production' car, but - being completely flat - isn't it just a case of having one made up by yer local glass specialist? I don't think it's any more complicated than having a 6mm thick (or less?) laminated pane made up to your template. It'll likely need a 'BS' standard embossed on it to show conformity, but again that's pretty standard stuff whenever you have a laminate or toughened window pane made. (But don't shoot me if I'm wrong!) Where are you based? Will you be parting with the existing engine and 'box too? If so, is it a type 9 'box? |
|
|
|
Post by scooby on Aug 10, 2013 8:49:11 GMT
Hi Gaz. Stupid Q time... Given that most RVs are Cortina and Sierra based, how possible is it to use Sierra 4x4 mechanicals in an RV? There seems to be a steady trickle of these cars available - MOT-failures with rusted bodies - but possibly mechanically sound. Just as an example: www.gumtree.com/p/cars-vans-motorbikes/ford-sierra-xr-4x4-29-v6/1027124737 (Even has a Stainless exhaust) |
|


 Derek
Derek  )
) .
.![love[1]](http://storage.proboards.com/658221/images/WB905yHTE4BG54DShTfw.gif)


 ) but not roughty either - hopefully just a neat, well-finished, relaxed runabout which my wife will also be happy to use. The side zorts will be going...
![cheers[1]](http://storage.proboards.com/658221/images/HTahwjnPNRnE0X3XkViD.gif)