|
|
Post by soldonkits on Oct 4, 2019 15:57:24 GMT
Eagle SS build... thought I'd start with something sensible while the tablets are still working.
Anyone else building a SS that would like to chat? Finding myself with a wreck of a car... make that shell-like jigsaw, no plans, no idea what should go where etc, etc, and with the cost of medication rising too, I have selected a nice area of wall to bang my head on. Love to add photos of the build but not a skoobie on how to do it and don't have a photobox-bucket-thingy and don't really want another account to manage anyway. Any other way to insert photos that doesn't require a programming degree or the brain of a phone addicted teenager to understand?
ANYWAY... just finished fabricating and bonding-in all the missing sections of the shell and there were many so I thought I'd get a quote for the re-spray, despite it being a long way off yet. This led to another short spell in hospital while I recovered from the shock. If everything was 'ready to paint and nothing... NOTHING else required', about 3.5k plus the lovely 'adds nothing to the finish' VAT. If it had stress cracks and bubble damage etc (I did explain that it was an Eagle SS and built aparently by chimps on acid and late on a Friday), the bill with bodywork could be 8k upwards plus the lovely VAT again. More heart medication needed and a lot of work addressing the bubbles and stress cracks, impact damage, chainsaw 'surgery' and other idiot/vandal inflicted injuries the car had (now you see why it's called Humpty!?). Anyway....... nuff said, unlesss there is someone out there reading this I'll shut up! As a BTW, I have some spares as a reuslt of all this work. Some original Eagle bucket seats- one bare and minus lining, the other lined with shabby leather; a wing; front bumper section. I even have a spare VW beetle engine 1641 that's somewhat tuned and little used since rebuild. Love to chat with someone suffering from the same frustrations. I even tried to meet up with an Eagle owner at Stoneleigh... three times but only saw one Eagle and no owner. I've got more chance of meeting a unicorn breeder. Still as a friend once said, when all else fails, there's always beer!
|
|
|
|
Post by Peter on Oct 7, 2019 11:26:52 GMT
You have just got a taste of the work involved, I have been at it since 1995 and still finding ways to change it, so many versions in the last ten years alone, and that is after it being tested and on the road legally. Bodywork and paint should be the last thing on your mind at the moment as working from the floor pan and a good rolling chassis, followed by engine etc before putting the body on is the only way to go. Don't get ideas of a 'super car' or modifications to "bring up to date" they don't work and you will never finish it. it is a 1970s design and always will be, work on that concept and keep it simple. Trim, paint, gadgets are way down the list. Meeting other SS owners takes a bit of effort, I am in Spain so even more so. but you will find other builders on here and on he euro-nova forum (from all over the world) who are very helpful and have lots of experience. As for shows, the attendance at Stoneleigh tends to be mainly RV owners and an occasional SS or 2+2 and don't forget they are there for the show too. always a couple o the Nova stand opposite who are very friendly towards their cousins over the road. Give out you location, you might have someone nearby who can help. In fact EVERYONE, please add location to your profile.Read, "So you want to build a kit car?" by me. on here eaglecarclub.proboards.com/thread/1242/build-kit-car |
|
|
|
Post by chrisbailey on Oct 7, 2019 15:56:45 GMT
Im in Kings Lynn, Norfolk.
Ive had my beetle based SS about 13 years and hoping to get it running under its own steam early next year.
The SS is a big project to take on, there really isnt many around so parts are rare. Most of them have been chopped about by multiple owners over the decades and there are no instructions for the non vw bits.
Peters advice is spot on, just fix what is necessary and keep it simple. Even the smallest modifications can take years to finish. When it takes too long, these projects usually end up on ebay.
If its on the road, you can get some use out of it and it will remain manageable.
It sounds like the quotes you are getting for paint are for show car quality. Is that what you are expecting or would you live with something less?
Alternatives are painting it yourself, getting a college to paint it or having it vinyl wrapped.
You could also not paint the car and go madmax, something i am considering.
|
|
|
|
Post by Peter on Oct 12, 2019 11:20:17 GMT
The paint quotes look expensive, I had my Audi 90 Sport completely resprayed and new decals done for 650.
Unless you are going for show finish and why would you as there are so few shows these days, a good paint job is just that, good enough. I am using large spray cans of acrylic black on mine and providing you do a good prep job and that means a lot of elbow grease and a GOOD primer, you can get a really good finish, we have even had some great results with a roller! (and a lot or rubbing down). Remember, paint is the LAST thing on the list.
Keep it simple and you will soon be on the road.
|
|
|
|
Post by soldonkits on Oct 23, 2019 16:30:29 GMT
Maybe my moaning wasn't clear enough... and I thought I was good at it!?
I have spent 2 years (on and off) repairing and updating a reasonabe floorpan until it's a now good floorpan. I still have front and rear brake conversions to disk and adjustable spensioning to address but the floor is sound and even painted. The gearbox is a Limebug modified box with longer legs for less revving on motorways and a higher cruising speed. This is ready to mate with a tuned 1762 twin port, twin carb engine. But my main work has been fixing all the damage, both accidental impact damage and deliberate idiot damage (you guys know who did it) so that the floorpan and shell can be brought together. My main reason for the body mods have been to either replace damage or to form new parts where bits were missing or impossible to save ie, missing rear end, wrecked sills, wrecked front bib, butchered dash, broken bonnet etc, etc, and this is before I try to replace the large lumps of rust that were once door hinges, with something that will actually open and sort out how to create opening windows.
Hey, I am really good at moaning!
Seriously though it's been a rough ride working with a broken car and no guide to what is shouled look like or how the designers ever though it would work. For example, no drainage channel around either the front boot or the engine bay. This leads to the boot filling with water every light shower or car wash and the engine electrics shorting out at the same time. What were they thinking? It also looks like a small miracle will be needed if I am to come up with a heater and blower combo that can cool the car (and me) in the summer and de-mist and warm it in the winter. Hey, but thats wat I wanted, a challenge, or so the wife keeps reminding me. With all the fixinng and fettling I have a few bits going spare and will have more as the builds continues. So far, a front driver's side wing, bonnet, bumper and two very rare and original seat shells, plus too many VW beetle O's & S's to mention. I even have a Nova rear bumper, not sure how I got that.
Anyone interested in the bits or would just like to tell, me in person, how I should have approached the build, I'm in the Oswestry area. Otherwise I'll keep posting rubbish like this and trying to find an easy way to include photos without joining muck-bucket or similar to do it. Just remembered, I have also had made some rear windows in tinted glass designed to fit in a recess like the front screen. More details if needed.
All for now, by the way Peter, I've moved on from beer to the hard stuff!? Acetone held in reserve.
Oh about the paint. After all this graft, yes I'm looking for a show finish, and someone that's knows how to produce a lasting paint job on a fibreglass car. I sprayed my previous kit myself, but that was a new shell with minimal finishing, this one needs more finessing before painting. So not exactly happy to pay more for the job but more resigned to it to get the finish.
|
|
|
|
Post by chrisbailey on Oct 25, 2019 11:44:51 GMT
I dont think you have much choice then on the painting front.
Im sure you already know, but have the expectation that the gelcoat and bondo will crack if you drive the car. There are so many parts of the body that flex that really shouldnt. Main parts are around the doors, the doors themselves and both front and back wings. People usually put bracing in underneath from the chassis to help stop this.
I have replaced the hinges on my doors, I made stainless steel copies of the originals. You have to split the top of the door to swap them. Obviously do that before painting.
i cut the top skin of the doors out, replaced the hinges then bonded the skins back on. Lots of matt resin and filler to hide it all.
I think i have still got one set of stainless hinges in the garage. They need welding though.
|
|
|
|
Post by soldonkits on Oct 26, 2019 13:08:57 GMT
I was unsure where all the cracks came from as the car has suffered so much damage in its short life on (and off) the road, Crash damage, scavenger damage and lifting damage from strops and ropes, have all contributed to the 'stress' cracks. My approach to fixing cracks is much like my approach to everything else,- if it's worth doing at all it's worth overdoing!? ie belt, bracers and hairy string.
I've addressed the cracks, whatever the cause, by stripping back the gel to solid base grp layer, matting inside and out with new layers of chopped strand GRP then finishing with a glass reinforced body filler that sets like fibreglass putty (chopped strands mixed with layup resin) but finer. Re-gelcoating is likely to be less resiliant and not relly needed when the shell is to be painted. This filler, unlike the generic 'bondos', sands smooth but fills deep and strong. It doesn't crack as easily, bridges well and works more like the original GRP. Also, being basically resin and fine glass strands, it behaves like the original structure too. (details and brands available to anyone interested). I have used some more traditional filler to fill very fine details but this too is sourced from a GRP supplies company and works very well with the shell's flexing.
Another defect in the construction is the numerous bubbles in the hastilly slapped-on gelcoat that occured during manufacture. These burst in the heat creating small sicle shaped cracks in the gel and even paint if really bad. Since the whole car has been stripped of paint, these bubbles have been ground out and filled with the glass reinforced resin filler.
I have also added several strengthening ribs to the car's more flexible sections using foam rib cores overlaid with matting. Bonnet, scuttle area, wings rear valance etc. These ribs are light in weight but rigid enough to give the car it's missing strength. I also plan to secure the shell to the floorpan a little more than standard with steel struts and corner bracing and if this still cracks during driving, I'll be dumping the car back in the same field I found it in!?
Thanks Chris for the tips on the door hinges, both a pet hate and worry of mine. The hinges on my shell were little more than lumps of corrosion. If someone had said they were bits off the Titanic, I couldn't have argued. This means I have nothing to copy and improve on. I don't even have enough to take measurements off, or work out where the pivot points should be. My current thoughts are to replace them with either off the shelf gull-wing door hinges, or use some standard marine door or hatch hinges that will remain rust free and future proof. I had already come to the conclusion that major surgery would be needed to remove and replace the old hinges, whichever style of replacement I settle on. Here I'm hoping my skills with GRP won't let me down.
Thanks for following up on the thread. It's good to know I'm not totally alone in this sad form of restoration madness.
|
|
|
|
Post by Mark on Nov 6, 2019 21:30:30 GMT
Sounds like you doing a proper job on the bodywork, nice one. Those Doors are tricky, I think the hinge retainers corrode maybe because the inner and outer door mouldings can split in this area and water gets in between and stays there, could also be water getting into door via door handles or by other means. The door is then opened and the runs down into hinge retainers and stays there causing corrosion. Stainless steel hinges do sound nice. I found the doors one of the hardest parts of the bodywork to get right and it is worth while spending some time on them. Mine are not perfect but I could do a post on my experience with them if anyone is interested. Keep up the good work, you know you love it really despite the frustrations  Hope you've seen my reply on other thread concerning inserting images would be great to see some photos. Is your Eagle DVLA registered by the way or is that too come? |
|
|
|
Post by soldonkits on Nov 7, 2019 16:04:01 GMT
The problem with the doors sounds like another design fault.
As a minimum, the steel used in them should have been plated and there should be better water management; pouring into your crotch is not shedding water properly from the doors, despite it being refreshing!?
Stainless would have been the best answer, if a little dearer, drainholes would have cost nothing.
Thanks for the heads-up. I'll make sure the doors are drained properly.
I for one would be very interested in your door work. All help and guidance always gratefully recieved.
My own thoughts are curently on three alternatives to the lumps of rust where the hinges should be.
1 - Custom hinges mounted inside the car and away from the water. (not sure if this will require a large groove cutting into the top of my head but either way it might be worth it. 2 - Stainless marine hatch hinges modified to take the weight of the heavy doors. 3 - Fabricate new replacement hinges to the same pattern as the original... if I can find an archeologist to translate the rust stains into hinge dimensions.
Mor on this as I get nearer.
It really helps being a (how the hell do you spell this?) masochist !?
The car is hopefully being registered using the donor beetle details as a 'body-swap' but untill I get the two together I can't submit the paperwork. Here's hoping they still look kindly on re-bodied beetles. The original beetle has been a 1200 saloon, a buggy, and a Europa kit car before becoming a rat-look rebuilt beetle again... you can't beet a bit of recycling. Even the Eagle shell has been registered before. Hopefully this will be the last time.
Work on including images also continues slowly but I'll stuff some into the build thread whn I've cracked it.
Thanks for the response.
|
|
|
|
Post by soldonkits on Nov 7, 2019 16:26:03 GMT
Time to try adding a photo
WHOA that's a big photo!
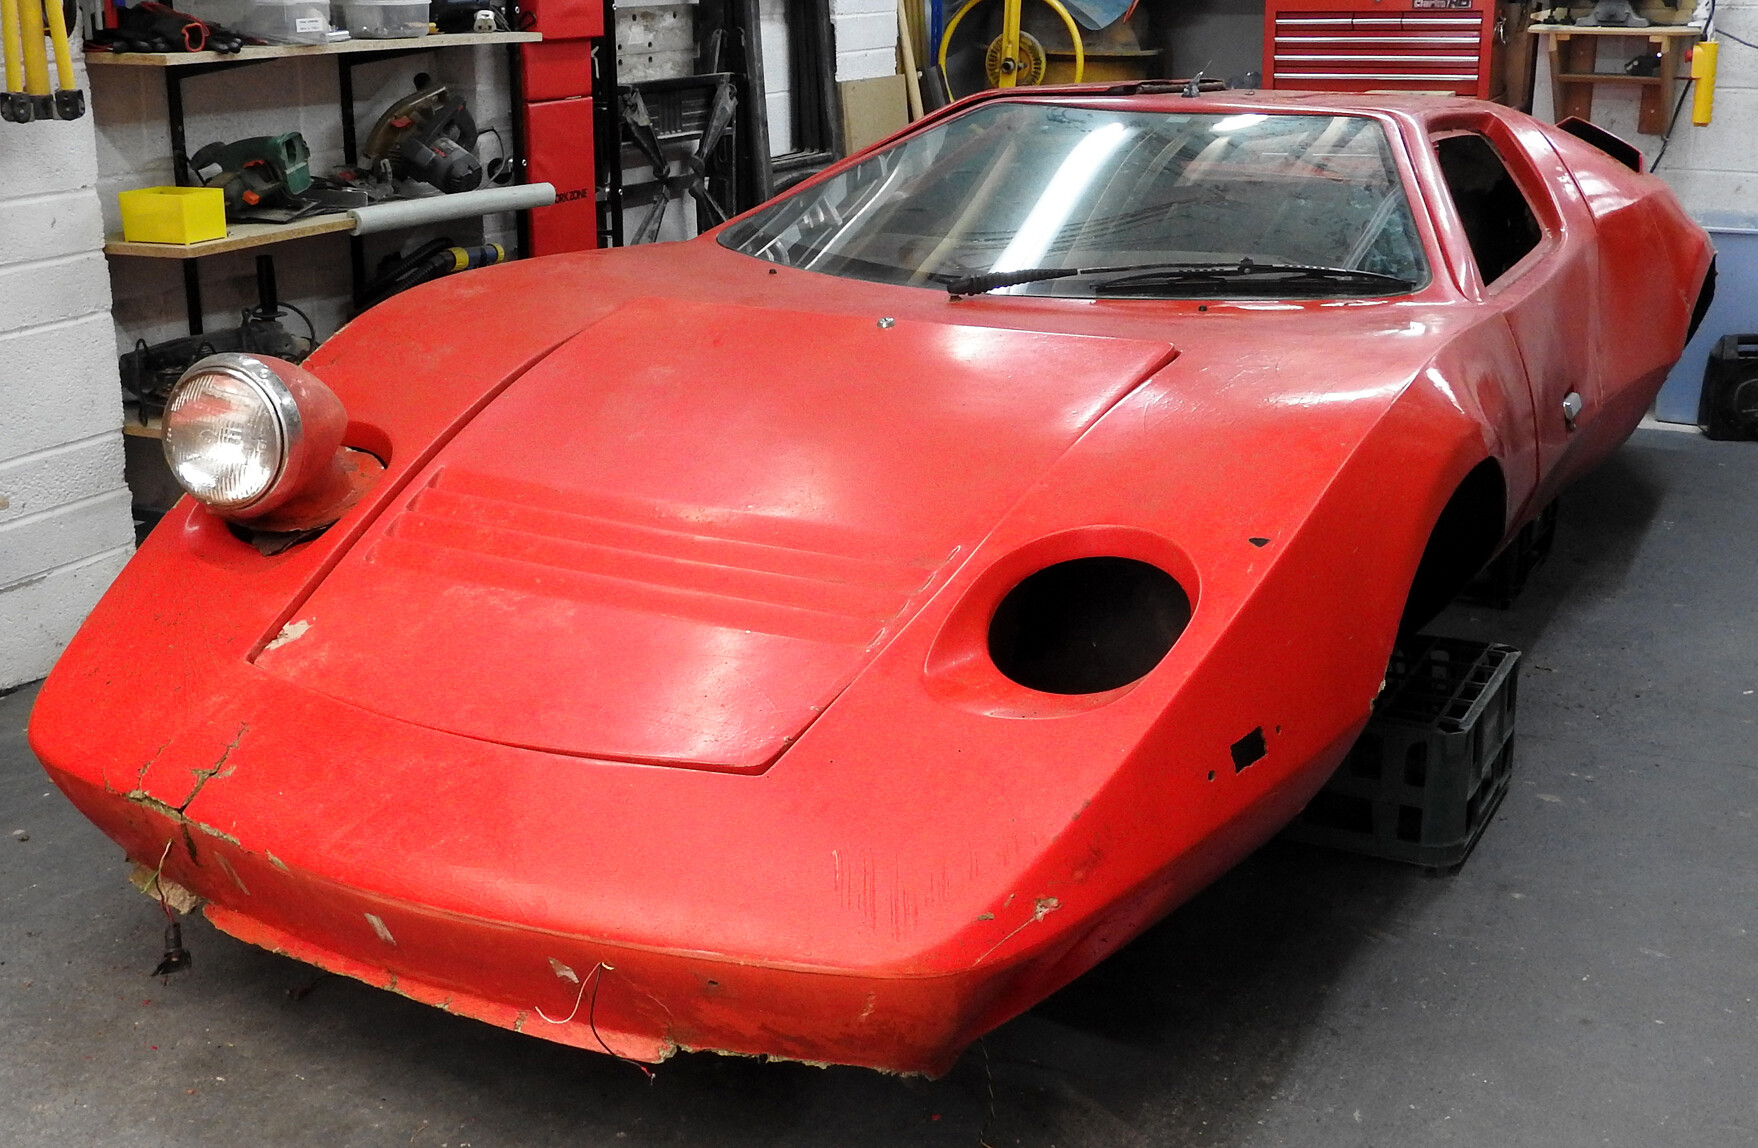
I'll need to do some re-sizing to do more but here is Humpty on the day he arrived. The milk crates were an optional extra! It really doesn't do the damage justice and it looks a lot more intack than it really was. More to follow ... hopefully.
|
|
|
|
Post by Mark on Nov 10, 2019 17:04:03 GMT
Photo looks fine
I see what you mean about bodywork damage its certainly has had a bruising.
Is this how it is at the moment or is this an old photo?
On my car none of the tubing bracketry or hinges were plated let alone stainless, adds to cost of kit I suppose.
One of my doors has cracked by the front hinge so I'm going to strip it back to metal and see what's what, before it gets any worse.
If I had to replace hinges, which I will probably have to do in the end I would most likely go with a similar pattern to original but in stainless steel similar to Neilssmith’s or Chrisbailey’s replacements.
|
|
|
|
Post by soldonkits on Nov 10, 2019 17:46:21 GMT
Not familiar with the two hinge replacements posts you mention, any chance you could guide me to them if they are useful?
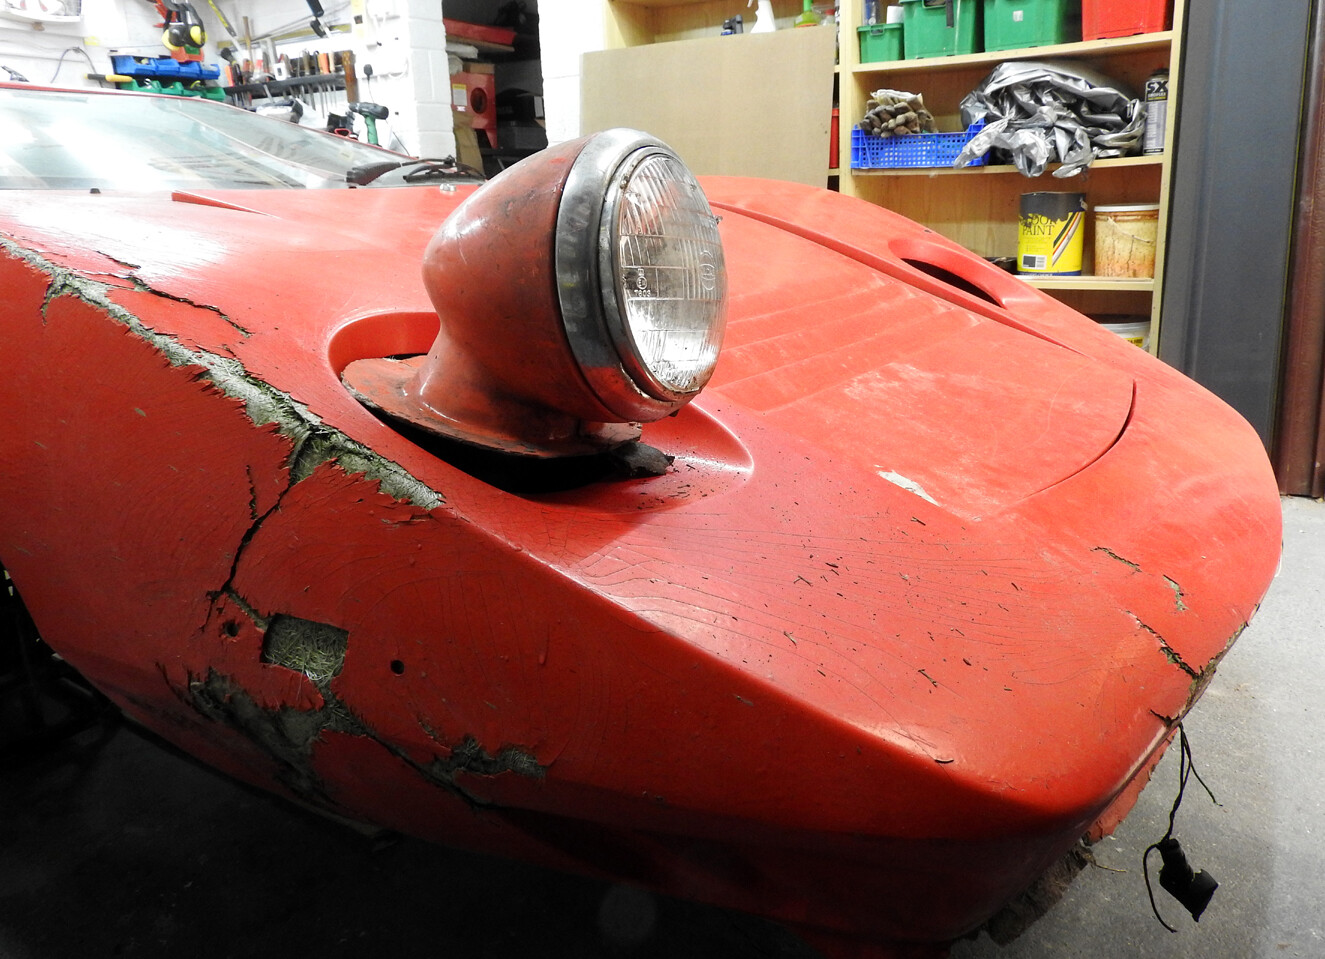
Another view taken at the same time. This gives some small hint of the damage. I'll try to load a view of the rear or what there was of it, in another update. Just trying to resize and edit some so they're fit to load. The photos so far were both taken at the time of the shell's arrival. I'll post some more recent views of the same areas as they are tweaked. If anyone is interested, I'll then write something about the jobs done.
Im currently looking to hack out the old rusty hinges. Here I'm assuming the best way is through the outside gelcoat till I hit metal, not the inside through the more complex inner moulding. It would help if I knew how they were bonded into the doors. My plan, if I don't totally wreck the door tops, will be to replicate them, or do something similar, in stainless.
More to come.
Can't believe I build my first kit car in just 7 months flat; scrap car and shell to MOT'd roadgoing car. This one is definitely a challenge.
|
|
|
|
Post by soldonkits on Nov 10, 2019 17:56:35 GMT
To quote Jake Thackery,
'I love a good bum on a woman, it makes my day'
Not exactly PC but the guy was verry funny.
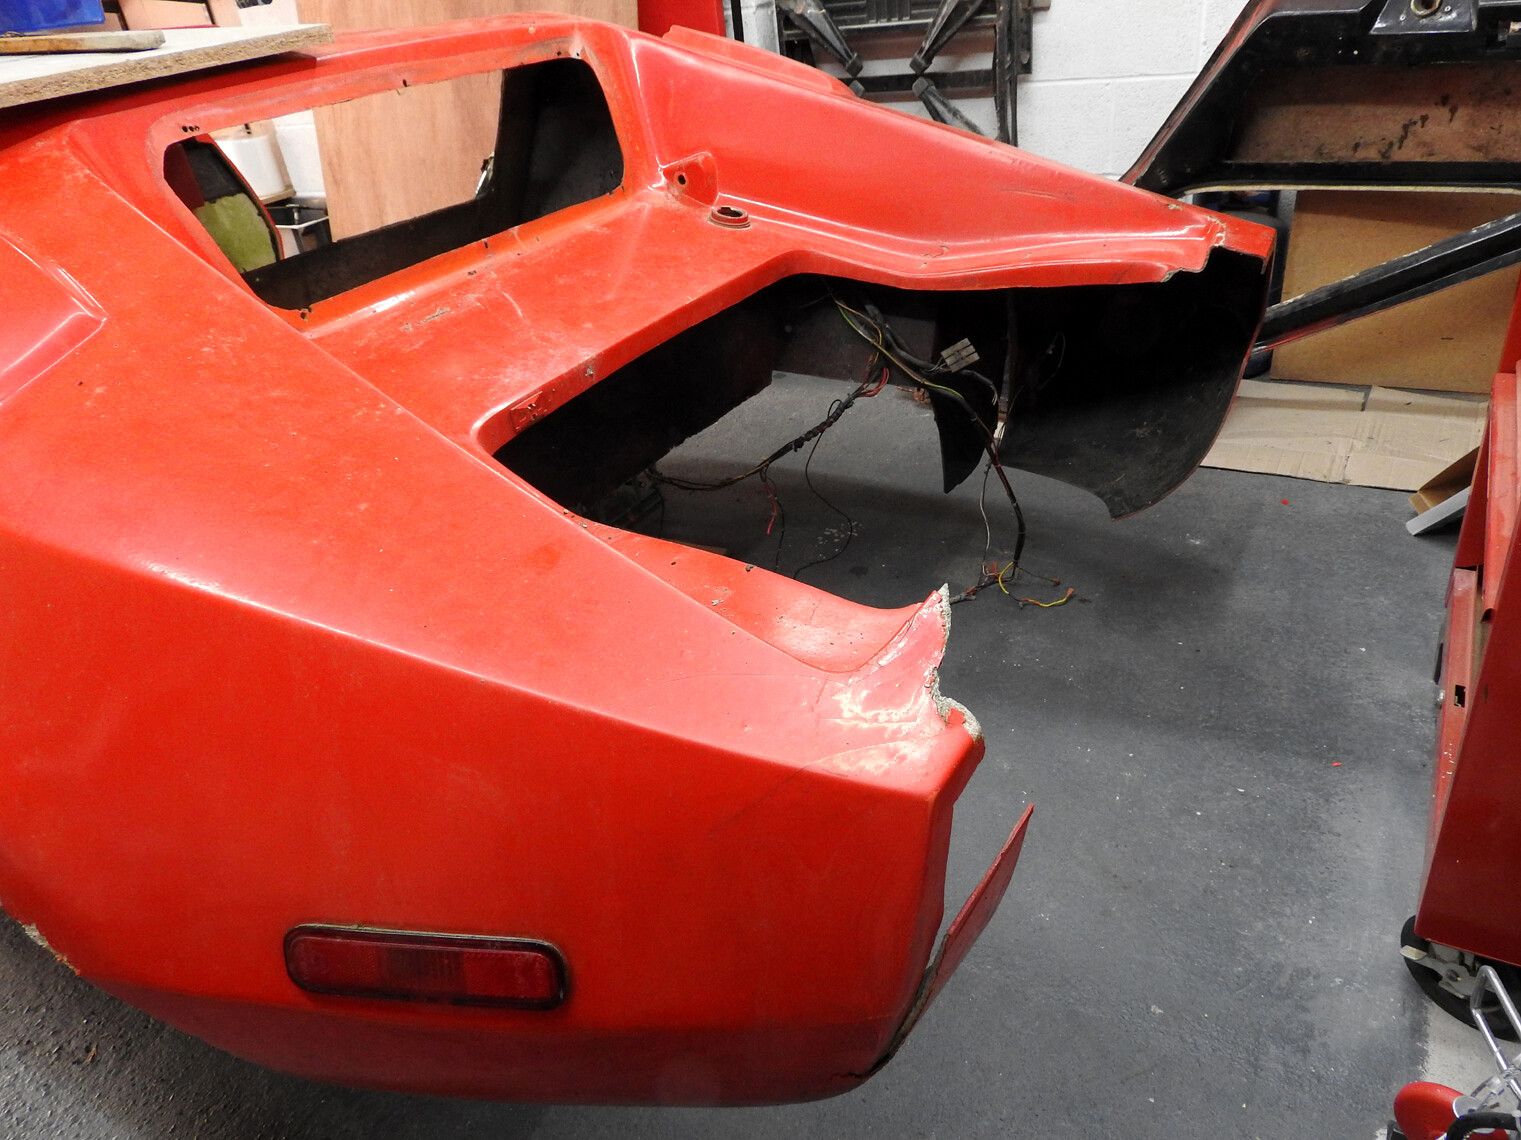
Talking of bums, back to the next photo. As you can see, Humpty came without a bum.
It would have been nice to have one but at least it gave me a clean slate (and a potentially drafty engin bay!?)
I'll try to post some more recent views of how the repairs were addressed. They involved some creative guesswork and a lot of replacement grp mouldings.
|
|
|
|
Post by chrisbailey on Nov 10, 2019 17:58:33 GMT
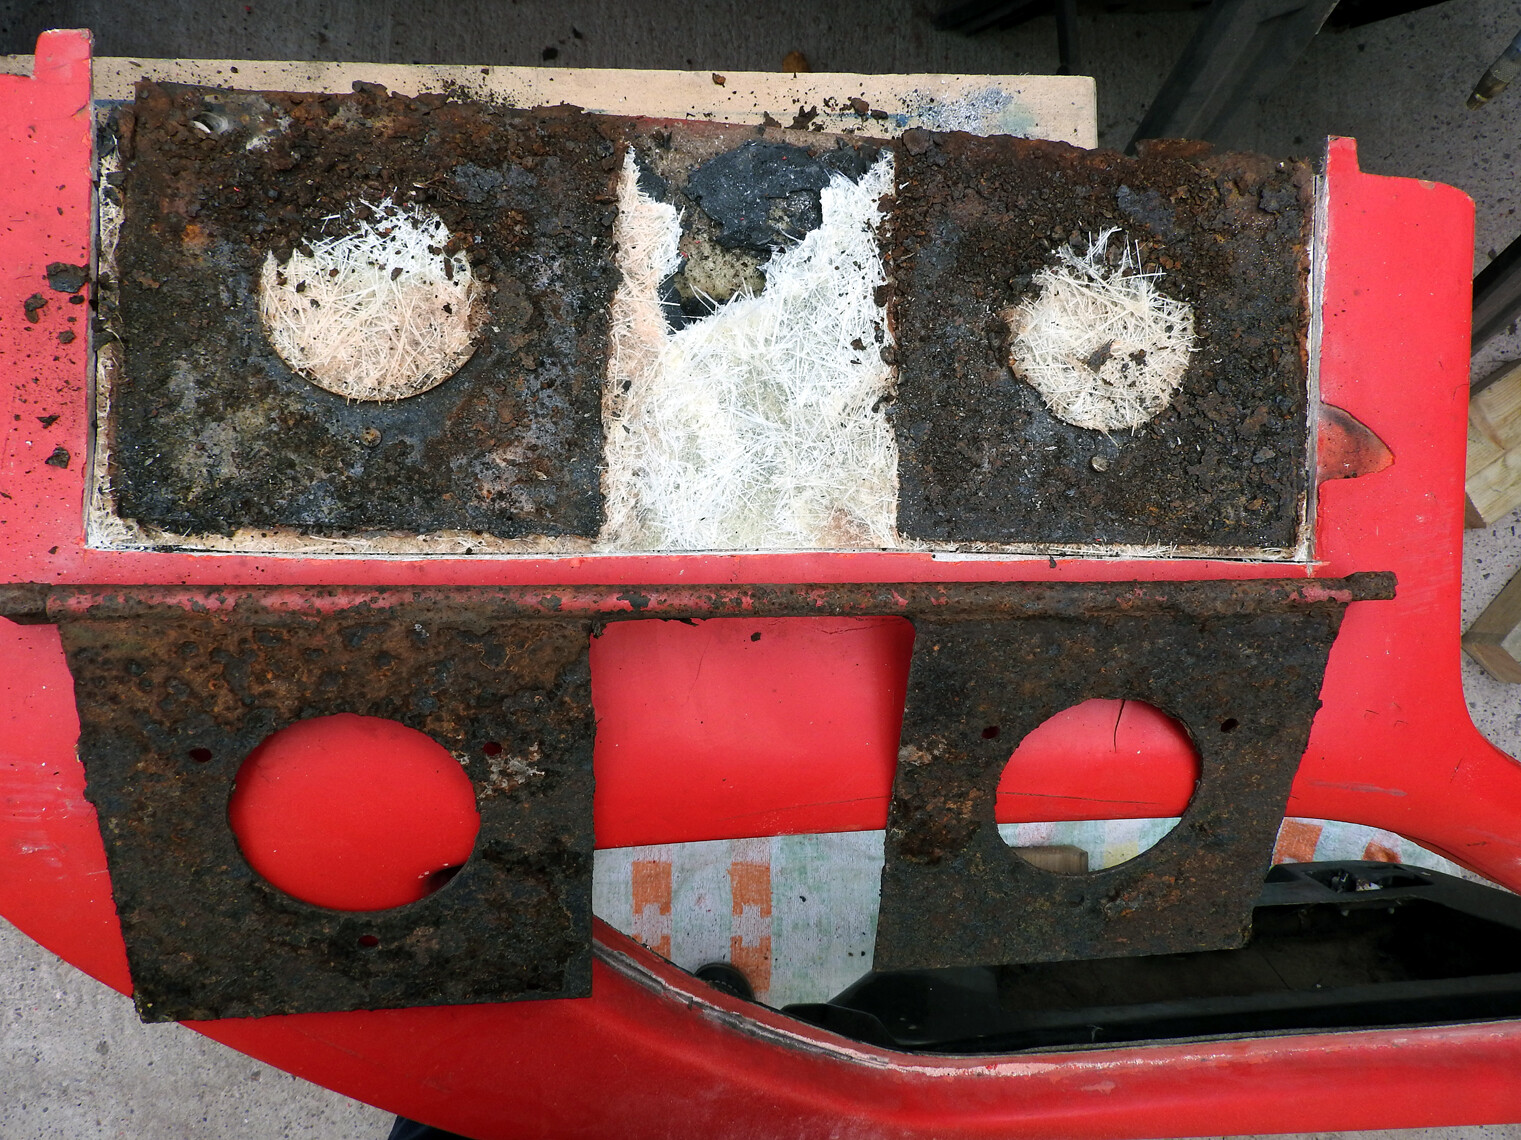
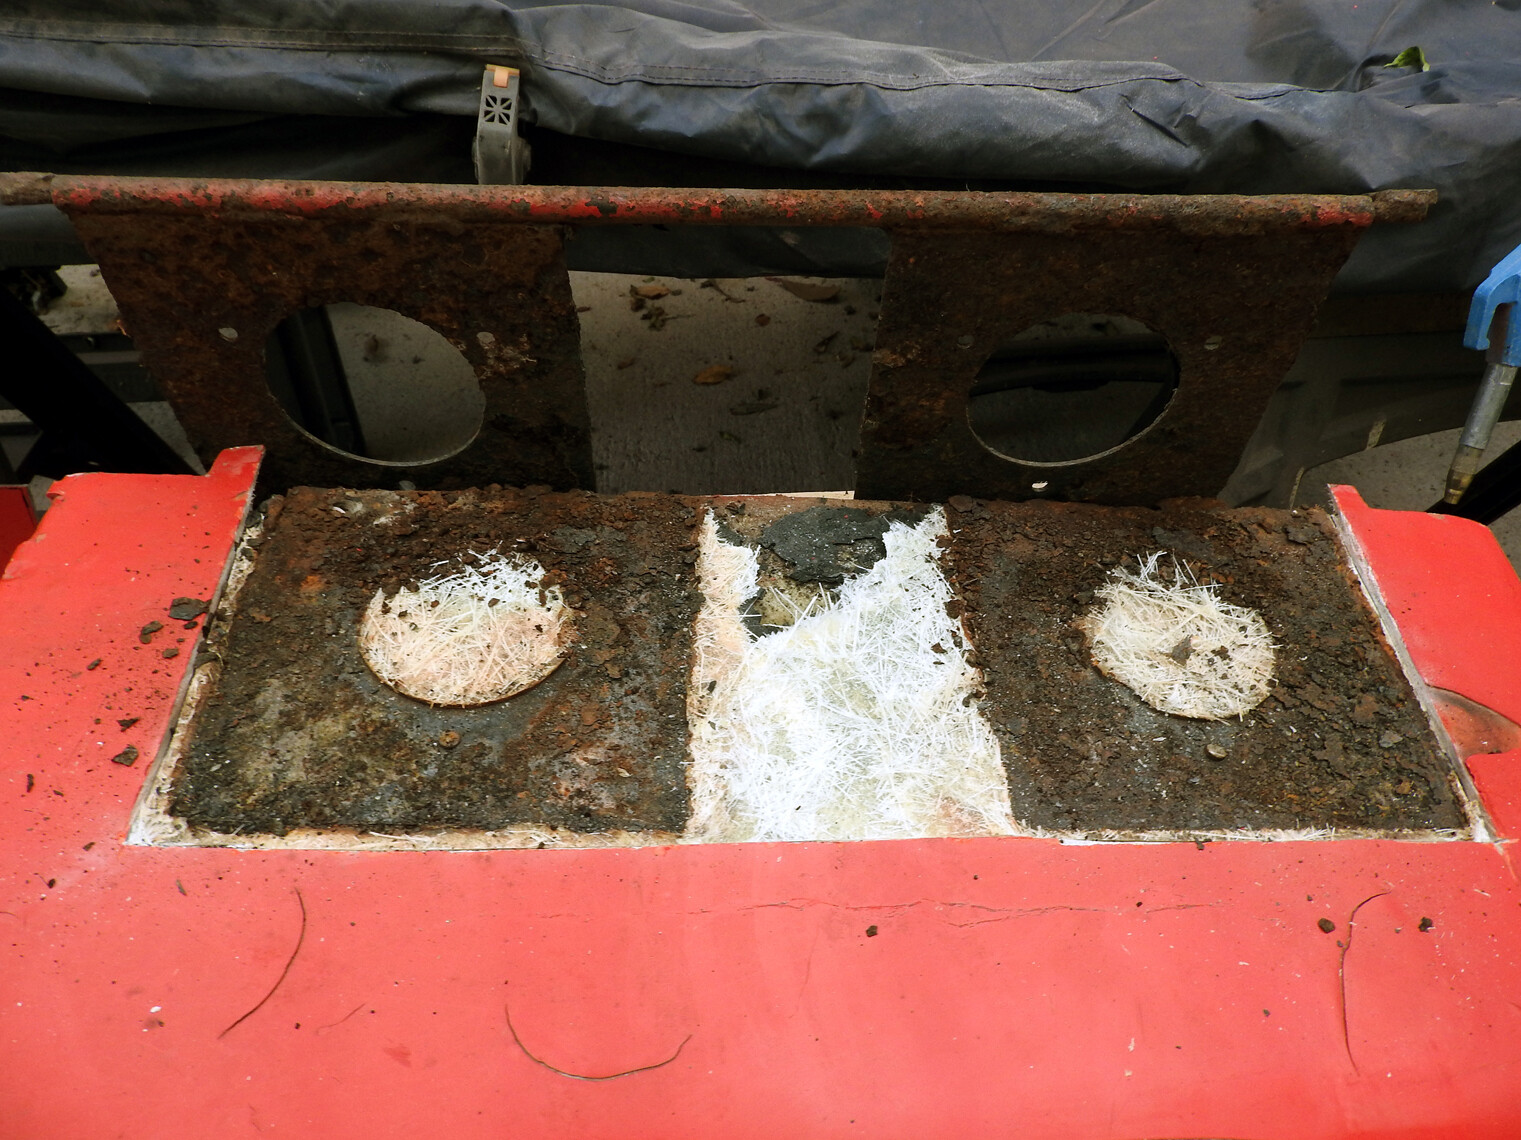
The hinges are tubes welded to flat steel plates. The steel plates usually have one or two big holes cut into them and the fibreglass matt is bonded through the hole.
Going in from the top is easier.
you will need to almost peel the door aoart asif it were two skins bonded together. A chisel and hack saw blade helps.
i have photos somewhere of when i did mine.
|
|
|
|
Post by Mark on Nov 10, 2019 18:38:24 GMT
Re Photos
Oh my .... What the.... I’m speechless
|
|
|
|
Post by Mark on Nov 10, 2019 18:47:18 GMT
|
|
|
|
Post by soldonkits on Nov 11, 2019 15:19:38 GMT
Thanks jointly to Chris, Mark and Neil for the info on hinges ... having seen the photo of the removed hinges, all I can say is... what the hell were they originally made out of? The OEM's look like re-used repair plates for suspension tops. It's a wonder any of these cars have any doors left, let alone hinges. The expanding corrosion must destroy most door tops.
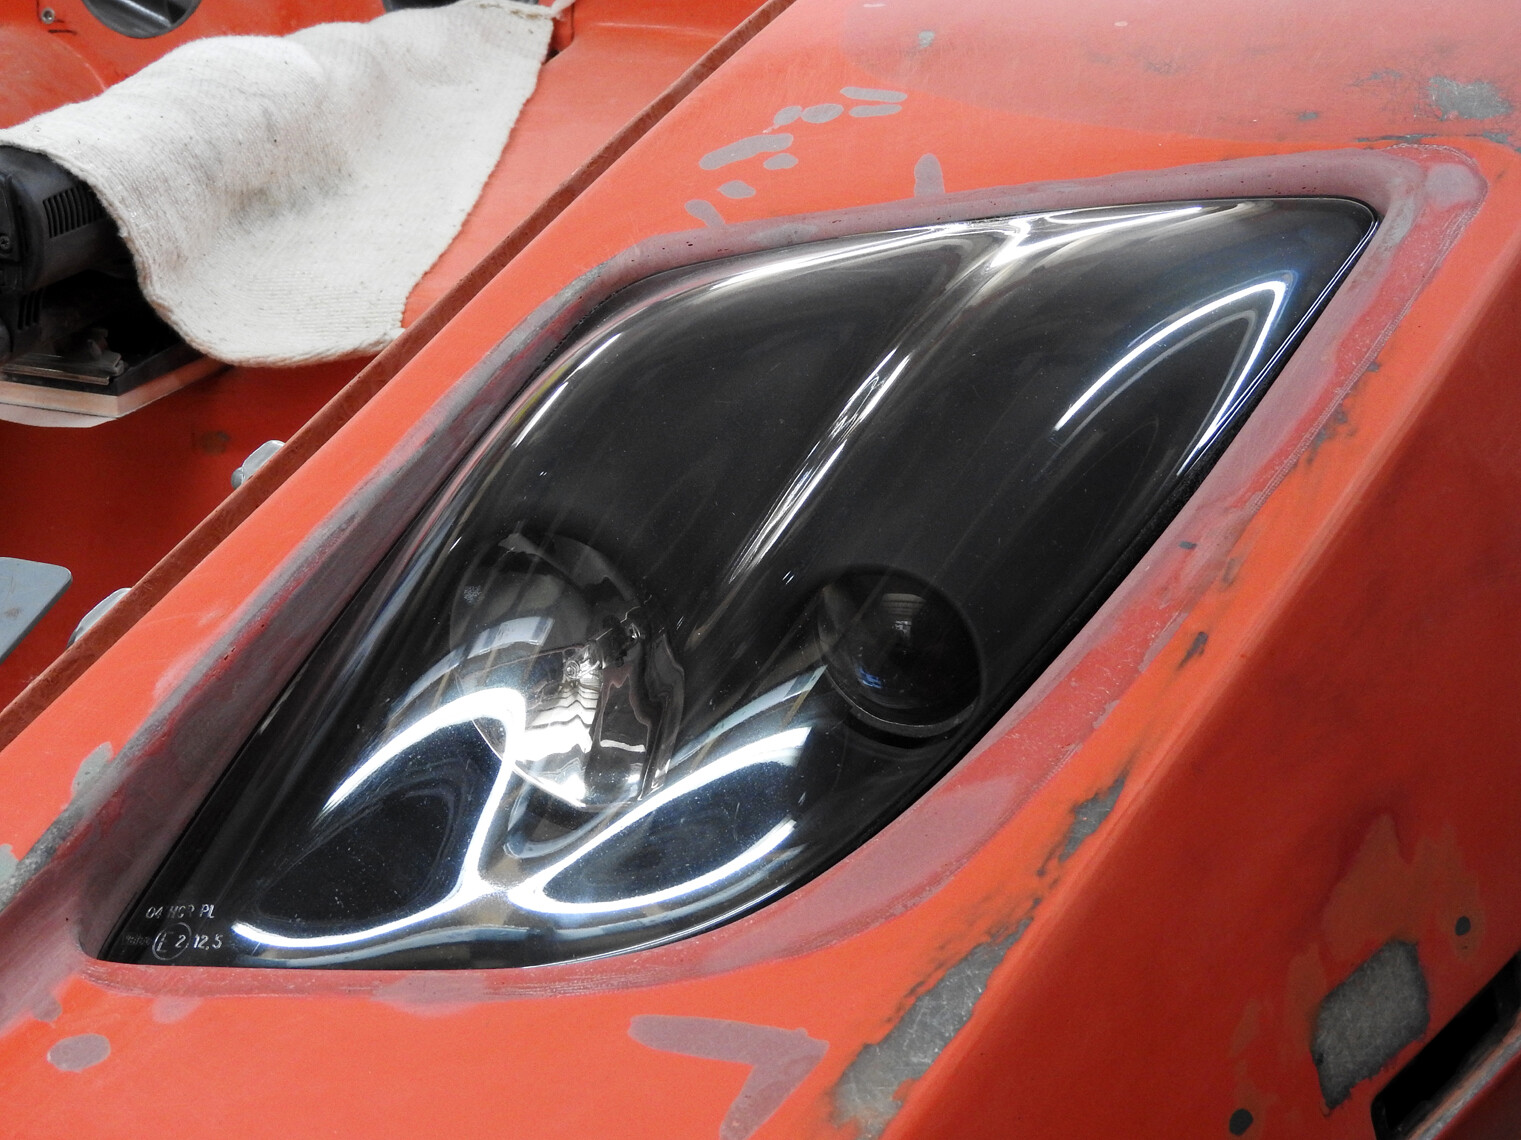
So it looks like I'm going in through the top! Pity, its the only part of the gellcoat without any cracks (so far). I'll shoot some photos of the work as it progresses. Meanwhile I thought I'd include a shot of Humpty's nose job. It's taken after the wing and other front-end repairs were completed but not before it was completely blended in.
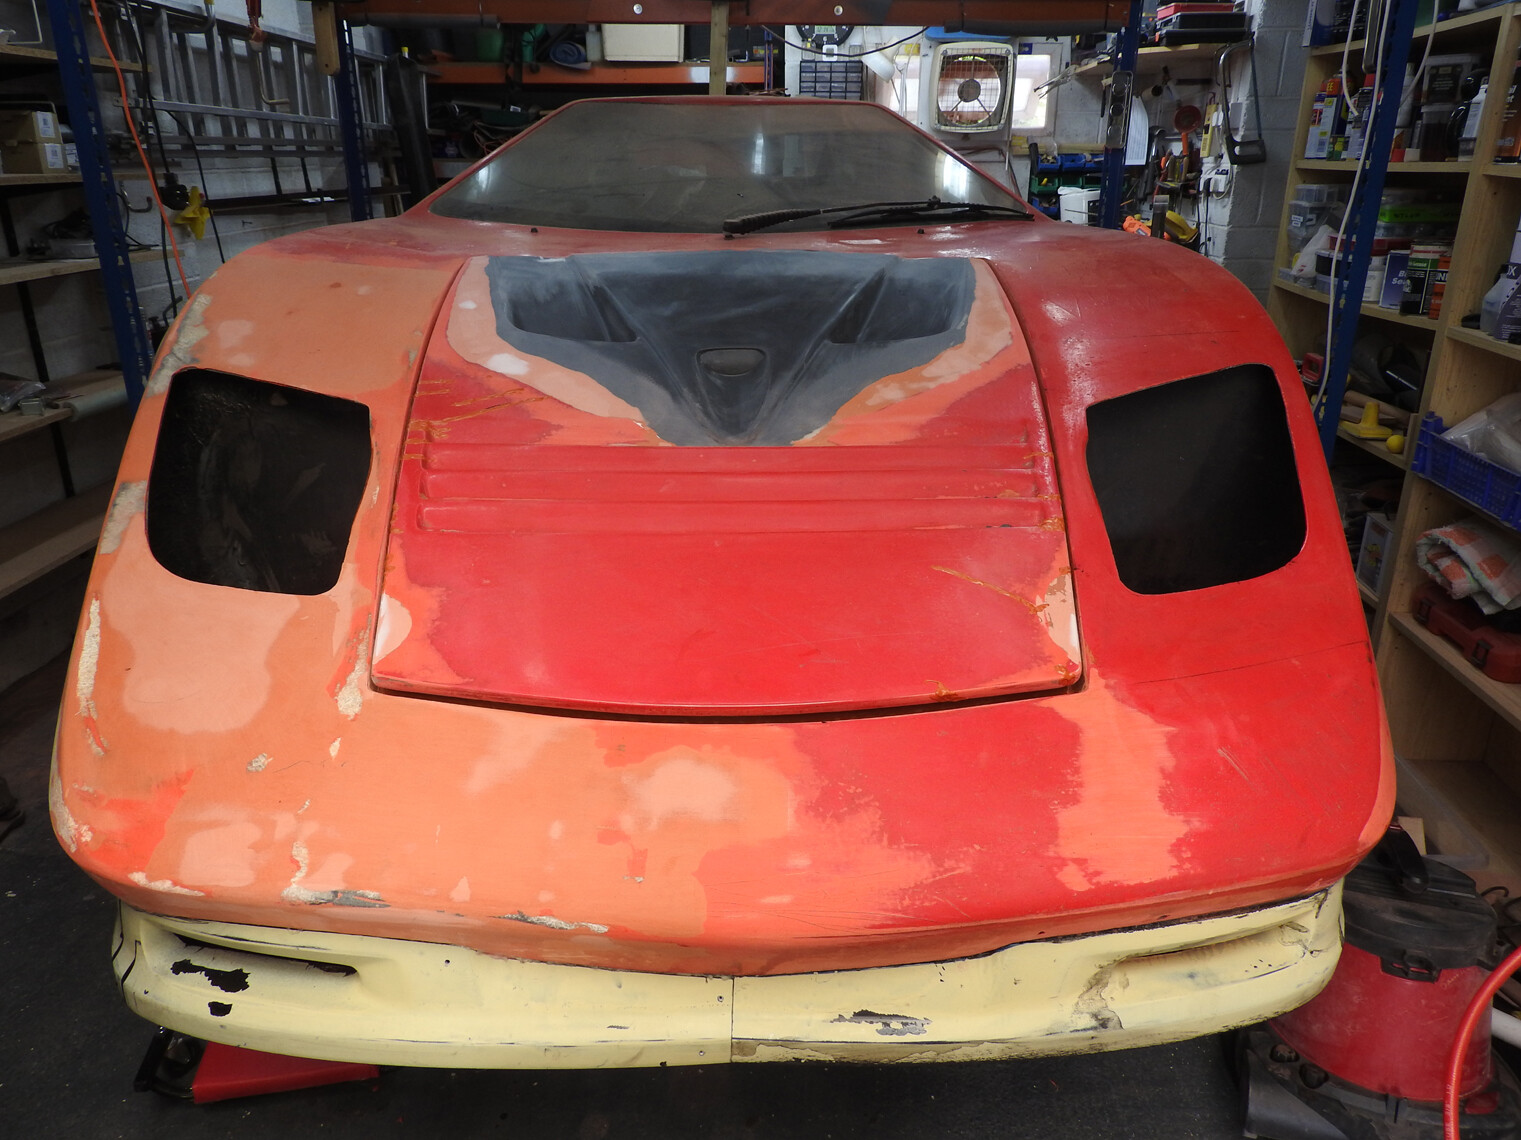
The re-worked front splitter/spoiler come from a Subaru Impreza, it was added after the remains of the shattered bib/spoiler was removed and now allows more ground clearance. Likewise the bonnet bulge was also Subaru. This was added to break up the acreage of flat GRP in the bonnet and also to replace more damaged/cracked sections. It has the advantage of adding rigidity to the bonnet. At the time of fitting it, I also corrected the lack of curve in the bonnet so it now matches the wings. As you've probably guessed, the light pop-up system was also completely knackered and Humpty had only one eye when I found him. The above shot shows the begining of his conversion to fixed lights from a Fiat coupe.
More to follow if anyone is interested in any of the mods.
BTW, the adjustable racking serves as a really cheap car lift.
|
|
|
|
Post by wiggy on Nov 11, 2019 15:57:20 GMT
Coming on really nicely, nearly cried for you when I saw the drivers side front end. Can't wait to see the coupes headlights in, think they will be a spot on fix (no pun intended) and lift its looks. Wiggy
|
|
|
|
Post by soldonkits on Nov 12, 2019 11:34:14 GMT
This is a shot of the first fitting of the Coupe headlight. You can also just make out the water channel around the bonnet opening the prevent the boot from becoming a waterbutt. A simple thing but even simpler to have incorporated it in the original moulding.
After creating a pair of surrounds in GRP, using the light as a mould, I had an opening the light would sit into correctly. This I bonded to the underside of the wing opening but I still had to drop the inner section in front of the light first to get the unit to sit right and look right but it adds a nice line to the car's nose/light pod.
A warning to anyone thinking of doing the same mod; the lights appear to have no built in adjustment. They need to be installed focussed correctly for any MOT. Thanks Mr French designer!
Not quite ready to fit permenantly yet but the effect is an improvement on the pop up snail eyes... no offense to anyone with working Porche-style lights. I think I'm still narked that mine were such a lost cause.
Back to the garage and the ongoing battle.....
|
|
|
|
Post by chrisbailey on Nov 13, 2019 8:14:26 GMT
I like the front splitter.
My front bib is wrecked too, its been dragged on the floor many a time.
The rear of mine also looks similar to yours now. Somebody chopped it to fit an exhaust (which looked awful). It also had metal supports which cut through with vibration.
I decided to start again so chopped the whole rear out.
Ill be interested in what you do to repair/replace yours.
|
|
|
|
Post by soldonkits on Nov 13, 2019 16:49:32 GMT
Hi Chris, I guess damage can lead to some interesting solutions, even if they are a lot of work.
Humpty's rear end, part way through his bum-tuck!?
It's a little hard to see from this photo but he's got Frenched Corvette style lights, a 'square' set-in numberplate recess and a black honeycomb valance from a Audi TT framing the exhausts also set in and adding some strength to the lower edge. (Must get a better photo) The modified spoiler is from a Nissan Skyline.
Once again the engin bay has had some water management added with drain holes to get the water passed the electrics. Also not clear in this photo is the new rear window recess. I enlarged the opening slightly before adding a recess for the new glass window. The version I had, had glass bonded into the tunnel and a sort of porthole ring fitted in from the back. I decided to get some glass made thet looked better and that could be bonded in likethe screen. As a result, I now have spares as they wouldn't make just a one off! The glass is toughened, smoked and with a black border that is fritted into the clear... they look really good. Now all I need is a front screen to match ... still getting little sense from Pilkintons.
Rear window hood was still in the fettling stage when this was taken but that looked like this-
Part fitted but not bonded into place yet. I'll shoot some more photos as it gets nearer completion.
As always thanks for all you positive comments. I hope my wittering is of some help.
|
|
|
|
Post by chrisbailey on Nov 14, 2019 8:34:24 GMT
That does look much better.
I think the original design of the ss with huge boggle eye rear lights and nothing much else lets the car down a bit.
Yours is a masssive improvement.
You obviously have a lot of skill with fibreglass, was it part of your profession?
Seeing all of your work makes me want to start on the bodywork of mine. I really have to get it on the road next year so will probably look more rat rod than classic sports car.
There is a guy who lived down the road from my parents. He had a Nova which he completely redesigned bodywork wise. He made a bat wing rear splitter, exposed the engine and completely changed the front and rear. He said he did it using things like plant pots as moulds. His design was a hate it or love it thing, but you could definitely imagine it in madmax or death race.
|
|
|
|
Post by soldonkits on Nov 15, 2019 11:45:33 GMT
Hi Chris,
Technically I'm retired now. The planned early retirement was meant to leave me with time to recover from a long-time 7 day a week job but it hasn't worked out that way yet.
My early background was in toolmaking but I spent most of my working days teaching multiple craft skills to the dissabled. My fibreglass skills ('skills', if it all works out, if if it doesn't, it's more like dabbling!) came from building a series of boats before the first kit car came along, which was a Mini Marcos. I have aquired a few good tips along the way from the professionals that I would be happy to pass on to others if anyone is new to GRP. The learnng curve to begin with can be a near vertical line and although it can look like an easy fix, getting it wrong will certainly bite you in the arse later.
Rather than diving in and creating a Marmite monster that is either liked or loathed, I hope the mods to Humpty look more like a natural development of the original car, as if it was a later model but still with a nod to the period.
Oh yes, I do a bit of gardening too, hence the liberal manure in my writing.
The shell is almost completely restored now so I'll take another set of photos of the various mods. The door hinges and locks will be the last thing to do after the shell comes off the cradle, which is a little restricting.
Still got a some updating on the chassis to do, discs all-round and adjustable ride height etc but I'm fighting the weather for those as the floorpan is outside.
Also, still trying to order a screen from Pilkinons but progress is slow.
Right, back into the cold!
|
|
|
|
Post by Peter on Nov 15, 2019 13:55:25 GMT
The 'original' rear lights were the rectangular 'trailer' units and then a square bumper bolted on the rear, all a bit of an afterthought in my opinion and should have been done properly rather than taken directly from the Cimbria.
Work in
looks like it's coming on nicely, at least you are not doing a "Super car" rebuild, which would more than likely never get done. Doing a great job.
I have always liked the Feat coupe headlights and the Noerca GS Moon 'Nova' projectors are cool too and used on quite a few Sebrings and Novas but never a SS as the original lights mean a lot more work for pods..
|
|
|
|
Post by soldonkits on Nov 16, 2019 13:58:19 GMT
Hi Both, Good to see all my wittering isn't going un-noticed. It's especially helpful to get some feedback and other views on the repairs and mods.
Now on the subject of repairs, what is God's name were they thinking when they designed the door hinges! I've just cut the top of one of the doors to reveal more rust and a stupendously cheap construction. It's no wonder they succumb to the ravages of rust.
This is going to need a lot of thought and a shed load of luck to get right. Now, where did I put that box of lateral thinking? Definitely need to use stainless, probably a combination of of the shelf marine hinges and bond-in plates as per the original but hoping to avoid the same pit-falls with water ingress and rust. Haven't got access to a proper machine shop so it's going to be a bit 'cut and weld'. If I get it right, Ill post some photos of the finished hinge before fitting it.
|
|
|
|
Post by Peter on Nov 16, 2019 14:35:46 GMT
The 'hinges were, as some bright spark mentioned were repair plates for front suspension mounts with a bar welded on so mild rust ready steel, stainless would have been the sensible way to go but,,,
I am lucky that my hinges have not rusted, at least not to any noticeable extent, I did have a good look when I had the doors off and I may have them off again but to tidy up the damage done and to level of the depression in the roof, just rip up the ell coat and fill with P45 and flatten with a sander, nothing fancy and then a coat of black acrylic. I need a small strut on the front as can be seen in the video on youtube the door twist horribly when the actuator works it's magic.
I have seen Mini boot hinges used on the outside and it looked CRAP! I would rather use kitchen cabinet door hinges inside, should last a couple of openings.
I did design a 'hidden' strut design using tubular actuators built into the door roof and a two parts mounting that folded into the roof when closed but kicked down when opening to make the angle needed but TEAC never took off so that was that. In fact a few things that would have been on the MkIV died with the mid-engine project.
|
|
|
|
Post by soldonkits on Nov 16, 2019 16:49:24 GMT
Yeah,  Peter the bright spark was me. But my eureka moment on discovering the origins of the plates doesn't compare with the designers idea when they thought they could cut corners with crappy off-cuts. I am amazed that anyone's hinges are still original and working or that the doors haven't peeled apart into two sections. Having literally circular sawn through the outer skin and crow-bared the top off my door, I couldn't believe the amount of rubbish between the skins. Apart from the rust attempting to separate the inner and outer skins, there was a ton of hardened adhesive, which appears to be the only thing holding both the skins together and the hinge plates in place. Incidentally, most of the adhesive was in the wrong place and just serves to make re-glassing the door a bigger clean-up job. Also the GRP was all GR and virtually no P!? As a result, the layers had so little resin in they pulled apart like shredded wheat but at least I now have a clear run at fixing the problem.
I'll worry about which gas rams to use and where to place them later.
Photos to follow if the idea goes to plan and my sanity holds.
On the bright side, it keeps me working in the garage instead of going out and having fun!?
Anyone know what the setting time is for poly resin when the air temperature finally settles at 0 deg ?
|
|
|
|
Post by Mark on Nov 16, 2019 16:53:26 GMT
Looking really good very different and unique and a lot of very skilled work has gone into it
|
|
|
|
Post by Peter on Feb 18, 2021 14:26:16 GMT
It's been a long time since we heard of this project. Where is it at now?
|
|
|
|
Post by soldonkits on Apr 5, 2021 9:30:13 GMT
The project is still progressing... slowly. Some jobs ticked off the list many more added.
The door hinges appear to be working and just need final shimming to reduce play.
The gutter around the doors appears to work and the door still shuts but the shut-lines need some attention. At least there is no way the doors can leak now (famous last words).
The roof mounted door stays also appear to work but because of the leverage involved, the forces needed to raise the doors are high, even with two rams either side. I'm still working on strengthening the roof with a flat stainless frame to spread the force of the rams.
After many changes in position and release mechanism, the door handles now work with the bear claw latches... don't try this at home kids uless you have the patience of a saint!
The rear engine bay now has two new compartments behind the wheel arches for battery and auxillary fuse box on the driver's side and oil coooler and fan on the passenger. The plumbing for the cooler also required saintly patience... which I no longer posess!?
A new steering column support bar was fabricated and temporarily fitted, awaiting the chassis and column to be fitted.
Active fans now link the wing scoops to the engine bay via ducting. The fans will run in unison with the oil cooler fan to keep cold air flowing into the engine bay.
Having decided to use mini-bear-claw catches on the boot and bonnet, to keep the exterior surface clear of locks and other additions, I realised the release mechanism needed to be foolproof. With no ccess to the front boot compartment if the internal pull release failed a hidden secondary release would be needed to avoid the need to break into the boot. These I made using stainless rods with direct links to both latches. Hopefully with no room for it to fail to work. So many cable releases tried, so many failed to work. The solution ... the fourth solution, turned out to be an Outlander fuel cap release cable. Very flexible and with a pull-lever, it appears to be OK so far.
The bodyshell is still throwing up new blisters to grind out and re-fill. The stress-cracks are nearly all repaired and the new sills, spoilers and bonnet mods blended in.
The next hurdle is to complete the floorpan and the brakes upgrade, only the front discs have been completed so far, brake lines still to be fitted as with the modified gearbox and rebuilt engine.
I hope to have some more photos next time but the process of adding them is still tedious when needing a third-party website.
Any thought? Anything I've missed so far?
|
|





 Peter the bright spark was me.