Deleted
Deleted Member
Posts: 0
|
Post by Deleted on Aug 27, 2009 20:08:18 GMT
I have to agree , this is the most likley cause of the problem !
Never been to keen on retro fitted electronic ingition especialy as it was a non runner when you got it, you can,t be sure if all parts of the system work or even present !
I would of thought that the contactless points would have needed a control unit like the sparkrite that was fitted ? But I'm no expert .
safer to go with points and a cam !
|
|
Deleted
Deleted Member
Posts: 0
|
Post by Deleted on Aug 27, 2009 20:27:13 GMT
12 volt coil is perfect.
Ditto re the electronic gizmo...although if this is duff it still wouldn't prevent you getting a spark when you earth the coil HT lead and turn the engine.
Added benefit of points is that there is a simple test that allows you to test the condenser....you cant do that with your present set up....but for the cost of a replacement just renew it anyway.
It's a pain in the backside but it will be something simple and likely staring you in the face!!
|
|
Deleted
Deleted Member
Posts: 0
|
Post by Deleted on Aug 27, 2009 21:04:50 GMT
So can i get the manual/points bits back into this distributor? can i buy those bits separately? or is it a new distributor jobby  ? According to this....i wouldnt get current through the HT lead until i had a condenser...possibly? I have current going from the coil's + to - 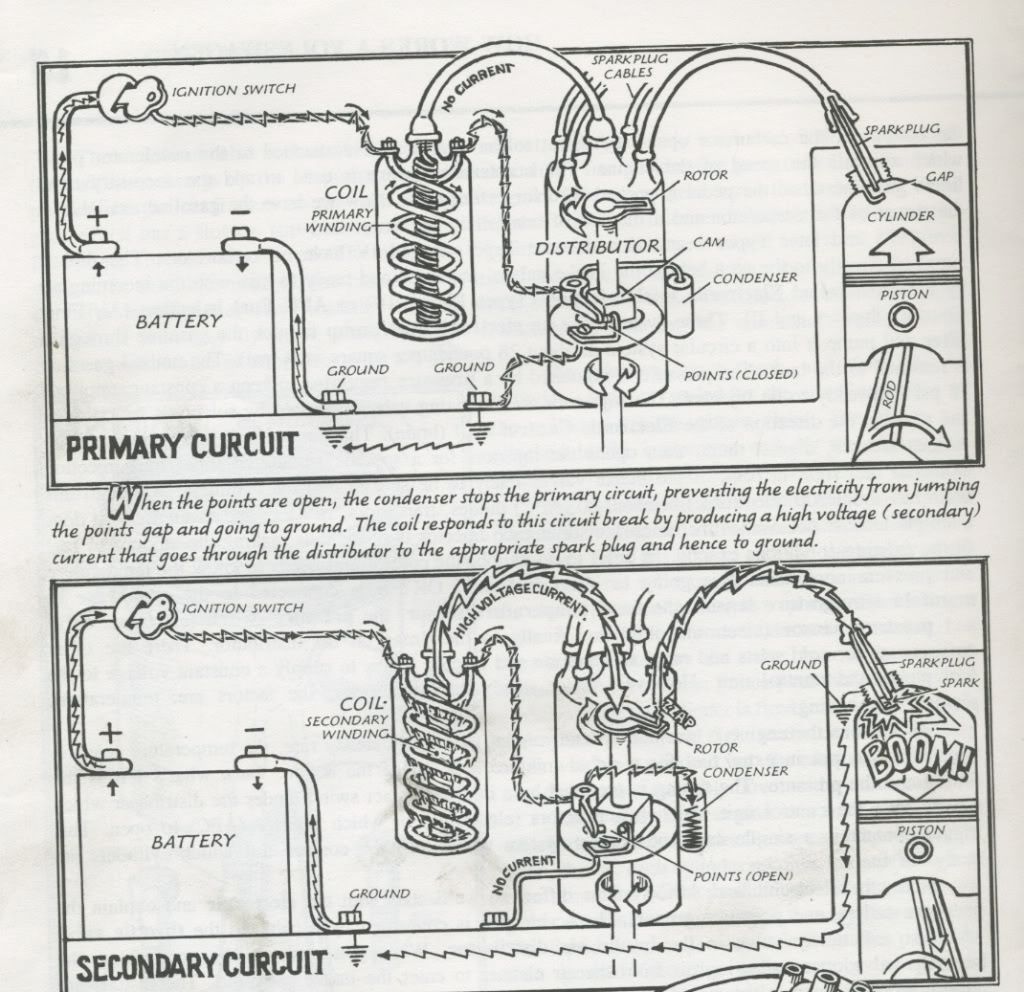 |
|
Deleted
Deleted Member
Posts: 0
|
Post by Deleted on Aug 27, 2009 21:18:44 GMT
That's from John Muir's book........from that diagram if you had a set of points and the condenser was not fitted or was duff then when the dizzy shaft rotated and opened the points then the spark would jump the gap to earth......the condenser prevents this from happening. Now the electronic gizmo has no moving parts so this could lead to you answer because as there's no gap to jump and therefore there's no evidence that the coil is live........so if the condenser is duff you may not get a spark at all  .......with points you'd get a spark across the gap. The points can be fitted to your dizzy....they just fit on the dizzy base plate using the screw that's holding the gizmo in place. The condenser screws to the outside of the dizzy...hopefully the little screw is still there with the wire going through the little cutout in the side of the dizzy body and connecting to the terminal on the points. |
|
Deleted
Deleted Member
Posts: 0
|
Post by Deleted on Aug 27, 2009 21:55:42 GMT
Ok new points tomorrow and condenser, and hopefully we'll have a spark should only be a fiver!!!!
|
|
Deleted
Deleted Member
Posts: 0
|
Post by Deleted on Aug 27, 2009 22:03:42 GMT
You'll need a set of feeler guages to set the gap as well.
|
|
Deleted
Deleted Member
Posts: 0
|
Post by Deleted on Aug 27, 2009 22:10:21 GMT
Oooo the old man has a set of them........somewhere in the garage  |
|
Deleted
Deleted Member
Posts: 0
|
Post by Deleted on Aug 27, 2009 22:20:50 GMT
If your willing to splash out another fiver, buy a new set of feelers at the same time. Welcome to the money pit  |
|
Deleted
Deleted Member
Posts: 0
|
Post by Deleted on Aug 28, 2009 13:37:31 GMT
IT CAUGHT.....and then died! Think I flooded engine  Took sparks out to vapourise some of the fuel. Will try again in quarter of hour or so. ;D ;D ;D ;D Edit: engine has started, but isn't everytime. Where would i find how to tune the carb? Is there anything else (i've done spark distance and distributor rod line-up) i need to tune? |
|
Deleted
Deleted Member
Posts: 0
|
Post by Deleted on Aug 28, 2009 18:17:41 GMT
When it starts and runs.........dies it run smothly until you turn it off. On the assumption that the motor hasn't run for a while I would try and get it started and leave it running for a good half hour or longer...........let the thing warm up and loosen up......out in the open with no kids running round!! The carb is likely to need a service but I dont know if these carbs are still available or not.......hit the Google button I guess. If you can't, get yourself a good second hand stock solex...that'll give you the auto-choke aswell. When the engine has warmed up check the oil...will need an oil change at some stage, check for oil leaks, check for engine overheating....hot smell followed but cutting out. Dont forget you just want to assess the engine at this point to ascertain whether its a quick dress-up it needs or does it need a rebuild/replaced. If you can also bolt up a seat you can check the clutch operation and gear selection as well as the brakes if you're brave enough  |
|
Deleted
Deleted Member
Posts: 0
|
Post by Deleted on Aug 28, 2009 19:09:59 GMT
No it does cut out, not really had it going for long enough (bout 2 mins at most). It sounded too lean to start with so opened the valve to make it slightly richer, but then it just stopped. Then flooded.   So left it for tonite, we'll see if the old man has any suggestions tomorrow. |
|
Deleted
Deleted Member
Posts: 0
|
Post by Deleted on Aug 28, 2009 19:41:23 GMT
You've made progress though ;D
|
|
Deleted
Deleted Member
Posts: 0
|
Post by Deleted on Aug 28, 2009 19:44:26 GMT
I'm not sure of the way that Nikki carbs operate but I'd suggest taking it off first & giving it a good clean with some carb cleaner. Jets could be blocked or sticking if they.re variable. Nikki's are pretty ancient now and things like throttle spindles could be worn beyond repair. It will be difficult to get the engine running properly unless the carb is doing its job.
|
|
Deleted
Deleted Member
Posts: 0
|
Post by Deleted on Aug 28, 2009 19:51:26 GMT
Oh yeh...very happy. Once it runs for more than 5mins I'll oil change, run it again and think about removing it. While finishing drivers pan, then turn it on the side and buzz down the underside, repair the holes. Seam seal, prime and paint!
Do I use different stone chip paint on the bottom to the top?
Then I'll start on doing a corner at a time. I've a month to go before going back to uni but a good 3 weeks worth of work coming up. So we'll see.
|
|
Deleted
Deleted Member
Posts: 0
|
Post by Deleted on Aug 28, 2009 21:23:16 GMT
Looking at the floorpan I would suggest it needs more than the holes filling. The existing welding is of a very poor standard and really needs cut out. I would suggest removing the floorpans, dressing the edges and cutting back all the poor welding. Once you get a clean edge on the chassis, I would weld a fillet to the underside to provide a lip onto which the floorpan can sit. This should be seam welded on both edges. Once the floorpan is in position, it too should be seam welded on both sides. Just patching up these holes will leave you with a deathtrap, that welding is nowhere near good enough.
|
|
Deleted
Deleted Member
Posts: 0
|
Post by Deleted on Aug 28, 2009 22:06:34 GMT
I'll see what I find on the other side first and then when I take the paint off the underside.
|
|
|
|
Post by Peter on Aug 29, 2009 19:58:20 GMT
Don't mess about with a lot of work de-rusting floor pans, chop the lot off and get a pair of new floors, jobs a good un' for the next 40 years. Rear discs are good upgrade, nothing wrong with the VW 4 stud set up and a lot of stuff can be bolted on like the rear discs. 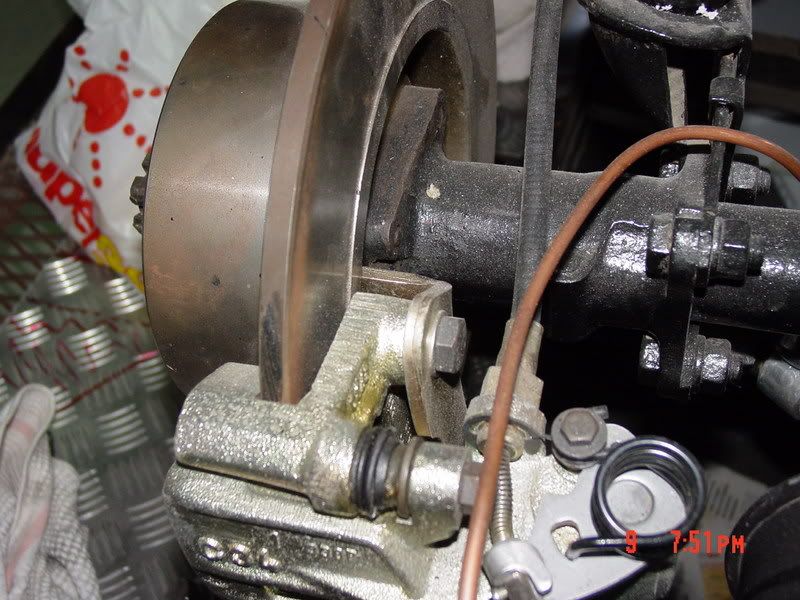 And vented four pot front stoppers too. 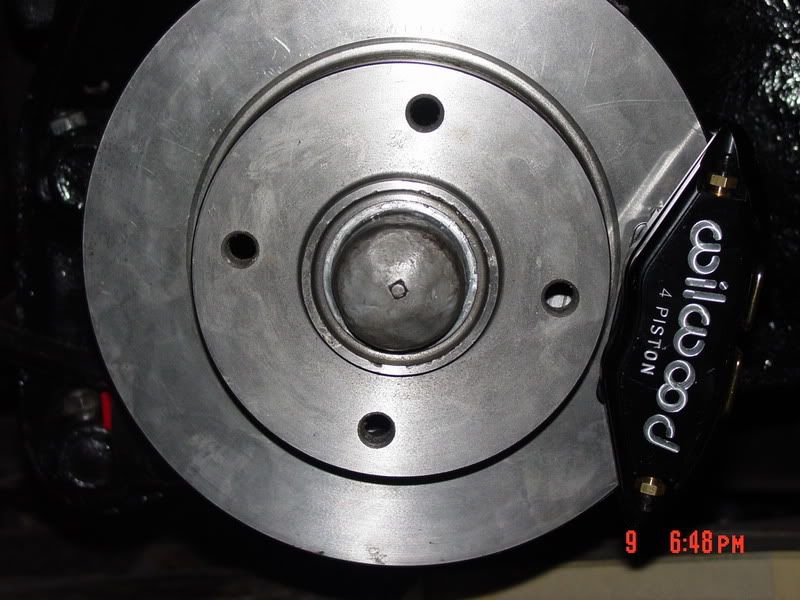 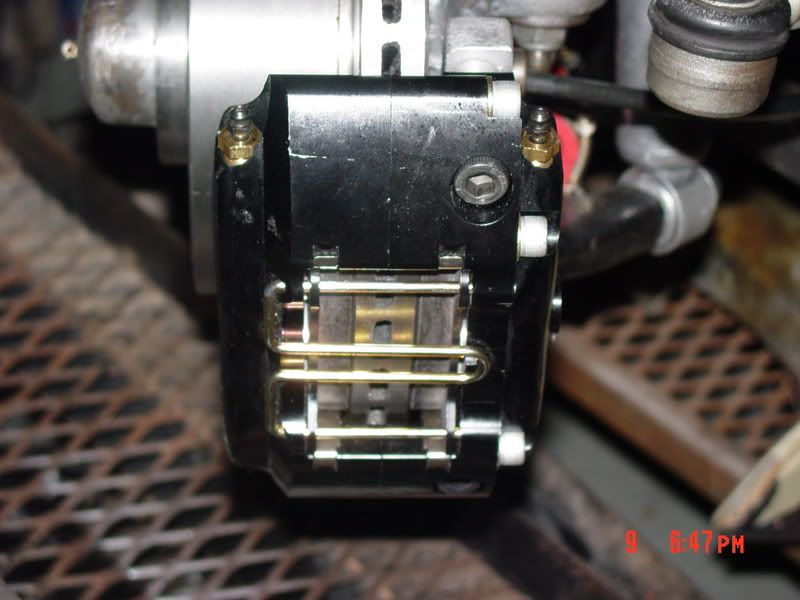 Main thing is,, once you have the basics working, strip it right down, clean and de-rust everything, anti-rust treatment and paint every bit, overhaul all moving parts and assemble like you mean it. If you dont you will be going over your half baked work again and again and again. do it once, do it right and really take your time and spend some cash on the electrics, gona be the biggest pain in the butt if you don't in days to come.  It might LOOK a mile apart from yours but it isn't really, just elbow grease and paint (and 3,000€ on the inside) Best advise I can give is remember 80% of kit cars never saw the road because builders got carried away and thought too far ahead and execeded their capabilities and wallets, like what seats and wheels to fit before they had even dug out all the rust etc. Now you know the engine fires up I wouldn't waste anymore time on it, enough to know it's not a duff, now get on with only the chassis and running gear. one thing at a time. Not a standard part left on the car, apart from the dizzy drive. |
|
Deleted
Deleted Member
Posts: 0
|
Post by Deleted on Aug 29, 2009 20:51:01 GMT
Engine started purring lovely today, for about 5 mins at a time, but it kept flooding and leaking from the gaskets. I thought sod it and took the carb off and stripped it down. Turns out the float had got some guck stuck between it and the window, meaning it didnt stop the petrol when full to the line. A good de-grease and it looks good to go. Can't find a dedicated repair/replacement gasket kit for the Nikki carb so job tomorrow is to source some gasket paper to do DIY versions. As a general rule do people use gasket sealant on their carb gaskets?? i know most in Halfords etc say not for constant petrol contact, i.e. fuel systems, but there are a few online, such as the number 2 version here ... www.neverseezproducts.com/gasketseal.htm I'm gonna keep working on the pans, got a friend of a friend come over sometime soon, he does car welding as a job, he said he'll come over and assess the state of the welds and how salvageable they are. There's really only surface rust, there's now none on the passenger side and from a quick blast today the driver's side is coming up all nice and shiney too. I'm gonna remove the heater channel leavers and wires tomorrow (ive had a look and concluded with my vast knowledge of everything ;D that its gonna be very difficult to get channels to the front) and the main brake hose running from front to back, possibly the pedals too. This will mean i can finish de-paint/rust the whole interior area of the pan. Hopefully can get gasket paper tomorrow and get the engine running for more than 5 mins. ;D ;D ;D |
|
Deleted
Deleted Member
Posts: 0
|
Post by Deleted on Aug 29, 2009 21:04:39 GMT
Did somebody around here not suggest a sticky float.......  Just get the gasket paper...take your time and reproduce a nice fitting gasket and sealer shouldn't be required. Have to disagree with Pete on this occasion get the engine running so that you can at least run the pan up and down your drive to check gears and gear selection..........you dont want to build the car reinstall the engine only to find your gearbox is duff!! As Mike has said you need to get the welding assessed and a bit of remedial surgery. New pans required if your existing ones can't be saved........you have to forgive Peter..he's got a bigger cheque book than the rest of us  .......And whilst we're on the subject Pete's got a nice engine if bling is your thing but here's a £500 engine that I built for one of my customers...ported and polished 1679 with high lift rockers, extracter exhaust and IDF Weber. Makes his Beetle hussle on a budget ;D  |
|
Deleted
Deleted Member
Posts: 0
|
Post by Deleted on Aug 29, 2009 22:25:57 GMT
I like that Chris....I like that a lot. Not that I dont like Peter's engine, but I just want to get it on the road before I do major upgrades like that. 2 questions though....why are the side air vents on the cooler covered up?? and how much did the weber cost? Cool so i'll do the gaskets asap and check the gearbox while its running. Do you think I bleed the brakes and check them too while im at it...how easy is it to unbleed them? I did have a look for replacement pans....£50-70 each side  |
|
Deleted
Deleted Member
Posts: 0
|
Post by Deleted on Aug 29, 2009 22:53:55 GMT
The Weber was a good second hand unit...an Ebay buy at £130 incl. folter and manifold plus another score for service kit.
Using a centrally mounted Weber like this IDF or a 28/36 is all about compromise and needs some propper setting up on a rolling road if poss..........a twin carb set up is preferable but it comes down to budget.
No need to bleed brakes so long as they will stop you on your driveway when you test gearbox. You should service the brakes as a matter of course anyway and any maintenance in the form of bleeding, new fluid etc etc is a waste of time and money cos is ging to get redone later.......or you swap to discs etc.
|
|
Deleted
Deleted Member
Posts: 0
|
Post by Deleted on Aug 30, 2009 15:43:03 GMT
;D
Need to recharge the portable battery starter before i can drive it up/down drive.
|
|
Deleted
Deleted Member
Posts: 0
|
Post by Deleted on Aug 30, 2009 16:15:27 GMT
How hard to people think it would be to remove the engine and transmission so I can paint the engine forks? Can I take them off as one lump? I.e. get it to this stage (minus paint)  These are the best lights I've seen so far  |
|
Deleted
Deleted Member
Posts: 0
|
Post by Deleted on Aug 30, 2009 18:19:41 GMT
Good on yer Ben...engine runnig without too much heartache and expense.......sounds like a goodun as well ;D ;D
Have you noticed the difference between the floorpan sitting there without its engine/gearbox and yours? The one without the engine has independent rear suspension.......seethe arms running diagonally from the main tunnel to each hub? This type of arrangement makes it easier to end up with a "Bare" rolling pan.
In your case the hubs andaxle tubes come off with the gearbox....so you've got the front end on its wheels and the rear end upported buy a few breeze blocks and a plank...or axle stands if you have them.
The gearbox and engine can come off in a oner......very easy but a heavy piece of kit to move around. Easier to unbolt the engine from gearbox an store to one side(Only four bolts!!)... then remove the gearbox and axles in another assembly and this is done by unbolting the xle tubes from the suspension plates, unbolting the shocks, disconnect the gear selector at the coupling under the inspection plate at the back of the pan and lastly the gearbox mountings bolted through the bellhousing to the rear of the forks......lift and separate.
Worth thinking about whether your going the irs route as Jon suggested now.
ps.....you're right those lights are the mutts'.........
|
|
Deleted
Deleted Member
Posts: 0
|
Post by Deleted on Aug 30, 2009 18:40:01 GMT
Independent sounds good but as i'm going for the re-bodied beetle registration, I'm going to leave everything as stock as possible, at least until after inspection. Suspension is a major part worth 2 points so really want to keep them stock. There's a thread on EuroNova about registration/IVA tests, they're currently discussing the points system. As it stands on the website it says; 1 'unmodified' chassis + 2 major parts obviously unmodified means no cut and shut vehicles like a SWB buggies.... but does that include my moved gearstick? If i grind, prime, paint and carpet, will the DVLA man be wise to my ways? Will they de-carpet a car any more than finding the VIN number?  |
|
|
|
Post by Peter on Aug 30, 2009 19:50:09 GMT
I don't think the moved gear stick will be a problem, you probably have a altered handbrake too. I used a Skoda 1300 shifter, cheap and very positive, with a Volvo handbrake assembly. I too like the 'Corvette' style of rear lights, too much work to change my 'Cavalier' ones now. HOI! I don't have a big check book, it's a standard size one, just lots of pages missing and I don't do all the drinking, smoking clubbing, just blow it on ebay.  . but honestly, although my budget over the last six years is approaching 6K most of what one sees is just hard work, I made the mistake of rushing it in 1995 and everything has had to be re-done since. That's why I now say do it right, do it once. It's not a peeing contest, just sharing life's little joys, (smashed thumbs,  empty wallets  and domestic 'discussions'  Swing arm unit engine gearbox tip I used . Blow a fiver on four heavy castors from B&Q or such like and a plank of wood 18"x18" ish. and a couple of bits of 2"x2" and you can just rest the 'kipper' on that and then with some blocks under the engine and gearbox you can unbolt the axles/wheels and gearbox/engine mounts and wheel the chassis foward leaving the lump sitting there, assembly in the revese order is very easy too, just wheel the floor to the gearbox and bolt in. |
|
Deleted
Deleted Member
Posts: 0
|
Post by Deleted on Aug 30, 2009 19:59:04 GMT
What do people do with brake reservoirs? I have a dual circuit master cyclinder, and am trying to find a reservoir that plonks on top of the cyclinder, save me routing one anywhere. I can only find single pots that fit into the top of the cylinders? is there a single pot that covers both, or is this asking too much? EDIT: such as this... cgi.ebay.co.uk/ws/eBayISAPI.dll?ViewItem&item=300342888758&fromMakeTrack=true#ht_500wt_1182have asked to measure the distance between nibs to see if its correct size. |
|
|
|
Post by Peter on Aug 30, 2009 20:04:21 GMT
The standard system uses a duel circuit master cylinder with a single reservoir, split to front left and right and a single to the rear. Ideal is a duel master system but the old wallet comes back into play. Reservoirs with one, two and three (like mine) are available from NF autos. www.cbsonline.co.uk/reservoirs-45-c.aspFitting the res to the cylinder ia all well and good, but, do you really want to crawl past the front right wheel to check the level top it up and don't forget, the Golf one is intended to sit on the master cylinder on the servo, almost at waist hight, advise, get it or the dual one from NF auto but mount it inunder the bonnet, you will thank me for it later. 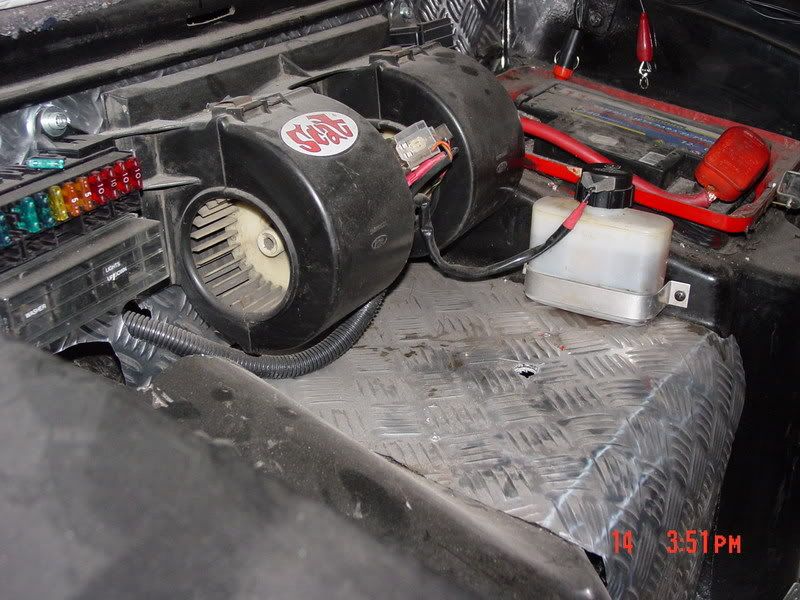  This is a quad cylinder set up. clutch, front brake, rear brake and throttle, but I alway did go overboard. ;D |
|
Deleted
Deleted Member
Posts: 0
|
Post by Deleted on Aug 30, 2009 20:29:09 GMT
The only thing is that i'm planning to keep the bonnet bay clear so i can actually use it as a watertight boot. But equally I dont want to have to do as you say and take wheel off to top it up?
|
|
Deleted
Deleted Member
Posts: 0
|
Post by Deleted on Aug 30, 2009 20:41:20 GMT
I'm with Peter on this one...........mount it somewhere accessible and away from any heat source......route it using the proper grade hose or combination of rigid and flexi pipe if its along run.
Good idea with the casters aswell Peter.......but unfortunately B&Q ain't that cheap anymore......check out your local industrial supplies place you'll get heavy duty bearinged casters cheap as chips.
I got four rated to 1 1/2 tons for £16..........and while I was at it I raided their high tensile SS nut bolt and washer bins....cheaper than going retail.
|
|