Deleted
Deleted Member
Posts: 0
|
Post by Deleted on Aug 19, 2009 17:44:49 GMT
Ben go through the info I gave about the chassis numbers earlier. The later number related to a 1973 super Beetle which ran with McPherson strut front end, disc brakes and a double jointed rear end. You have none of these so the plates do not relate to the chassis and on close inspection using these plates on your car would not stand up to close scrutiny.
My advice would be to try and identify the original car that relates to the chassis. Using the VW archive you can tie up the chassis number on the floorpan to a REG number. You then need to find out if that car is still officially in use and registered for road use....DVLA website. If it is still on the DVLA's computer but not in use you can fill in a form, pay £25 and get the V5 in your name, (Just like buying a car when the V5 has been lost).
I think this is your best course of action....like I said before I reckon your floorpan is earlier probably late 67 to 70 as it has single jointed rear and drums up front....no earlier as you would have a link pin front end.....you've got ball joints....registered in these years will give you free road tax under the historic vehicle regs.
If the number is in use then the owner of that car is running a car where the chassis does not correspond with the cars identity.......just like you would be. Be careful if you're going to try and pull the wool...wouldn't like to think of the consequences if you were caught...or if you had an accident and the insurance assessor spotted the anomalies.
Dont worry about the unleaded fuel in your V-dub motor. They will take it without any probs. they are low revving/low compression engines and are not affected as much as others by the absence of lead in petrol. My engines have run for a decade without hardened valve seats. For peace of mind you can fit unleaded heads if and when you rebuild your engine.....They are a must if you build a performance engine of 1776cc upwards.
Good luck Chris
|
|
Deleted
Deleted Member
Posts: 0
|
Post by Deleted on Aug 19, 2009 21:58:09 GMT
I like this option, I like it a lot! £25 is very little compared to the effort of buying a new kipper, or as you said trying to hide it (which I dont think i have the luck for).
I had a look at the VZI website (www.volkszone.com) and am not finding a database or somewhere to ask ... do i need to post a thread asking for someone else to find it for me? If so in which group?
Similarly I cannot find the heritage centre in Germany on the web, is there a phone number i need or a specific website (which ive obviously missed)
Would it not be easier for me to ring the DVLA and ask for a reg relating to this .... vin number? or would that be breaking some privacy act? And then ask if this reg is in use?
Cheers Ben
p.s if all goes according to plan, what would i do with the v5c i have adm, do i ring up and say its a false purchase?
|
|
Deleted
Deleted Member
Posts: 0
|
Post by Deleted on Aug 19, 2009 22:24:37 GMT
I don't think I'd suggest discussing ANY of this with the DVLA or, heaven forbid, handing back your current V5  . As pelland says, finding the reg that relates to the chassis number is the first step. If you can establish that, it will determine your next course of action. An alternative is to buy a complete wreck of the same vintage provided it has a current V5. If the chassis is of the same type, you might get away with it. |
|
Deleted
Deleted Member
Posts: 0
|
Post by Deleted on Aug 19, 2009 23:12:39 GMT
Update: online VIN decoder confirms Chris is correct on the chassis date (not that I doubted you at all ;D)
Year: 1971
Model: Standard Beetle
Serial Production No.: 652961
|
|
Deleted
Deleted Member
Posts: 0
|
Post by Deleted on Aug 20, 2009 12:10:39 GMT
Ben,
It seems that you are progressing faster than me and you have only just started! I have been through the DVLA system to ID an old chassis and it is reasonably simple and quick. You need to get in touch with VW and they will confirm the date of manufacture of the chassis no. You then go into the post office and get a form which you send off, you may get it online, and they come back with the original reg and other details. You can then move on from there. As for the seats I have a pair sitting in the garage, the only bit of the car currently on the same island as me, but I also have other choices and am not sure if I will use them. If you get to the stage where you need them before I get there you can have them and I will go with another choice.
Hope all goes smoothly with your restoration,
Jon
|
|
Deleted
Deleted Member
Posts: 0
|
Post by Deleted on Aug 20, 2009 15:22:07 GMT
Yeah....give Jon's idea a bash first. The Post Office is your first port of call. The VW heritage centre or whatever they call themselves in Deutschland doesn't, as far as I'm aware, have a website. You have to write to them and they'll get back to you.
I looked on Volkszone myself and couldn't find it but the site has changed a lot since I was last a member.
Good luck Chris
|
|
Deleted
Deleted Member
Posts: 0
|
Post by Deleted on Aug 20, 2009 17:34:04 GMT
Hi Jon, thank you for your input and the seat offer, how long have you had yours for, and where is the rest of the car if not on the same island? I did a similar thing today to your suggestion. I went to my dad's kit car friend for advice, who suggested simply just going to the DVLA as they were very helpful last time he had problems. So I grabbed a pair, manned up and strode into Chelmsford DVLA office, with every document and photo I have on the car. First thing to say...I was there for over 2 hours! I managed to get 3 senior DVLA officers to have a mini-crisis meeting, with the top inspector, and have a fairly heated debate over my car. Seems they had never come across this situation before. Long story short, I have a V5c for a car I don't own (already knew really) .... but I "should" have a V5c coming in the post for the kipper in the garage. Phew.  There were many back and forth disagreements between me and them about whether it would need IVA and Q plates... they called it a kit car, i called it a radically altered car with a "body kit" - claiming it is as much changing the car as having the chav's change a bumper etc.... - luckily i could prove that the Eagle SS official press release never calls it a kit car, merely a body kit. I also claimed it had no chance of passing IVA due to doors and seatbelt mounts, the inspector was very impressed about my knowledge. So in the end I won, showing them their own booklet on the point system (as discussed in other thread) stating that if the car had enough of the original car. I wouldnt need IVA. So even if the engine isnt original or the transmission, I still get to register it as an Eagle SS. ;D Then they said they couldn't do anything until i took it them to be inspected (which would need to be done when changing the body type anyway) but the inspector said without me "finishing" the car to MOT standard he wouldn't look at it. So in theory without me spending all my money to get it finished they couldnt find out whether it was stolen or scrapped etc. And have the possibility of the police taking the kipper away! Erm...not happening. Similarly because it's just a chassis number they couldnt give me a registration number, because technically i dont own the car yet...  ...so i couldnt check if the car was stolen on their DVLA website, without knowing the registration number, which they couldnt give me!! round and round this went... Eventually they said, we found everything about the chassis you have in the garage, and its good news. Fill in this form (V62, same one as you would fill after loosing log book) sign this, pay us £25 and dont worry about not having the registration number *wink wink* we'll get you the logbook. Similarly the inspector said, once I have the new V5c logbook, they'd help me pass the inspection. Again *wink, wink* So good news in the end! Hopefully! On another note my VW manuals came through, so I'm going to try and get the engine turning over tomorrow. |
|
Deleted
Deleted Member
Posts: 0
|
Post by Deleted on Aug 20, 2009 18:38:11 GMT
.............I bet you blag your way into posh parties without an invite too!! Well done looks like you're making progress on the admin front as well. At this rate the car should be finished by the end of the month. Well done!! |
|
Deleted
Deleted Member
Posts: 0
|
Post by Deleted on Aug 20, 2009 19:21:01 GMT
Haha i usually jump the fence and then blag that i was always there.
I dunno about end of the month but definitely as soon as possible, with everyones help that is!
P.S.
Jon I have just gone through your website of design build. Please tell me you did not pay for those designs?!? Even his photoshop does not hide the poor drawing.
The whole of Coventry University's Automotive/transport course would love to do some renders/designs for you, just to bulk up their own portfolio. Doing it for a "real client" would be very good for their cv/portfolio. I will ask a few people when I get back to uni in October.
|
|
Deleted
Deleted Member
Posts: 0
|
Post by Deleted on Aug 20, 2009 22:22:56 GMT
Hey Ben
A bit early in the day but something to think about considering some of your early posts but check out the headlight arrangement on Jon's bodyshell.........(pics on his website).
A distinct improvement on the swivel up jobbies especially with the "Flat" bonnet...........smooooooooooooooooooooooooth imo.
Chris
|
|
Deleted
Deleted Member
Posts: 0
|
Post by Deleted on Aug 21, 2009 0:18:35 GMT
Similarly has anyone seen this eagle ss.... im actually kinda liking the spoiler.
|
|
Deleted
Deleted Member
Posts: 0
|
Post by Deleted on Aug 21, 2009 7:03:00 GMT
this SS has already been discussed in another thread - as has the RV behind it |
|
Deleted
Deleted Member
Posts: 0
|
Post by Deleted on Aug 21, 2009 9:03:03 GMT
No Ben I didn't pay but his work is actually very good, he is currently doing a bi-monthly slot in one fo the Kit Car mags, CKC I think, where he takes an idea and presents it. I have a lot more to update the web-site with, I must get round to it whilst I don't have the car. The SS is in Northern Ireland, where I have just moved from, and will (hopefully) be moving back here next month. As for the offer of someone else's impressions of the SS I would love any further input. I have an idea of the "brief" and some ideas of what I am looking for so please let me know if someone is interested. I will finish this project so they might actually see some of their ideas in the flesh so to speak.
Keep up the good work and keep posting,
Jon
|
|
Deleted
Deleted Member
Posts: 0
|
Post by Deleted on Aug 21, 2009 11:08:36 GMT
Again a little early as I'm only just going out to play with the engine, how to people light up their number plates? do you use the light transparent TVR plates with bulbs behind?
EDIT:
Played around with engine today, firstly at the moment it will not start in its condition... too many wires/pipes leading to nothing.
There are two notable problems, i have 5 spark plugs! 3 correctly attached, one hanging loose and one is wedged into the cylinder drivers side closest to gearbox detached. Tried to remove with several spanners/pliers etc without any luck. can i wd40 a spark plug? or is there an easy way to get it out?
Another issue is a sparkrite tx2002. Most wires are attached, but a few aren't so either i try and find a wiring diagram for it, or it comes out.
Good news is that the engine is moving freely when i moved the crank. no stickiness at all.
|
|
Deleted
Deleted Member
Posts: 0
|
Post by Deleted on Aug 21, 2009 18:32:53 GMT
Pile the WD40 on to the seized plug and leave over night. Try to loosen the plug with a proper long reach plug socket. Obviously be a little sympathetic as the heads are alloy and strong-arm tactics will result in stripped threads requiring helicoil inserts or a snapped plug..........that would be a pain and expensive to rectify!!
It should come out as this is number 3 cylinder and usually gets oily residue from the cooler spread down in that corner. It is also the cylinder that also gets the hottest if the engine is run hard or run for lengthy periods out of tune. The overheating could explain why its seized.
If you are mocking up a fuel system and a starting circuit then get rid of the plug hanging loose....don't want any stray sparks around for obvious reasons. You'l have four plug leads one to each plug and the central lead on the distributor goes to the coil.
The sparkrite system had a good rep but for your purpose go with a straight coil and point operated distributor. You can source wiring diagram for the sparkrite at a later date.
|
|
Deleted
Deleted Member
Posts: 0
|
Post by Deleted on Aug 21, 2009 19:10:47 GMT
Thank you chris.
|
|
Deleted
Deleted Member
Posts: 0
|
Post by Deleted on Aug 22, 2009 21:53:49 GMT
Got a few hours under my belt today, not hugely productive as I was hugely hungover! Decided I'd leave the engine for tomorrow when I'm more alive, but managed to get the spark plug out....what a find, a spark plug socket in an old socket set box at the back of the garage. First question, the old spark plug and the new one are different lengths from the thread. (Pics tomorrow) I have looked at other people's plugs online, they are all short, the same as the old one. hmm so possibly wrong spark plugs installed?!? Second; there are rubber seals about an inch in diameter on the top of the spark plug, closest to the outside of the engine. They dont seem to be anything other than seals to stop dirt getting in the recess. These have started to crumble away, are replacements needed to turn engine over? Main thing today was to change how the body was held up in the garage, Old man was worried there was too much weight on the joists so we went and brought some wood and brackets so the main weight is held by the wall, not the roof. It took a fair bit of effort but looks much better, level and solid (not swinging). Pics tomo. Afterwards I thought id take all the loose paint/rust on the floorpan and tranny tunnel. So powertools in arm, I took a fair bit off. Firstly I removed the bitumen sound deadening pads over the tunnel, towards the rear, they were coming up at the edges and were oozing some sort of oil. These came off lovely with a hand chisel, as did the adhesive, and most of the flaking paint. Seems there was about 4 layers of paint/primer, the gold colour being the newest, a horrible sticky black one being the oldest. This lowest level is closest to a seam-sealant, as it is incredibly difficult to remove. The powertools merely melt it which in turn clogs up the tool. The chisel shaves it off slowly. I know I dont have to take all the old paint off, I'm not that anal. But looks to be some light rust underneath some areas, so I want to be sure. Does anyone recommend a paint remover, or suggest a better way to remove this pain in the arse paint? Pics tomorrow, probably showing my failed attempt at starting the engine. ;D |
|
Deleted
Deleted Member
Posts: 0
|
Post by Deleted on Aug 23, 2009 13:38:35 GMT
Well, the best way is to have it blasted but failing that, I can recommend a blow torch for softening up the underseal along with paint scrapers of various sizes. Don't worry if it starts to burn (unless you still have the fuel tank & pipes in situ), just make sure you have some water nearby.
Time & patience is all it takes.
Can also recommend a good quality angle grinder with wire brush attached.
|
|
|
|
Post by chrisbailey on Aug 23, 2009 14:30:18 GMT
Hi, i have an ss, i had to replace the door hinges because mine were in worse state than yours, I removed the old hinges by firstly slitting the door with a knife and chisel, you will inevitably crack the gelcoat, there in no way around it, even if it looks fine in the warm weather you will see cracks al over the top of the doors. in the end i decided to cut the outer skin off the top of the doors, this made it easier when rebonding the new stainless hinge plate down. The doors are a pain in the a£$%, i have had to use tubs of filler on mine to repair the cracks, here is some pictures of the hinges (not finished yet).    before  |
|
Deleted
Deleted Member
Posts: 0
|
Post by Deleted on Aug 23, 2009 18:22:02 GMT
The splitting and cracking of the grp isfrom the expansion of the metal as it rusts out..........how much less hassle would have been caused if they had used stainless steel?  Ditto as far as paint removal and those crumbly rubber things you mention Ben have two purposes: (i) To keep the grunge out of the way of the plugs so that it doesn't fall into the cylinder when you remove the plug and (ii) To seal the lower half of the engine from the top. In a Beetle the upper half of the engine is sealed from the lower half so that the heat generated by the combustion chambers and exhaust does flow upwards and get drawn into the air cooling system. The engine tinware had rubber extrusions all around and anysmall holes such as those the plug leads run through had sealing rubbers also. You can run the engine in open air without these. Most people running V-dub powered SS's don't bother with the engine tinware as there's more room around the engine than there is in a Beetle so its less critical. Good to have a cold air feed when you get to that stage tho. |
|
Deleted
Deleted Member
Posts: 0
|
Post by Deleted on Aug 23, 2009 20:30:59 GMT
No pics today unfortunately, seems i left the camera on over night, dead battery Tried in vain to start engine today, with trusty manuals and laptop I studied where wires are/should go. Tried to start, and failed, oh well.  So many reasons why it didnt, so we'll leave it for another day when my VW beetle enthusiast friend is coming down, might even just take it down to the vw garage and see what they say is missing/needs replacing. Definitely think the starter solonoid needs replacing, as too does the coil by the looks. First thing that threw me was the voltage regulator, none of my manuals had that pictured on, so had find out what it was and why on internet. Seems to be an old style manual regulator, anyone know a reason not to have it, or is it normal to replace for the newer electric ones? Second thing was the carb, seems i've got a non-standard Nikko carb, looks in mint condition, bar outside grime. Looked on a few dub forums and they seem to be popular with suzuki jeeps. Manual choke, so that will somehow need to either be replaced with an auto (not sure if there's a possible add-on) or wired down to the driver's side. All seems to be piped in, but couldnt find any install help online to see if it's missing something. So moved on to removing floorpan paint, done a fair bit, looking better, aiming to have both sides done by wed, depending on what hours at work i get this week. Seems the best remover is the 'twisted' wire attachments, slightly more abrasive. Found my first hole, , just at the edge of the lowered pan weld. Under 3mm so nothing too bad. After wed, planning to use some hammerite rust remover gunk, picked up huge tub ages ago to do the front gate, worked ok back then. Just to try and remove any rust in hard to reach places. Then a wash down and a prime/paint. Anyone recommend brands Chris has already dismissed POR15 and hammerite. Thinking much further ahead, what's the general consensus on this recent Toyota Concept interior. Very much liking the idea of the brace bar being exposed/dolled up a little. www.seriouswheels.com/pics-2007/2007-Toyota-FT-HS-Concept-Interior-Passenger-View-1920x1440.jpgChris Bailey, your hinges look in a much worse state than mine, it looks like you've put a lot of effort into restoring them but they look so much better than the original pictures. I really hope mine do not need that much work doing to them. Finally, what do most SS owners do with their heater channels? is there a way to use them somehow? or do most use a separate heater? If so do i really need the heater channel levers/wires? Cheers for everyone's input recently. ;D |
|
Deleted
Deleted Member
Posts: 0
|
Post by Deleted on Aug 23, 2009 21:25:55 GMT
I'll try and sort out a basic wiring diagram for you to get the thing started. I've got a trolley with a Type 2 VW Bus bellhousing, a small fuel tank and a starter circuit...just the basics.....I bolt up the engine and hit the button.....I'll see what it looks like and post a schematic for the starter. The carb is likely a Nikki...identifiable by a rectangular-ish glass float chamber to the rear. It was seen to be a good improvement over the standard Solex both for performance and economy but it that was in the 70's and 80's...things have moved on from then. Once the option for the rich kids but a lot cheaper now and more choice...twin carbs are the way to go ...but leave that to later. I have found that Hammerite goes brittle and POR15 was messy and never dried properly...might as well have painted the thing with old engine oil........maybe I had a bad batch or contamination or something. I under-coated my pan with the red oxide they use to treat the Forth Rail Bridge...they use it on oil rigs as well. Expensive but good stuff. Over the top I used a gloss black from the local hardware store. Granville's metal paint is also good stuff....similar blurb to Hammerite but when I've used it it has never gone brittle in the way Hammerite has. As for heating my charger has pipes running from the engine forward to replicate the heater channels. These are glassed in up under what I suppose passes as a sill. TTYS Chris |
|
Deleted
Deleted Member
Posts: 0
|
Post by Deleted on Aug 23, 2009 21:53:08 GMT
Cheers chris, I'll post detailed photos of the nikki carb and engine tomorrow, I'm sure I'm probably missing more than a few wires ;D
|
|
Deleted
Deleted Member
Posts: 0
|
Post by Deleted on Aug 24, 2009 20:19:14 GMT
Pics as promiced. Firstly my engine:  and the Nikki carb.   Starter/solonoid. 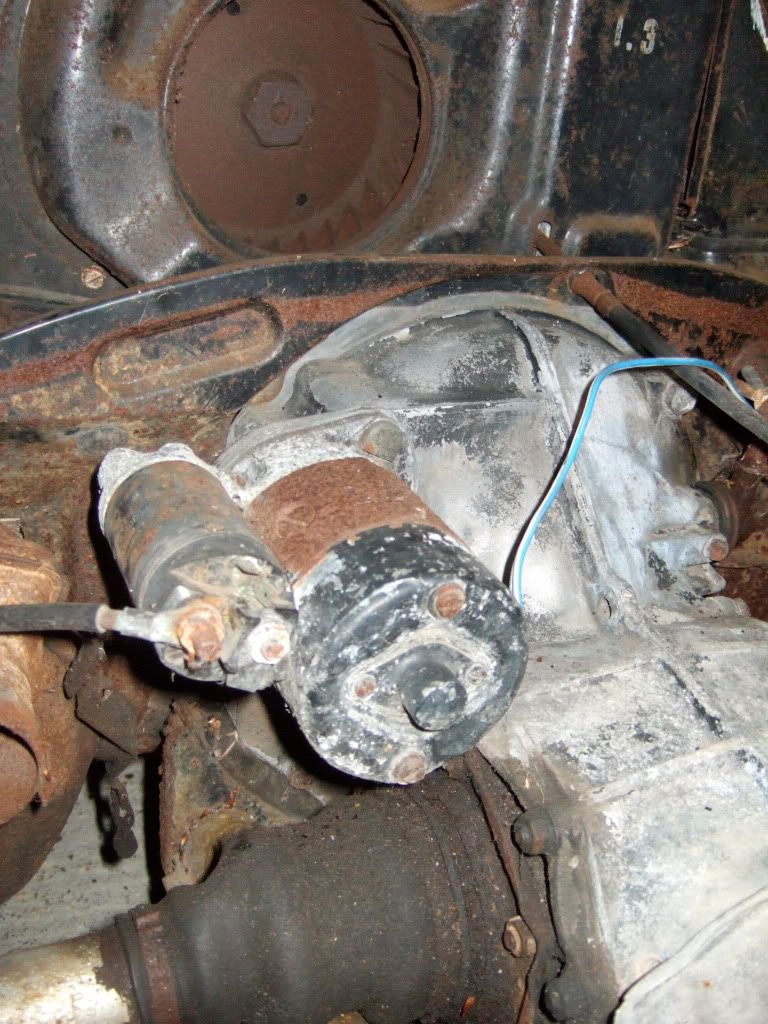 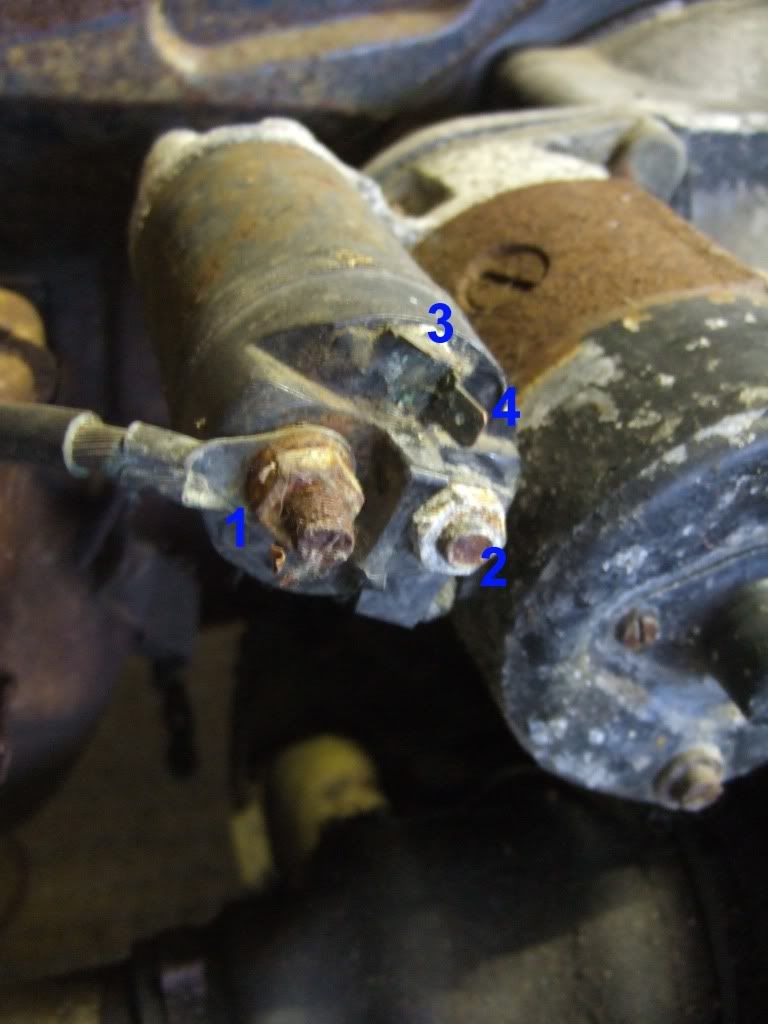 Distributer. 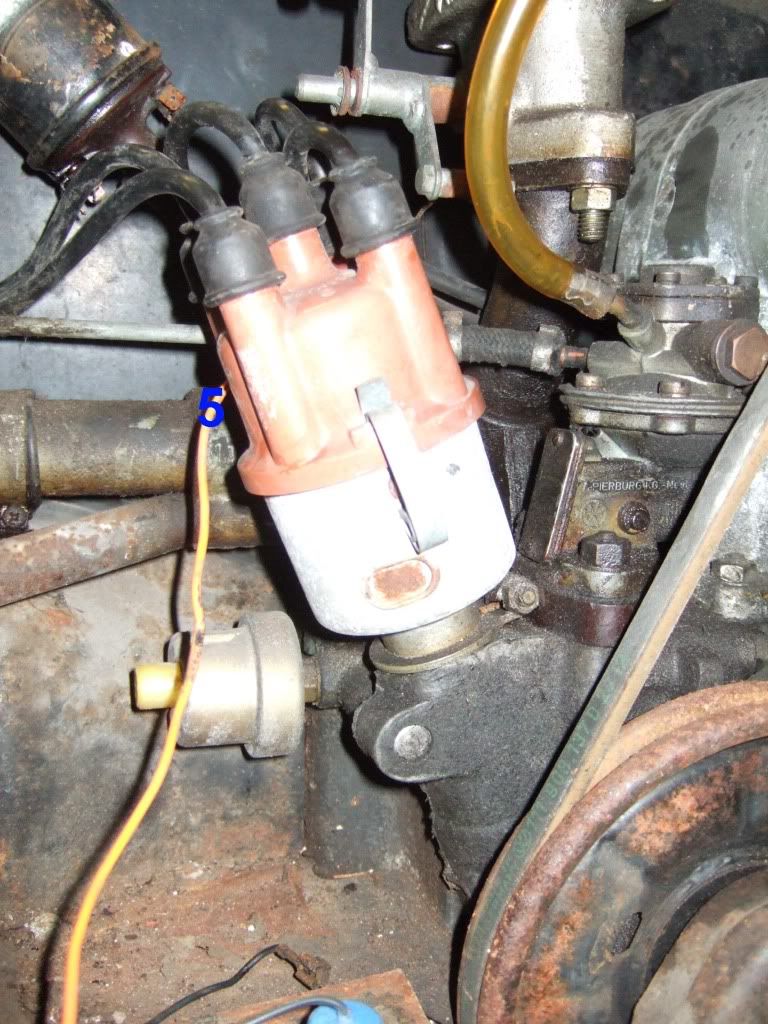 Coil. 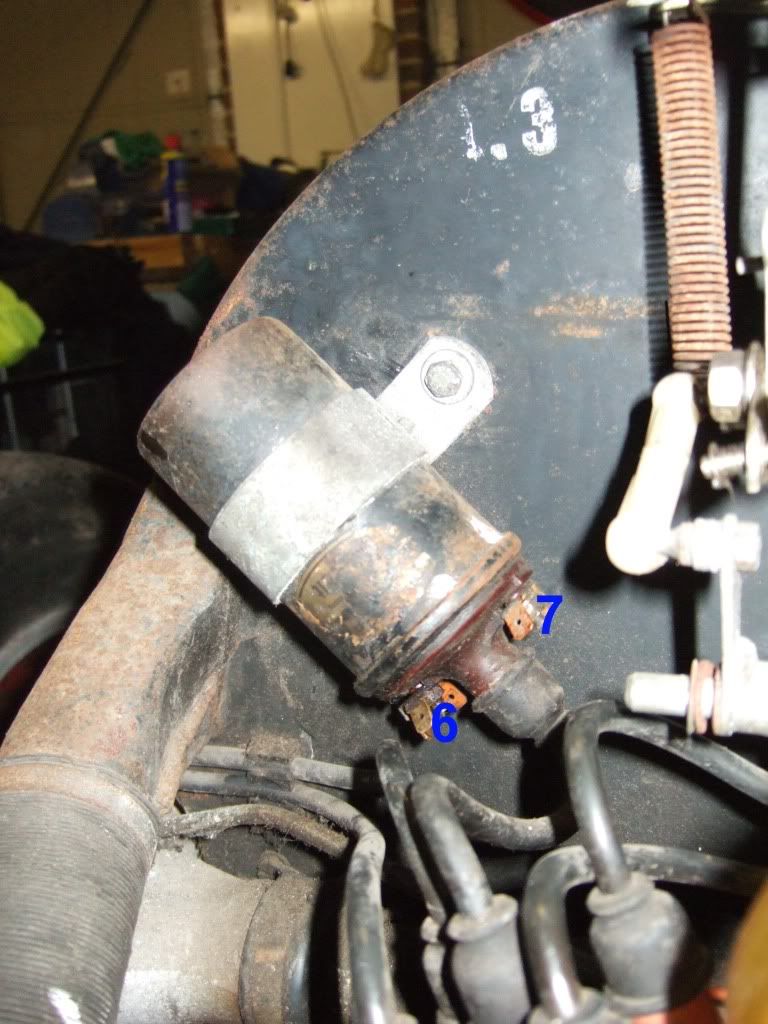 Voltage Regulator.  So by the manual's simple wiring....battery (+) goes to solonoid, (4) goes to starter, 2&3 go to starter circuit?(maybe)? which then goes to coil (either 7or8??), the other (7or8) connects to distributor via wire (5)?? lots of grounding in there to the negative battery via metal grounding wire. The generator voltage seems to be wired correctly, going to the positive battery wire. Please correct me, also what size/type of wire should be used inbetween each point? Does it change in thickness after the large positive wire from battery goes to the starter solonoid? please be kind towards my ignorance ;D |
|
Deleted
Deleted Member
Posts: 0
|
Post by Deleted on Aug 24, 2009 21:05:31 GMT
Marker 1 is the battery +ve lead (presuming by your coment about earths that it is -ve earthed) 2 is the short lead that goes from the solenoid in through the starter casing (starter +ve feed) 3/4 One of whitch will be the solenoid trigger feed and would come from the 50 terminal on the back of the ign switch the other is possabley not used - look on the terminals for scrape lines to suggest whitch has had a connector fitted (if you take a wire from the batterry +ve and short it on this terminal the starter/engine should turn over) 5 is the feed wire from the coil (see 6/7) 6/7 are the coil terminals and should have either +/- or SW/CB marked on them. - or CB (contact breaker) goes to the dizzy (see 5) and + or SW (switch) comes from the ign switch ,  can't remember offhand whitch terminal . If you are trying to get the engine to start then you can run a wire from the battery +ve through a toggle switch to the +ve/SW this will power the coil. but make sure you switch it off when not trying to run the engine or you could cook the coil ! clean up any conections with enery paper/wire brush and replace any rusty connectors ! Hope this helps ! Stu |
|
Deleted
Deleted Member
Posts: 0
|
Post by Deleted on Aug 24, 2009 21:30:09 GMT
Sweet, cheers Stu, just ran out and turned the engine over with starter. turns out its number 4 on the solonoid.
Will wire up the rest tomorrow, and see if engine will catch!
|
|
Deleted
Deleted Member
Posts: 0
|
Post by Deleted on Aug 24, 2009 21:35:59 GMT
No probs mate! Good luck and hopefully we'll hear her fire up all the way up here in scotland ! |
|
Deleted
Deleted Member
Posts: 0
|
Post by Deleted on Aug 25, 2009 6:53:31 GMT
Nice going Ben it is looking great. I notice that you have a swing axle on your chassis. If all goes to plan I will have a complete 944 rear set up over here soon that your are welcome to. I got it to do the conversion but have changed my plans again so will not be using it. When I get it over i will put it on one side for you, the conversion is one for later on when you have everything else sorted. Good lucka dn keep oing.
Jon
|
|
Deleted
Deleted Member
Posts: 0
|
Post by Deleted on Aug 25, 2009 8:46:21 GMT
|
|
Deleted
Deleted Member
Posts: 0
|
Post by Deleted on Aug 25, 2009 10:00:02 GMT
Cheers Jon, I've just had a look on the vdub websites, seems a normal conversion to do, widening the rear by an inch or so ;D always good.
Looks like there are some different 944 swing arms, some need welding cutting etc to fit them in, some dont. Just out of interest at this stage, could you explain what work is needed, and what improvement is gained?
It seems there are a few porsche upgrades that can be moved to a kipper, including brakes and engine. Has anyone else thought about changing to porsche brakes or are there better/cheaper alternatives, disk brake wise (even just the fronts).
And engine wise, some beetles bore out the engine and use porsche pistons, some just buy the 356/912/914? lump. Some bus's can fit a 911 straight 6 due to the extra room, does an eagle lack this room, ive heard some v8s can fit... so possibly...?
not keen on scoobys at the best of times so wouldnt ever think about changing the vw motor for their flat four, also heard it takes more effort than porsche anyway.
Similarly are there any really nice VW lumps that would fit, there's obviously the 1600 which just bolts on, is it a good upgrade?
All very far in the future i know, but nice to know for future reference.
|
|


 . As pelland says, finding the reg that relates to the chassis number is the first step. If you can establish that, it will determine your next course of action.
 ...so i couldnt check if the car was stolen on their DVLA website, without knowing the registration number, which they couldnt give me!! round and round this went...


 can't remember offhand whitch terminal .