Deleted
Deleted Member
Posts: 0
|
Post by Deleted on Jun 1, 2014 4:22:49 GMT
nothing wrong to keep it in timber
The advantage of polyester, it is stronger and lighter and you hold the mould, so if you yourself or someone else wants a copy later, in 2 to 3 houra you can make it. completely finished and in leather look.
Especially the making off the original is easier, you can use all the materials used by each other, and make the most complex shapes.
For example, with pu foam you can do wonders. The pictures show what I mean better then 100 words I guess, the final finish is that the polyester has a leather look.
|
|
|
|
Post by Peter on Jun 1, 2014 8:54:47 GMT
Another consideration is price, GRP resin is about 30€ a 5Lt tin plus actuator, mat, cloth, etc so not cheap, a small kit in a small bucket with 1L resin and 1m2 of matt is 27€ ![eek2[1]](//storage.proboards.com/658221/images/vSj4TVuwmNYSH8YDTJ5o.gif) I bought all the plywood, leather cloth, plastic, screws and pins for the console, armrest, door panels and overhead for under 60€, plus 6€ for PVA white glue and I still have left over, I much prefer the smell of timber to resin as well. I don't expect anyone will want a copy, we are all very individual when it comes to our Eagles and Novas, the distances from front to gear-shift would be different for example and my Volvo 245 handbrake is totally off the wall. We take ideas from each other for sure and I have designed a few solutions for others that have been used. I also think this shape does not lend itself very well as a plug for a mould and then a lot of it is internal parts too. I did try an earlier design with double curve, one piece dash but it was a disaster, the mould I made was in plaster of Paris coated with plastic and silicone which was fine but the resin didn't set and the whole thing was ruined. The DeHavaland Mosquito was made from plywood and that was one of the best planes of WW2 as are a great number of small boats. I just don't get the 'feel' with plastic that I do with wood and aluminium. so basically; been there, tried that, didn't like it. Raw plaster cast, 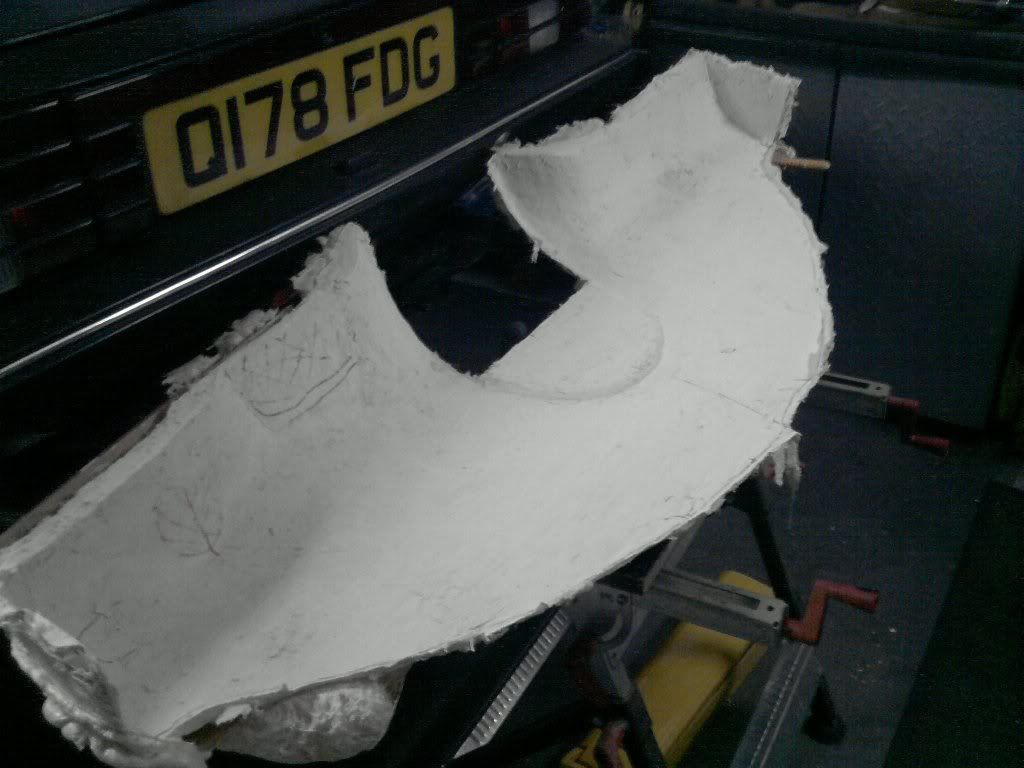 This was the buck before sanding and polishing 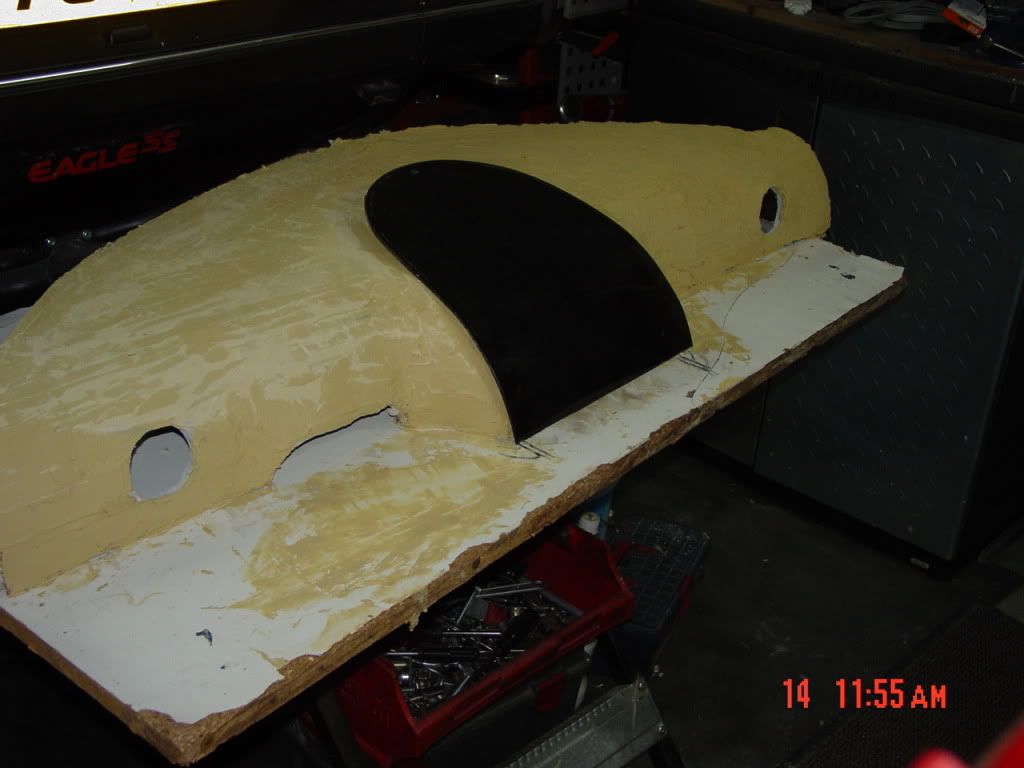 . |
|
Deleted
Deleted Member
Posts: 0
|
Post by Deleted on Jun 1, 2014 10:08:09 GMT
I do not know where you buy your materials, but to give an example, the T Roof, both the mould and the finished product I did not spend 35 Euros, except for the leather than because it is a special vinyl that is resistant to polyester, you can just glue it on any material and it have a huge stretch and is very pliable, I can send you a sample if you want.
To make your model, you can still use any materials, including plywood, I have to admit that working with polyester is a speciality, and it don't smell exactly good.
|
|
|
|
Post by Peter on Jun 1, 2014 16:07:52 GMT
Not sure if I got it all right but I think so. bit of a first for me even after all these years, I have done one or two, in fact all of the things but never all of them together. very open to suggestions Attachment Deleted |
|
|
|
Post by Peter on Jun 1, 2014 16:21:38 GMT
I do not know where you buy your materials, but to give an example, the T Roof, both the mould and the finished product I did not spend 35 Euros, except for the leather than because it is a special vinyl that is resistant to polyester, you can just glue it on any material and it have a huge stretch and is very pliable, I can send you a sample if you want. To make your model, you can still use any materials, including plywood, I have to admit that working with polyester is a speciality, and it don't smell exactly good. Spain is one, if not THE most expensive countries in Europe, don't know why as the salaries are rubbish, typical being about 1K to 1,200€ a month take home for a semi-skilled/hotel/waiter/shop worker and under 2,000€ for a skilled worker, per 40 hour week, mechanics are not rated as skilled and get about 10 to 12€ a hour. Rent for a 2 bed apartment of 100M 2about 600€ a month plus electric 100€pm, Town hall tax 80€ to 100€pm and community charges 90€ to 120€PM, about 90€PM for water, rubbish, etc another 80€ or so for car tax, test, insurance about 300€ a year for a small car like a 1.4 Corsa, which means just over 2K a month with food, minimum and we still have very high unemployment with a large % working 'black' still. If you are over 55, forget it, there are no jobs unless you know someone who works there, I think that at 68! I'm supposed to be dead! ![unsure[1]](//storage.proboards.com/658221/images/6Gy1jIcXxHETTCw1CY9x.gif) Stuff in the shops is very expensive and car parts are two or three times the prices that are in the UK or Germany BUT, we have the weather, at least in the South we do. ![cool[1]](//storage.proboards.com/658221/images/pc95quoFVbDqiqqHkukY.gif) Someone who shall remain nameless, but we will call her Anna, works 40 hour week in 5 languages, (English, Spanish, Swedish, Norwegian and German) travels an hour each way and gets stuck in queues for another 6 to 20 hours a week and all for 1,400€PM after 400€ a month in travel expenses!. Rant over ![freakout[1]](//storage.proboards.com/658221/images/Xhh8AWlKnPIBsoKU6Q8M.gif) |
|
Deleted
Deleted Member
Posts: 0
|
Post by Deleted on Jun 2, 2014 6:53:49 GMT
Lucky for you guy's there is internet to order your car parts on line, i can alway's ask my suplier for the rates to ship to Spain.
|
|
|
|
Post by Peter on Jun 2, 2014 8:32:11 GMT
Thanks for that. The internet and Ebay are a life and budget saver.
I ask why is it a parcel with DHL from Hamburg to Marbella is 17.50€ and the same parcel by the same company returned is 52€ Marbella to Hamburg?
Postage and courier charges out of Spain are killing our exports.
Maybe a list of the sort of stuff you could supply to the UK and me that you think might be competitively priced (inc shipping) or unique would be cool as I'm sure there are parts, fabrications and services that could be of interest to forum members.
|
|
Deleted
Deleted Member
Posts: 0
|
Post by Deleted on Jun 2, 2014 16:33:18 GMT
well he can suply almost anything for VW beetle and all the spare parts for the other cars, i'm not sure i can put the prices on the net, but simple, iff you want to know a price just ask and Isend him the mail, what is more important to me is that he onley deliver Germane quality and have a perfect service.
|
|
|
|
Post by Peter on Jun 2, 2014 22:27:44 GMT
I don't suppose you know anything about VX220 rear light lenses or anyone who makes replacements.
Sent from my INGO-TAB using Tapatalk
|
|
|
|
Post by scooby on Jun 3, 2014 19:44:32 GMT
Nope.
But I have some hen's teeth you can have.
|
|
|
|
Post by Peter on Jun 4, 2014 15:26:21 GMT
Found these little beauties that should solve the latching ignition problem when used to switch an 80A relay. Ebay number 321283345565 Attachment DeletedIt's all building up to a fool proof idea, am idea so cunning even the weasels don't know of it. These little units could also be used to make one touch switches. touch on-touch off. Attachment Deleted |
|
|
|
Post by Peter on Jun 4, 2014 17:14:19 GMT
|
|
|
|
Post by scooby on Jun 4, 2014 18:24:17 GMT
That's all very good in theory.
Ok, prob in practice too.
Makes ma heed hurt...
|
|
|
|
Post by Peter on Jun 4, 2014 21:10:54 GMT
Just 'chunky' logic, and your head hurts?  |
|
|
|
Post by Peter on Jun 6, 2014 18:36:51 GMT
And for those who like pretty pictures. (I really do need to get out more ) 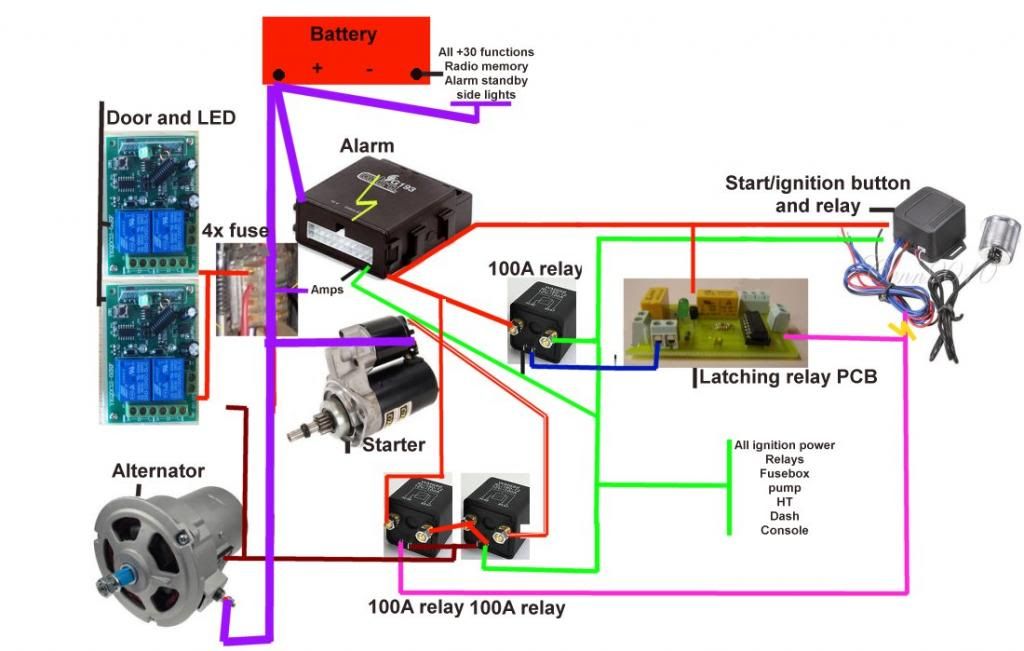 |
|
Deleted
Deleted Member
Posts: 0
|
Post by Deleted on Jun 7, 2014 16:02:24 GMT
looks good, we like movie's also lol, so show us how it works haha
|
|
|
|
Post by Peter on Jun 9, 2014 7:12:18 GMT
I'll keep you all posted about the catches, be about 2 weeks. In the meantime I have to remove the central bonnet lock and fill in the hole and fit the gas strut fittings before I cut the latch holes and wrap the whole bonnet. As you may have noticed I have swapped the idea of the small latching module for a PCB assemble. Although the small module does what I want and at 16.95 x 5 pack, not expensive, (still have them in mind for one touch switches later, maybe), but the PCB can handle a constant 1A minimum which as it has the energise the 100A relay all the time I though a better idea, the PCB unit replaces the 30A switching relay in the original plan. As the 100A relay will carry all the +15 volts it would kill the car if it failed so I'll put a switch with an inline diode directly from from the alarm under the dash just in case so I can manually energise the 100A relay. Also the 80A relays have been upgraded to 100A constant, 180A max. Attachment Deleted upgraded for the stronger Attachment DeletedAlso working on cup holders, never thought it would be so difficult, so limited in space and within the reach area which basically is from the steering wheel to the gear shift area, missing the seat front, elbows and legs and then the unit has to slide or swing in within a very small space just in front or behind the gearshift in the console base I guess as I cannot reach the dash, possibly under the door sill in front of the seats IF I can reach there, have to check. Maybe fold down ones either side near the switches might fit, I can get those locally in red or black. The problem of the sharp edge on the front chine spoiler could be solved with a plastic edging for glass tables I found in the Chinese store, about 2" wide and 4mm thick. |
|
|
|
Post by Peter on Jun 14, 2014 16:40:23 GMT
Sometimes the most simple requirement creates the the most difficult problems and in this case after about 6 complicated designs I can up with a simple solution. Requirement; drinks holder for std 66.7mm can that will retract, is in easy reach of the strapped in reclined driving position and secure. Parameters; Limited area for installation, door is ruled out for obvious reasons, glove box/armrest too far back to safely reach, no room in face of console for a horizontal or vertical slide unite. Solution; steel bar bent around former and threaded either end for two nuts each and a bar with two nuts all held on a back plate that holds it all in place, the whole unit fits in 3 simple holes in the side of the console or sill just by my knee with just 4mm of the loop showing so I can pull it out. Something like this. Attachment Deleted |
|
Deleted
Deleted Member
Posts: 0
|
Post by Deleted on Jun 15, 2014 17:15:38 GMT
|
|
|
|
Post by Peter on Jun 15, 2014 21:21:18 GMT
Seen those and looking for hide a way one rather than stuck on which look, well, stuck on.
|
|
|
|
Post by Peter on Jun 18, 2014 11:29:49 GMT
Got a few hours in the 'shed yesterday and hope to have some tomorrow too. Just had a sit in the car and there is NOWHERE to put a cup holder other than in the tub side below the door opening, in front of the seat on the console is a no-no (gear shift location) and there is no space in the console, front or sides, arm rest too far back to reach without ending up in a ditch so on the side by the left knee it shall be. I removed the steering/ignition lock and light switch from the steering column, (no steering lock ![confused2[1]](//storage.proboards.com/658221/images/Hnf6_PWrRzqdv0t6nVL7.gif) , QD steering wheel  ), and fitted the Jetta light switch to the left of the radio and found there was enough room to the right for the ciggie' lighter accessory socket. Stripped out a couple of lighting switch wires and the complete ignition wiring from the car to the switch which will now go to a new location on a board behind the console containing the barrier connection strips, relays, etc, (AKA a plastic chopping board). Lights now controlled by the Jetta unit which includes a dimmer for the instruments. The Jetta switch powers a relay on second click to turn on the headlights so no need for heavy wires to the switch, the dip switch/flasher just opens or closes a 5 pin change-over relay for dip/main so one wire less, dip on = no power relay closed = dip, main selected, (or flash) = power and relay changes = main, easy, similar to the VW system but not latching. The area around the switches and radio are so narrow I am going to have problems making it from acrylic without breakage so I am reverting to a lower panel in metal covered in CF wrap up to the speedo aperture and then from a fine joint, one piece of acrylic to the windscreen. In order to avoid problems with CE markings or rather the lack of, on the 'Chinese' sidelight and indicators I am making a smoked cover to fit the opening covering them completely, with a 'CE mark' on them of course, . Removed the right door temporary actuator bracket and drilled for the new alloy one but have yet to remove the door and do as I did to the left door and change to stainless fittings with coach bolts inside, cut the slot to fit the inner bracket plate before plugging with filler. Rebuilt the left actuator with the new 12v motor that arrived on Monday and after a few polarity issues it all works and is refitted, just need to adjust as I have fitted rose joints on both ends and it is a bit too short now. (better than too long) but now I have a very noisy gearbox in it so I need to sort that out now. Also made a start on the front headlining unit, thought it was going to be easy but I can see there are going to be issues around the screen corners and it will have to fit inside them so the top of the 'A' post trims will have to cover that area as well. All in all a good days work so getting there, slowly.  |
|
Deleted
Deleted Member
Posts: 0
|
Post by Deleted on Jun 18, 2014 16:11:43 GMT
Hmm, Getting there slowly? then I would like to see what happens when you go fast, sometimes it is difficult to understand what you are explaining,  another way off telling you we like pictures. |
|
|
|
Post by Peter on Jun 20, 2014 9:52:36 GMT
Example of me fast is remove Yamaha YM250 SOHC engine complete from a XYKD250 buggy, strip and refit a new crankshaft , reassemble, refit and have running in two hours and ready for the afternoon tour.
|
|
|
|
Post by Peter on Jun 20, 2014 10:00:41 GMT
Three BIG relays arrived from S. Korea this morning, 45mm cubes with bolt on connections, they will do nicely with 120A continuous and 180A max Clock for the overhead console arrived yesterday too. List of parts building up so a huge day in the 'shed' looming. Attachment DeletedAttachment Deleted |
|
Deleted
Deleted Member
Posts: 0
|
Post by Deleted on Jun 23, 2014 8:01:34 GMT
jow that are serious relays, pitty that we have to pay so much import taxes, maybe a idee to buy with a few persones on the forum, tham make the price even more interesting.
|
|
|
|
Post by Peter on Jun 23, 2014 9:53:21 GMT
Come on Luc, where are you going to get 120A/180A relays from at under 12€ each post included ![hmmmm[1]](//storage.proboards.com/658221/images/XKN5ScdKR1O8cJ3IeDgW.gif) kkhhrrooootte is the S. Korea seller on Ebay. If the goods are DECLARED at under 22€ we don't pay import duty into the EU and of course none within the EU , I missed that once and had to pay 20% plus 15€ admin plus 21% IVA and it nearly doubled the cost of an 12v door actuator. Next unit they declared 20$ and no tax. you must tell the seller to do this, even on a 150€ radio it works. The 'Chinese' Aerocatches arrived today and I am pleasantly surprised by the excellent quality, very well made and exactly the same as the UK 'Aerocatch' but at 17,50€ with free shipping a 1/3rd the price a PAIR, locking too with 4 keys. Highly recommended.   |
|
|
|
Post by scooby on Jun 23, 2014 19:44:37 GMT
I got a pair of these recently too - £12.95 delivered (but not the locking type). Yep, pleasantly surprised by the quality; the actual surface finish, edges and stuff might not be top notch (I'm guessing the real 'aeros' are noticeable better), but these still look very well made, appear strong enough and have a secure mechanism. Now just to work out how they'll fit on a slightly curved surface...  |
|
|
|
Post by Peter on Jun 24, 2014 9:30:47 GMT
I am fitting mine in the rear corners of the bonnet, where are you putting yours? I am going to mount mine on a plate under the surface and bond and (countersink) rivet them in place before I rub down flat and wrap in Carbon Fiber so it will all look flush, even on a slight curve. Attachment Deleted Looking ahead a couple of weeks (I hope) and the installation of the console to the car I was worried about all the wires from the switches, radio and lights that needed to be connected, then I saw these and a dim memory from my Ministry of Defense days (shhh) came back and I thought,"what a good idea". home run! 19 pins at 10A should do it. Attachment Deleted |
|
|
|
Post by scooby on Jun 24, 2014 10:35:43 GMT
My intention had been to fit them to the sides of the bonnet near the front - pretty much where the rubber catches are now. However, the bonnet sides curve more than I'd thought along the top edge, so there's actually very little 'flat' surface there - so not sure yet if that's a goer. The alternative position would be on the top surface as near the front corners as possible, but even that surface is surprisingly curved so the clips would end up further from the corners than I'd like. I'm still hoping that the sides will take them, even if it means a wee bit of filling in along the sides of the clamps. Nice idea you have of 'flushing' them in, but us RV folks want as many sticky-out bits as poss... Yee-haaaaa  |
|
|
|
Post by scooby on Jun 24, 2014 10:39:15 GMT
Ooooooh - 19 pins in them plugs, eh? That's nice. Er, what are they called? Where can you get 'em?  |
|


![eek2[1]](http://storage.proboards.com/658221/images/vSj4TVuwmNYSH8YDTJ5o.gif) I bought all the plywood, leather cloth, plastic, screws and pins for the console, armrest, door panels and overhead for under 60€, plus 6€ for PVA white glue and I still have left over, I much prefer the smell of timber to resin as well. I don't expect anyone will want a copy, we are all very individual when it comes to our Eagles and Novas, the distances from front to gear-shift would be different for example and my Volvo 245 handbrake is totally off the wall.
I bought all the plywood, leather cloth, plastic, screws and pins for the console, armrest, door panels and overhead for under 60€, plus 6€ for PVA white glue and I still have left over, I much prefer the smell of timber to resin as well. I don't expect anyone will want a copy, we are all very individual when it comes to our Eagles and Novas, the distances from front to gear-shift would be different for example and my Volvo 245 handbrake is totally off the wall.![unsure[1]](http://storage.proboards.com/658221/images/6Gy1jIcXxHETTCw1CY9x.gif) Stuff in the shops is very expensive and car parts are two or three times the prices that are in the UK or Germany BUT, we have the weather, at least in the South we do.
Stuff in the shops is very expensive and car parts are two or three times the prices that are in the UK or Germany BUT, we have the weather, at least in the South we do. ![cool[1]](http://storage.proboards.com/658221/images/pc95quoFVbDqiqqHkukY.gif)
![freakout[1]](http://storage.proboards.com/658221/images/Xhh8AWlKnPIBsoKU6Q8M.gif)

![confused2[1]](http://storage.proboards.com/658221/images/Hnf6_PWrRzqdv0t6nVL7.gif) , QD steering wheel
, QD steering wheel  ), and fitted the Jetta light switch to the left of the radio and found there was enough room to the right for the
 another way off telling you we like pictures.
![hmmmm[1]](http://storage.proboards.com/658221/images/XKN5ScdKR1O8cJ3IeDgW.gif)


