|
|
Post by scooby on Mar 26, 2014 20:58:43 GMT
Jeepers, that's harsh. I guess the UK was one of the very few countries that actually had a thriving kit-car industry at one time, and there still seems to be that flexibility and allowance for people wanting to build 'one-offs'. Are you confident your car could pass the UK's IVA? Is an ultimate desperate option to have it delivered and tested 'back home', given a UK reg number, have it - cough - registered with a UK resident's name, and then... Sigh, I guess not  |
|
|
|
Post by Peter on Mar 27, 2014 9:28:05 GMT
Jeepers, that's harsh. I guess the UK was one of the very few countries that actually had a thriving kit-car industry at one time, and there still seems to be that flexibility and allowance for people wanting to build 'one-offs'. Are you confident your car could pass the UK's IVA? Is an ultimate desperate option to have it delivered and tested 'back home', given a UK reg number, have it - cough - registered with a UK resident's name, and then... Sigh, I guess not My advise to anyone in the UK rebuilding or restoring a car is to get it done NOW as this sort of thing is already coming into effect in the UK and soon it will be impossible to get a kit cat registered. If you want to take your time or can't afford to get a move on, you could end up with an expensive ornament, something I am desperately trying to avoid and I have changed tactics from modifying and customizing to 'just get it legal first', problem there is, once I have it homologated I can't alter anything without a new inspection, fit a spoiler,inspection, fit side skirts, inspection etc. It already has a UK reg number, Q178FDG, but that doesn't matter in this case as since 1996 any vehicle in the EU must have a certificate of conformity, and that in the UK is the SVA and Ukhozi was first registered in 1995 and homologation came in 2007  Also one cannot drive a foreign car in another EU country if one is a resident of that country. Otherwise I would be hammering around on the plates I have already. The "engineers report" of "characteristics' is no more than dimensions and tyre sizes, weight, etc and they would have to actuality measure and weight Ukhozi to get that as there is no 'off-the-shelf' figures to go on, unlike a production car, which would normally have that all done anyway. There will be problems I am sure, even if I hand it over to the company in Valencia. Things like in the SVA, one "must be able to adjust the driver's mirror from the seated position", which in a SS you can't as the side windows do not open, so you leave then off, then will it fail for not having side windows? ![confused2[1]](//storage.proboards.com/658221/images/Hnf6_PWrRzqdv0t6nVL7.gif) . Will the screen need changing as mine doesn't have any markings? Will I need to conform to 2014 emissions, with dual DellOrtos,  Will it need catalytic converters on each side instead of the J tubes??? Will my combined none CE marked side lights/indicator/running light/fogs, pass or will I have to have new ones professionally fitted and homologated as with ordinary cars, (If you want DRLs I have to pay 45€ and have them fitted by the official fitter, present my log book and personal ID card and have them certificated, what a load of rubbish!) This is the sort of thing I need first, before a MoT (ITV) and THEN a SVA, in Madrid! Attachment Deleted |
|
|
|
Post by terryrob on Mar 27, 2014 22:31:35 GMT
What a load of b*****ks, why do they make things so difficult, all we want to do is drive something unique, different and built by ourselves. Good excuse to come back to Brittain.
|
|
|
|
Post by Peter on Apr 1, 2014 15:24:06 GMT
What a load of b*****ks, why do they make things so difficult, all we want to do is drive something unique, different and built by ourselves. Good excuse to come back to Brittain. Bad news is, it IS coming your way, very soon. More bad news, I may have to alter my exhaust sytem and put a pair of cats on it like this. another 100€, thank yuu EU. Attachment Deleted |
|
|
|
Post by scooby on Apr 1, 2014 22:58:36 GMT
Since your car is already Q-reg'd, a desperate option may be to return it to the UK, have it all made legal here, register it in a friend's (UK-resident) name, and just 'borrow' it for a few months each year...
|
|
|
|
Post by Peter on Apr 2, 2014 7:30:37 GMT
Good idea, if it wasn't illegal. I cannot drive a UK reg car in Spain AT ALL as I am a resident. I cannot drive anyone else car that is not. I have tried to get aground it many ways and it is too risky, not as if I'm driving a 'std' car and even in Marbella where Fezzers outnumber minis I would get pulled for a "document check".  |
|
|
|
Post by scooby on Apr 2, 2014 8:10:50 GMT
Blimey - that's just incredible.
|
|
|
|
Post by Peter on Apr 5, 2014 10:20:09 GMT
SHED TIME! managed to get the actuator upper brackets made and the left one fitted, didn't exactly to plan as I had to cut the end out of the rear door rib to get the back plate in but it is done and looking good, I'll fill the rib with spray foam which is very light but adds a surprising amount of rigidity and strength to the box section. PHOTOS! Rough cut with Riv-nuts fitted. 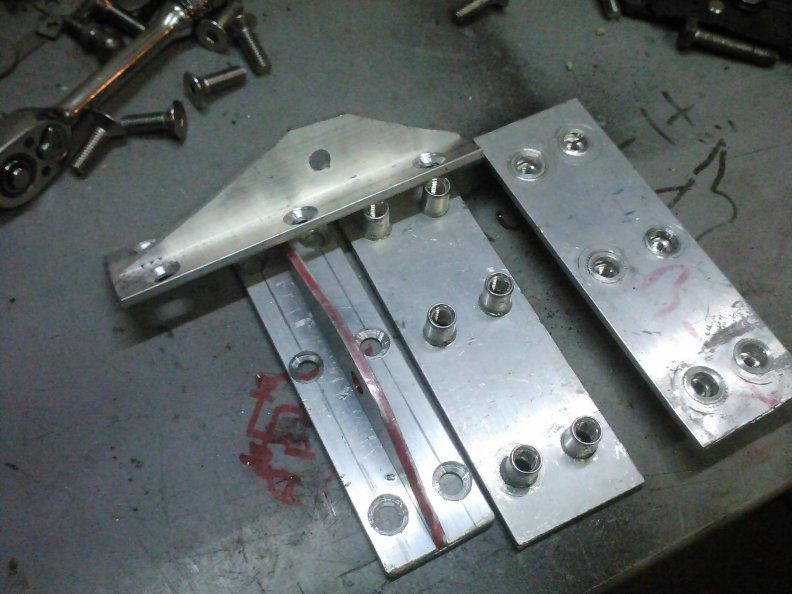 Polished ready to fit.  Offered up to the door's roof 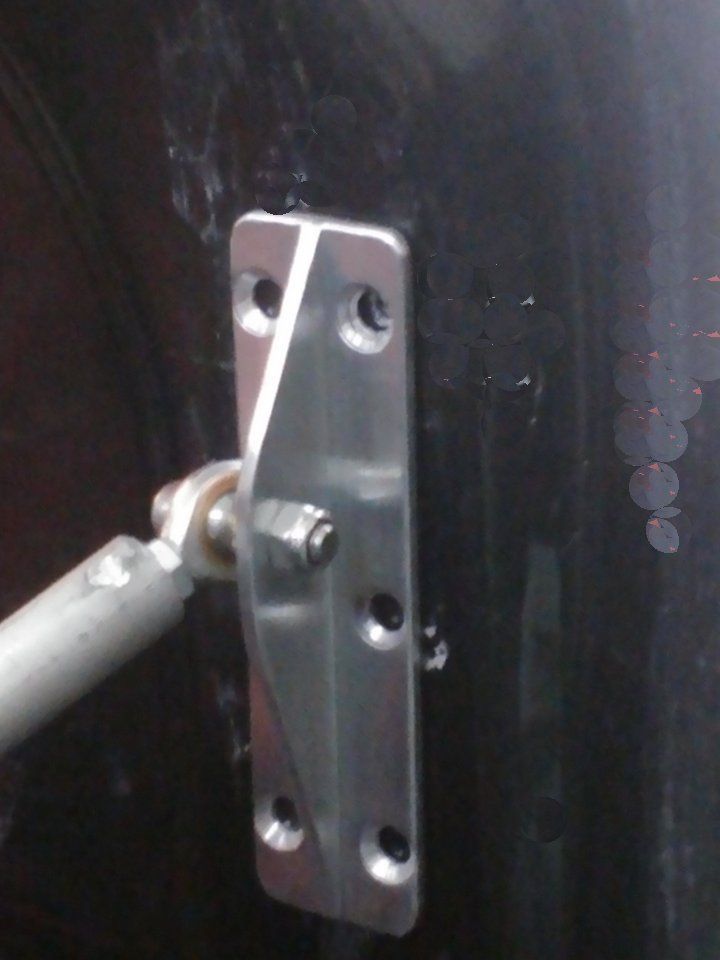 Fitted, showing the slot to be filled up. 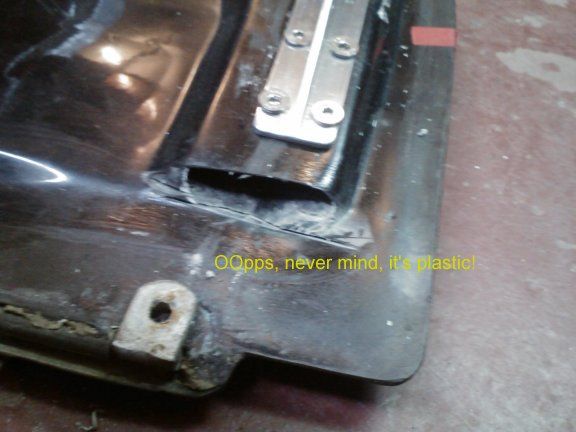 |
|
|
|
Post by Peter on Apr 9, 2014 14:21:12 GMT
Had an idea hit me, well it was my right knee actually. If I cut the end of the dash off at an angle and build the door card out to meet it I have a LOT more room to get in and out without clouting my ageing bones on the dash and I still get the wrap-a-round look I want. Still keeping the centre section which is now in one piece with the speedo built in. SO, off we go again, Mk? (soon as I finish the doors and the wiring and..... Attachment Deleted |
|
|
|
Post by Peter on Apr 16, 2014 9:11:57 GMT
Full day in the 'shed'.  Stripped and adjusted rear brake shoes and handbrake, Changed roof antenna twig and repaired wiring. Moved third brake light from rear window to rear spoiler, Checked all levels and pressures, Cleaned rust from under rear window, treated and painted. And NO not on the Eagle, on the wife's Corsa, had intended to spend a second day on the SS refitting the drivers door and the passengers side strut bracket but that lot got in the way.  |
|
|
|
Post by Peter on Apr 19, 2014 22:48:15 GMT
MG Maestro speedo died, kicking about the workshop for 14 yers didn't do it any good so I bought a Astra GTE one on Ebay, just need to fit it in when it arrives next week. Attachment Deleted |
|
|
|
Post by scooby on Apr 19, 2014 22:59:25 GMT
Eh? You just out one leccy dash and stick in another?! But...but...but... |
|
|
|
Post by Peter on Apr 20, 2014 11:26:40 GMT
No buts, it all done with smoke and mirrors. IF the digidash is an analogue input one as is the MG and the early Opel/Vauxhall ones, as in direct from the sensors and senders, it's easy, you can't fit ones from say a Carlton as it has to go via the ECU and thank god I don't have an ECU. Before and after, (when it gets here in about a week) Attachment DeletedAttachment Deleted Oil pressure from sensor on remote oil filter housing Oil switch from standard unit on crankcase by dizzy temperature is oil not water, on lower right of crankcase Volt meter from ignition fuel gauge from standard sender in tank Speedo from transducer on end of standard cable tacho from neg - on HT coil Warning lights direct from alternator, side lights, main beam, handbrake, brake fluid, fuel tanks sender, indicators etc, add 12v ignition and earth and there ya go, fit it to any car. |
|
|
|
Post by scooby on Apr 20, 2014 23:32:15 GMT
Ah, well, piece of peesh if you put it like that.
(walks away quickly, eyes fixed on floor...)
|
|
|
|
Post by Peter on Apr 21, 2014 8:01:53 GMT
Always easy when you know how.
|
|
|
|
Post by Peter on Apr 28, 2014 22:19:05 GMT
It has arrived! My 3D carbon fibre wrap and it looks fantastic, ![banana091[1]](//storage.proboards.com/658221/images/hPS8GPcvjxbdKlOp6lIL.gif) can't wait to get it on the bonnet, boot etc. Still waiting for the speedo and console buttons for the doors. Good day in the shed today, got the left door back on and hooked up to the actuator and... PERFECT. Shuts down just right. ![rock[1]](//storage.proboards.com/658221/images/WwlTZGzEzqS029BPkumN.gif) Removed a bit from the inner part of the door above the hinge to clear nylock nuts as I have fitted coach bolts from underneath so to get a flatter headlining. Bit of the wiring done too, AND fitted a new battery on the Corsa. |
|
|
|
Post by Peter on Apr 29, 2014 13:58:01 GMT
Happy days, that which was lost found and that that thought dead is alive, (bit too biblical?)
The Speedo arrived this morning having been 'delayed' in the post and so far seems to be all OK, nice clean example, Letterman7 in the States is getting one to play with too.
Just need to get the Mercedes A170 alive again as I am finding the BMW a bit juicy for the 80Km return trip to the 'shed' and I need to get some serious 'shed time' in.
|
|
|
|
Post by Peter on May 1, 2014 10:01:20 GMT
Got to the 'shed' again yesterday which is a first, two days in a week, wow. Took the 'new' Astra GTE LCD speedo apart and removed all the bits I will not need like front glass, sides etc and it fits, very near the same size as the MG one so no need for major changes on the console, just a tweak here and there and new inner side panels. Mileage easily reset to 300 miles. And it all works too, apart from a fungal damage to the speedo part of the LCD panel and the film cover which has eaten the colour so all I can do is felt tip it over and it seems to have done the trick as I cannot see it when the smoked cover is over it, it is on the left lower part of the first number of three on the speedo and I doubt I will ever go faster than 199KPH it doesn't really matter. Wiring is of course GM Opel so I am re wiring it in British Leyland colours to avoid confusion as the rest of the car is in BL code. Small list of things to do still but it is getting there, slowly. promised myself no new ideas, (no chance). Jobs still to do on Ukhozi. 1. Rewire speedo, (changing colours from GM to BL), and fit connectors. 2. Change R/H actuator bracket 3. Repair to doors where actuator brackets were fitted, fill cavity and fill ends of slots. Paint. 4. Make and fit headlight bar bearings to mounting tube to stop rattle and undesired micro switch operation. 5. Make and fit bonnet ‘gulley’ to direct rain and wash water to front corner tubes and not into boot. 6. Fit oil pressure switch to oil filter housing and wire to front, (blue/yellow) 7. Finish rewire of dash area. 8. 3 way plug for radio camera controls, reverse, handbrake. 9. Re-model dash centre to fit new speedo. 10. Make new black perspex speedo cover with hole for button. 11. Re-make center console to take 2 more door control buttons and recover in Carbon Fibre (CF). 12. Fit remote radio control to buttons for door control. 13. Make and fit new threaded plates for bracket fittings. re-cover rear console in CF 14. Re-cover dash centre section in CF- 15. Repair to RCA out on radio, no rear left output? 16. Make rear console support brackets, (at handbrake and gearshift locations). 17. Fit rear, front then top console sections. 18. Refit handbrake and gearshift trim. 19. Re-shape dash sides and make undersides. (glove box?) fit 4 way contact panels. 20. Phlegm box control to be finished and to be fitted to bulkhead. 21. Fit vents and tubes. 22. Cable clearance on tunnel kick plate. 23. Tidy up door wiring and extend wires for modified door cards, (longer needed) 24. Refit 'Golf' door latches and hook up. 25. Fit door sill boxes and make striker. 26. Make door cards, blending into dash ends and fit 4 way contact plate, install. 27. Make and fit door head linings 28. Possible front 'solid' head lining section with display??? 29. Fix remote control card to bulkhead 30. Tidy up carpets 31. Remake headlining and fit 32. Make and fit ‘A’ post trims. 33. Fit door seals. 34. Fill space on doors for ram fitting, Rub down scoops and vents. 35. Rub down mirror backs, inner door sides, bonnet and boot, wipe with alcohol and fit CF 36. Repair inside of wheel arches with filler and rub down smooth. 37. Rub down old door handle locations. 38. Design and make rear valance/diffuser to cover exhaust header. 39. Kit skirts? 100 quid??? 40. Rubber edge trim to front splitter. 41. Remove cable hitch from under chassis tunnel and re-fit tow bar to front. 42. Re-fit seat belts top mounting, possibly move bottom mounts forward. 43. Remove and re-fit screen, (20 year old mastic 'gone off'). 44. Fill and rub down door roofs, dig out spider cracks, fill, rub down, then repaint in blue/black metallic. Still under 50 jobs, (that I can think of) ![unsure[1]](//storage.proboards.com/658221/images/6Gy1jIcXxHETTCw1CY9x.gif) And then next week,  |
|
|
|
Post by Peter on May 4, 2014 10:37:21 GMT
Due to current economic conditions the light at the end of the tunnel has been turned off [but... up the 'shed' tomorrow [/b] ![driver[1]](//storage.proboards.com/658221/images/7oaeflFwvH1EGzY3IURW.gif)  Finish wiring, check correct fuses in the fuse box as I have been nicking them for my car over the years, tut tut. I hope to fit the left door actuator bracket. ![proud[1]](//storage.proboards.com/658221/images/JYxU3BNyiAL3MEEMHMKp.gif) Two new 'virgin' remote 4 button pads arrived so I need to solder the correct link code in them. Start work on 'modifying' the centre console with new centre panels in Carbon Fibre and two additional buttons for the left door up/down function.  That should do it it for one day ![cheers[1]](//storage.proboards.com/658221/images/HTahwjnPNRnE0X3XkViD.gif) |
|
|
|
Post by Peter on May 13, 2014 10:03:43 GMT
After trying to get the Astra GTE speedo to fit nicely and it does, just, I have decided to remake the centre console as I can make it 1" narrower and in one piece, so I hope it will look a bit more 'factory made' when fitted, the design etc will remain the same and the base and rear section will stay the same. I am going to change the centre panels to black Carbon fibre to match the other bits I'm doing like the bonnet, boot, mirrors, (sills?) and door latches. Bodywork paint has been fixed at 'Satin Black' I so liked the Volks Magic Nova, looked really smooth. Left actuator motor has burnt out ![eek2[1]](//storage.proboards.com/658221/images/vSj4TVuwmNYSH8YDTJ5o.gif) in fact I burnt my hand on it it was so hot. now dead, been getting slower and not pulling the door down as hard as it used to. so trying to get a replacement motor from China, here's hoping. Threaded the plain yellow wire I'm using for oil pressure gauge sender though to the front, so much easier if I had laid in a couple of 'spare' wires when I remade the loom. Adaptor for fitting both oil pressure sender and oil warning switch is on it's way, save drilling and tapping either the oil filter housing or the end of the gallery. Bloody buttons I ordered from the same seller arrived and they are different, shiny and not the smooth dome of the older ones, guess I had better order 4 next time. ![cursing[1]](//storage.proboards.com/658221/images/cfTn3T5UL4wuItbNCxN1.gif) Just heard back from the Chinese and they are asking the factory to send me a new 12v motor, even replied at night, their time. cool. |
|
|
|
Post by Peter on May 15, 2014 10:36:26 GMT
Burnt my hand . Left door actuator failed to raise so I grabbed it to see what was stuck, Argghhhh, HOT,. ![dunce[1]](//storage.proboards.com/658221/images/FxqOrvJpqz02pFK3Dwgv.gif) When I stripped it I found the negative brush holder had come away from the stator plate and shorted out the armature and the 12v motor was VERY hot.  Seller OPNE is going to send me a new motor FOC but post will be 4 to 5 weeks from China, so back to 1m prop under the door edge again. Also, just to make my afternoon complete, the 10x10x10 adaptor for the oil gauge was over cut on the male thread (9.75mm) so it stripped out the crank case thread, super, I though it was an easy screw in by hand, should have left it alone and fitted the OPG sender in the top of the oil filter housing like I was going to. So now do I drill and tap to 12mm and use an insert back to M10x1 or just 'glue' the bugger in with epoxy? Bearing in mind where the hole is, under the dizzy. |
|
|
|
Post by Peter on May 17, 2014 11:35:24 GMT
OPNE has sent me a new 12v motor but I had to pay $18 postage as it was out of 3 month warranty, still, a new one from Gimson Robotics would have been 15 pound plus shipping. Just need to wait 5 weeks for the bloody thing to arrive, in the meantime I am going to strip the other motor and solder a small brass plate under the four tabs that holds each of the brush holders onto the stator plate so it cannot happen again.   I have decided NOT to hack into the crankcase but to alter the adaptor. if I cut off the offending over cut m10x1 male thread and drill and tap the adaptor so it has 3 x M10x1 female fittings I can make a slightly larger than m10 x1 male to male adaptor to fit the crankcase and the adaptor, only problem is, the only bit of alloy I have is 13mm bar, so I have to make that 12mm x 40mm round first and then put a M10x1 on one end and a M1.2mmx1 on the other, easy. OR..... |
|
|
|
Post by Peter on May 27, 2014 10:18:04 GMT
This is becoming more of a 'blogg' than a build diary but progress is being made. On there way are several bits to add to the long list of stuff already waiting to be go on the car. Overhead clock/temp thing which will go in the overhead panel I am having right across the top of the screen and then back a bit to the start of the headlining. Attachment DeletedThen there is the barrier blocks, (thanks to Nick's use of them on his Stirling) which will tidy up the mess under the dash so I can have one 12v in and 5 out without a load of connections. Attachment Deletedand of course I need to 'modify' the oil take off adaptor as the crankcase is iffy and I need to make a slightly oversized thread to fit into the case and a normal M10x1 thread for the adaptor, hence the split die so I can run it down the stub open and make a undercut thread and then close it a bit for the adaptor end, will be as tight as a duck's chuff. Still having to wait a month or so for the new actuator motor to arrive which is a pain but I am going to modify the motor stator plates as well so it cannot happen again. Went at the console thing in totally the wrong frame of mind last week and basically buggered up a nice new piece of 10mm ply, so a new bit and a better frame of mind today and hopefully a proper job as a result. The old one, I say 'old', it's never been fitted, was a two piece thing and about 10mm too narrow where the speedo goes and 15mm too wide in the top bit that fitted over the speedo so I'm making it in one piece from gear shift to screen in one flowing double curve, then the sides in red as before and with the aid of a heat gun, the centre will be covered in one piece of 2mm smoke plastic and then covered in black carbon fibre wrap apart from the speedo glass with cut outs for the 2DIN radio/reversing monitor/DVD screen thingy and the switches and buttons. |
|
|
|
Post by Peter on May 28, 2014 10:32:33 GMT
Haven't got out of the house, yet so decided to put into a drawing what I have in mind, and what a mind it is, So, if a picture says a thousand words, here is a million or so. Attachment Deleted |
|
|
|
Post by Peter on May 30, 2014 7:02:34 GMT
And a good 8 hours later. Managed to get a fair bit done and the carcass of the console made, still need to round it off and fit switch/button sub-panel. I then need to cut out, bend the acrylic panel, cut out the radio/switch 'T' slot and button holes and the wrap in black carbon fibre and install over the radio and switches, getting that right is going to mean a few cardboard templates in the bin to get it a perfect fit before I get the oscillating saw to the plastic. The panel will be held in place by a sharp return at the screen end, the buttons in the middle and the gear shift ring at the bottom. The speedo is held in by two screws in the panel in front of the instrument screen and when undone it just tips and lifts out the top, (when the covering panel is removed of course) Attachment Deleted Attachment Deleted |
|
|
|
Post by Peter on May 31, 2014 8:53:38 GMT
Managed to make the M10x1 spigot for the oil pressure adaptor, nice tight fit and a bit of 56N thread lock to make sure. Now, where the heck are these two oil pressure senders I have, somewhere |
|
|
|
Post by biggles1 on May 31, 2014 12:01:35 GMT
That's looking great Peter. I can't seem to get going on the RV. Every time I plan making a start, something else crops up. Looks like the transfer case is getting noisy on the wife's daily driver, so I reckon I'll be underneath that soon.  John |
|
|
|
Post by Peter on May 31, 2014 12:49:28 GMT
The next operation is to made the separate piece around the bottom around the gear-shift ring, then to machine the side supports so they are in-line across, rather than at right angles to the sides as now, so the front panel will sit flat and then to trim the side panels so they are uniform distance from the supports strips (about 3mm), then round the whole thing off and smooth, make and fit the switch and button support panel as I don't want to mount the switches IN the plastic and the buttons will be pocked a lot so they need support. Having done that and it all fits, I have to mount the remote-remote PCB for the doors to the base and the wiring to battery 12v and the door solenoid relays, cover the sides in red, refit the radio and the switches, then, having made and curved the plastic and covered with wrap, fit the front panel over the radio and switch panel and then the five buttons IN the front and wire up to the PCB. fit to base which may or may not contain a pair of swing out cup holders by then. job done. Also doing away with the ignition switch and the light switch on the steering. The ignition function will be taken care of by an immobiliser circuit operated by the Cobra CAT 1 alarm and a heavy duty relay and the start button wired up to two starter relays at the starter motor end for 'one touch starting'. A VW Jetta rocker switch for off/side/head and dimmer will be on the top left of the console next to the radio. I was going to have an engine ignition cut off switch, (this would emulate the 'position 2, ACC' on the original ignition switch but then I thought, "If I was running the radio with 640 watts I would need the engine running anyway, so what's the point". So, plenty to do. |
|
Deleted
Deleted Member
Posts: 0
|
Post by Deleted on May 31, 2014 17:52:20 GMT
i love the the shape you are making, are you going to make a mold off it and then make it in polyester? if so will it be a smooth finish or leather look.
|
|
|
|
Post by Peter on May 31, 2014 22:42:05 GMT
Nope, I make it in wood and over in faux leather on the sides then a one piece 3mm sheet of acrylic covered in carbon all down the middle, can't see much point in making it it wood then a mould and GRP cast of what I started with in the first place when the original is very light and strong.
Sent from my INGO-TAB using Tapatalk
|
|


![confused2[1]](http://storage.proboards.com/658221/images/Hnf6_PWrRzqdv0t6nVL7.gif) . Will the screen need changing as mine doesn't have any markings? Will I need to conform to 2014 emissions, with dual DellOrtos,
. Will the screen need changing as mine doesn't have any markings? Will I need to conform to 2014 emissions, with dual DellOrtos,  Will it need catalytic converters on each side instead of the J tubes??? Will my combined none CE marked side lights/indicator/running light/fogs, pass or will I have to have new ones professionally fitted and homologated as with ordinary cars, (If you want DRLs I have to pay 45€ and have them fitted by the official fitter, present my log book and personal ID card and have them certificated, what a load of rubbish!)


![banana091[1]](http://storage.proboards.com/658221/images/hPS8GPcvjxbdKlOp6lIL.gif) can't wait to get it on the bonnet, boot etc. Still waiting for the speedo and console buttons for the doors.
can't wait to get it on the bonnet, boot etc. Still waiting for the speedo and console buttons for the doors. ![rock[1]](http://storage.proboards.com/658221/images/WwlTZGzEzqS029BPkumN.gif)
![unsure[1]](http://storage.proboards.com/658221/images/6Gy1jIcXxHETTCw1CY9x.gif)

![driver[1]](http://storage.proboards.com/658221/images/7oaeflFwvH1EGzY3IURW.gif)

![proud[1]](http://storage.proboards.com/658221/images/JYxU3BNyiAL3MEEMHMKp.gif)

![cheers[1]](http://storage.proboards.com/658221/images/HTahwjnPNRnE0X3XkViD.gif)
![eek2[1]](http://storage.proboards.com/658221/images/vSj4TVuwmNYSH8YDTJ5o.gif) in fact I burnt my hand on it it was so hot. now dead, been getting slower and not pulling the door down as hard as it used to. so trying to get a replacement motor from China, here's hoping.
in fact I burnt my hand on it it was so hot. now dead, been getting slower and not pulling the door down as hard as it used to. so trying to get a replacement motor from China, here's hoping. ![cursing[1]](http://storage.proboards.com/658221/images/cfTn3T5UL4wuItbNCxN1.gif)
![dunce[1]](http://storage.proboards.com/658221/images/FxqOrvJpqz02pFK3Dwgv.gif)


