|
|
Post by Peter on Jul 25, 2015 9:57:10 GMT
Already on my 'watch list', it's not beyond the realms of possibility to have a therms-coupling under a head bolt and connect that to a gizmo to control the fan speed.
|
|
|
|
Post by trike on Jul 27, 2015 14:57:11 GMT
Electric fan should work fine, just make sure the little air deflectors between the barrels above the pushrod tubes are in place(always seem to go missing). As the beetle engine relies on the oil for cooling as much as the air from the fan, a remote oil cooler,with its own fan & thermostat is a good idea.(Not chinese e-bay ones though).  Easy enough to fit a temperature switch into the oil line (before the cooler )to control the main fan,possibly even a two speed setup. As the vw fan takes a fair bit of horsepower (about 10% on stock engine) getting rid of it will make a noticable increase in performance,and in theory,as the engine hasn't got to work so hard,run cooler anyway. In the past i've run vw lumps in trikes & bikes with no fan or housing whatsoever,no problem. |
|
|
|
Post by Peter on Jul 28, 2015 8:42:37 GMT
Thanks Trik, Nice to hear from someone who has played with the cooling on a VW and not just gone on theory. I just couldn't see why, if Porshe use them, a multi blade fan driven at the correct speed shouldn't produce the required air flow and in fact exceed the CFM of the VW unit whilst reducing power drain on the engine and avoiding fan blow ups, I know there will be a slight additional drag on the alternator for the 80W fan. Until I research it further I am going to add internal vanes and shapes to my A shroud to improve flow and keep RPM under 5K. Think a 10" curved bladed fan DUCTED into the original opening of the shroud should do the job. I was also thinking of a two stage compressor fan with a 12" fan driving into an 8" fan in a duct, this would create a high flow/ pressure unit. On the oil cooling side I have that covered with a NASCAR Dynaflow cooler 8" fan on a thermo' switch adjacent to the inlet of the cooler as well as a 1.5L sump and finned remote filter. BIG cooler and fan, lots of fresh air from scoops to area, I will be opening up the fire wall louvers to a 10" hole with mesh guard.  Deflectors in place, check- Big sump, check. (the numbers are for possible inclusion of twin CATS if needed for homologation.  Until the next brainwave comes along, |
|
|
|
Post by Peter on Aug 10, 2015 8:57:04 GMT
So the cameras work, not brilliant but they do cover that nasty blind spot out to the rear side.  What the camera sees, the problem I had was taking any picture of the TFT screen at all so this is best effort, it looks a lot better actually.  and the actual shot from just behind the camera.  Had a scary moment when it all went fuzzy, I realised in time I had twisted the lens and put it out of focus, |
|
|
|
Post by Peter on Aug 18, 2015 13:00:29 GMT
Another distraction, a newer alternator pulley kit. BLING!   So now I have to stop hopping about and get some things actually finished, sometimes 'again', New alternator pulley change. HT lead tube, 'solder' brackets on and polish. Weld and balance fan and refit to alternator. Make and fit deflector inserts to shroud. Fill in holes with alloy 'solder' left by 'good ideas' that didn't work very well such as internal HT leads and hydraulic throttle.  Refit shroud, HT leads, alternator, etc. Finish re-wiring Finish installing 'blind spot cameras'. Finish center console fascia, switches and screens wrap and fit.. Remake dash board wings. ETC |
|
|
|
Post by Peter on Sept 29, 2015 11:31:51 GMT
Monday 28th was an interesting day, arrived at hospital for some tuning on the ol' ticker and pre-prepped at 13:30 lay in bed until 18;30 when wife arrived as did nurse to swab me down and wrap me in sterile towels etc, ten minuets later surgeon comes in and says, "it's all off we have had two pacemaker emergencies so come back and do it all again Friday", hit Burger King BIG TIME for comfort food after starving all day.
|
|
|
|
Post by Peter on Oct 5, 2015 16:30:07 GMT
Back in on the Friday and all went well, nothing found so clean bill of health, well, for the heart anyway which for someone pushing 70 is great. ![rock[1]](//storage.proboards.com/658221/images/WwlTZGzEzqS029BPkumN.gif) |
|
|
|
Post by Peter on Oct 9, 2015 12:27:50 GMT
Couple of days in the 'shed', and "a bit more done". ![cheers[1]](//storage.proboards.com/658221/images/HTahwjnPNRnE0X3XkViD.gif)  All the fuel pump fittings and lines have been changed for 'proper' AN-6 fittings. Nasty checker plate bracket changed for better stainless steel one and everything cleaned up.  I'm just thinking  looking at that I might just put a 90 fitting where it comes through the wall and fit the filter verticality to the wall with a clip and then another 90 to the pump raising it, so there is better clearance over the axle, Hmmmm, EBAY!   I have also 'copied' the idea of having a nice shiny alloy tube across the shroud for the HT leads, I was going to 'weld' brackets on but then thought, ![hmmmm[1]](//storage.proboards.com/658221/images/XKN5ScdKR1O8cJ3IeDgW.gif) "If I use stainless 'P' clips not only will it save a LOT of work but will add a degree of insulation too", So, I did. ![angel[1]](//storage.proboards.com/658221/images/XtuH5rwyBaS0gOkAn3Cd.gif) Also cleaned up the alternator assemble and fitted the new alloy pulley, bling! 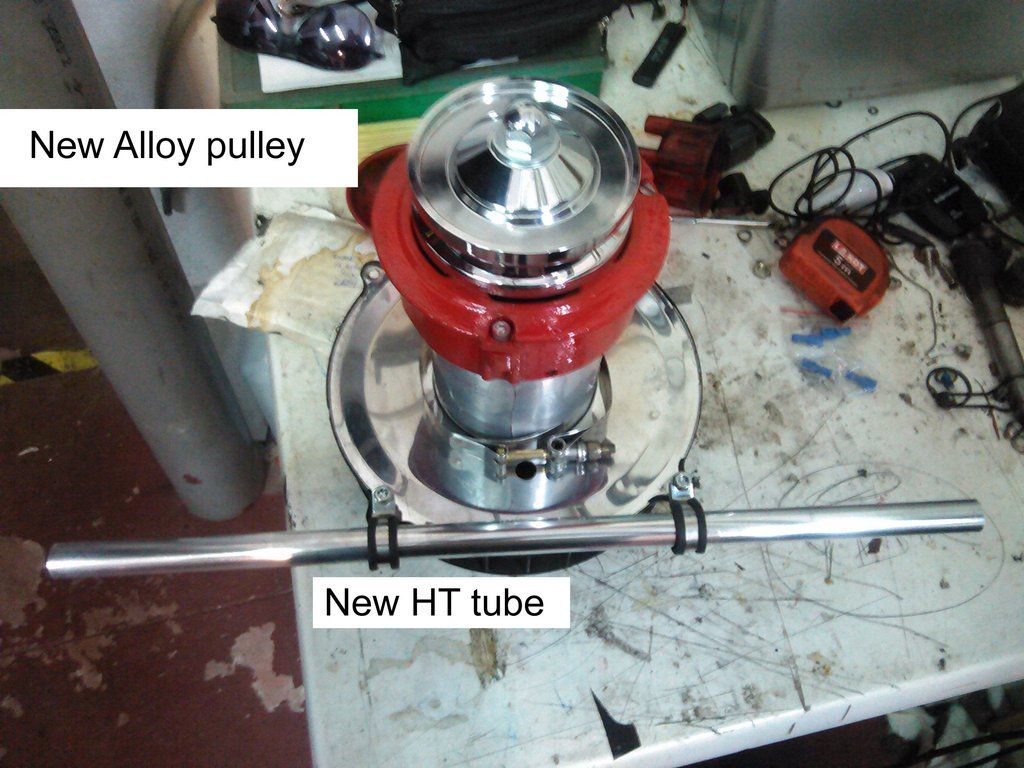 Welding up the holes made for the 'through shroud' HT lead idea has proven a lot of work and i have now to finish it and polish, I hope it doesn't show too much or a Petronix sticker will be there.   Right from the start I didn't want that ugly toe under when static so I set the ride hight with a couple of 1cm stops and to stop the spring plates jumping past the stops on cornering i fitted retainers too. 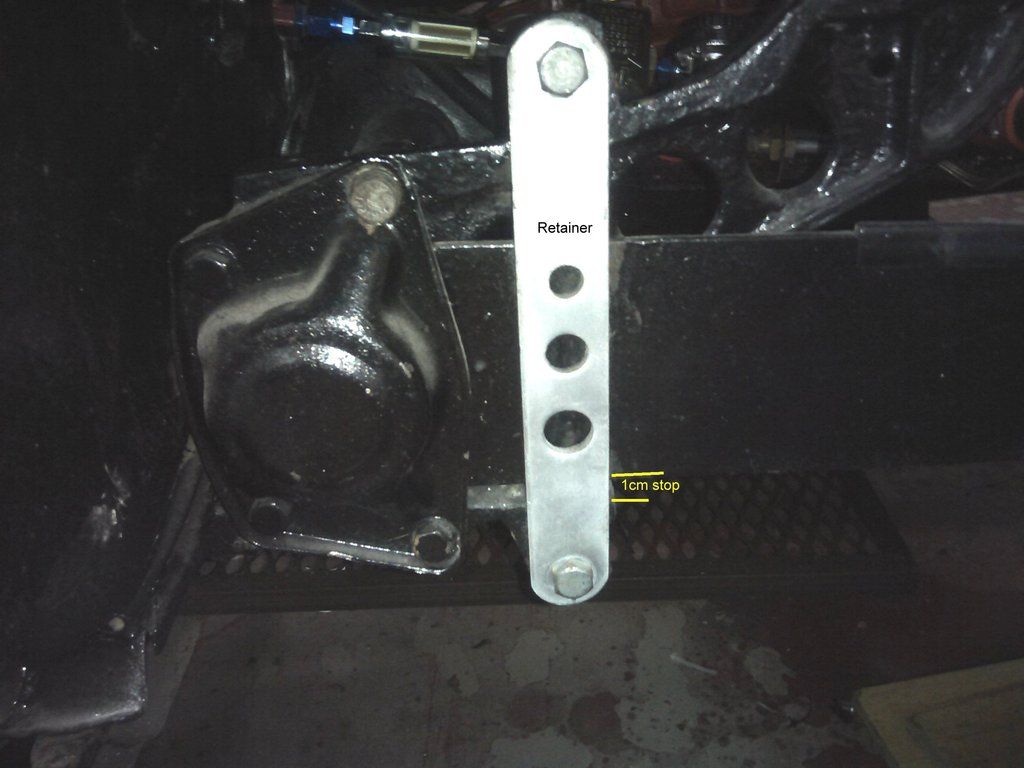 |
|
|
|
Post by Peter on Oct 13, 2015 21:01:34 GMT
After I had put the wheel back on for the umpteenth time I decided the fuel lines were to close to the axle and too low so off to TORQUE on Ebay again and a whole load of AN6 fitting and I am going to raise the whole assembly so the last section over the axle will be horizontal and the pump, reg and possibly the filter will be on the lower edge of the inner wing with a 'proper' AN6 90 degree bulkhead fitting level with the tank outlet. At the same time I ordered some fitting to do a better job of the clutch line with a bulkhead fitting to fit in the alloy bracket and a AN3 to 3/16" hard-line fitting, I already had the A4 fitting but couldn't figure out the connection to the hard line, now I have by using a AN3 to AN4 adaptor as no-one does a 3/16" to AN4 connector. Bout of 'stomach flu' (and all that entails) has laid me low just as I wanted to get stuck in again in the cooler weather. proposed new gas lines in about 10 days time.  In the meantime I can get that center console sorted at last!  |
|
|
|
Post by Peter on Oct 21, 2015 14:22:01 GMT
Hooray! Shed time at last. Don't have a photo yet but the shroud holes have bee filled in and ground down flat ready for a polish, looks better than the 2 x 1" holes and most hidden behind the HT coil anyway. The clutch line was a pig in many ways but all done now, only THREE attempts to get it right. As it was with throttle cable in top hole and clutch line all metal in lower hole without support, crap in other words. 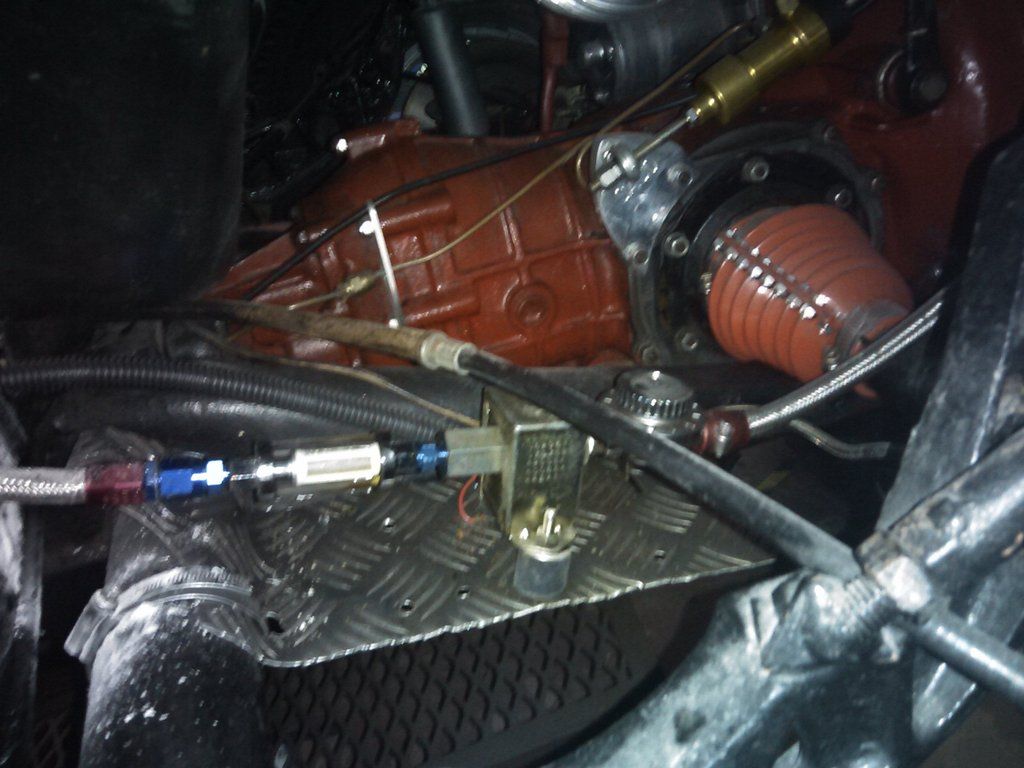 A few quids worth of AN fittings and starting to look better.  Then brain storm and moved it all about, grommet in lower hole for throttle cable and the bulkhead fitting in the top hole, neat. 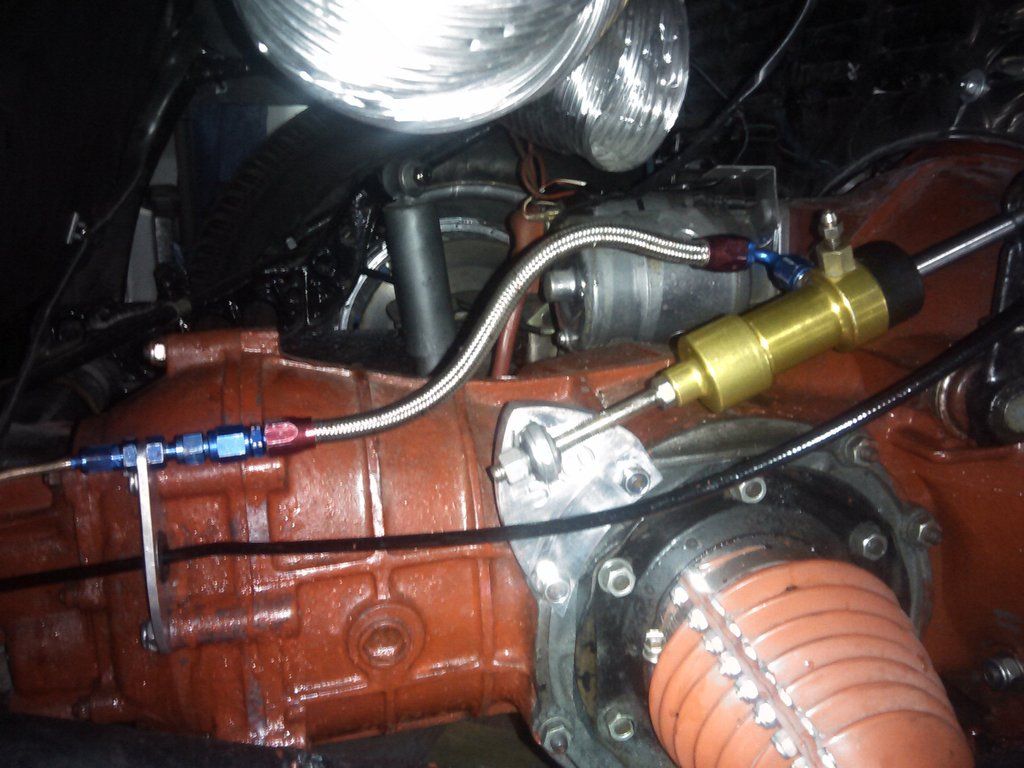 I have re-run the fuel line three times and I'm still unsure of the first and second parts but most of the work is done. 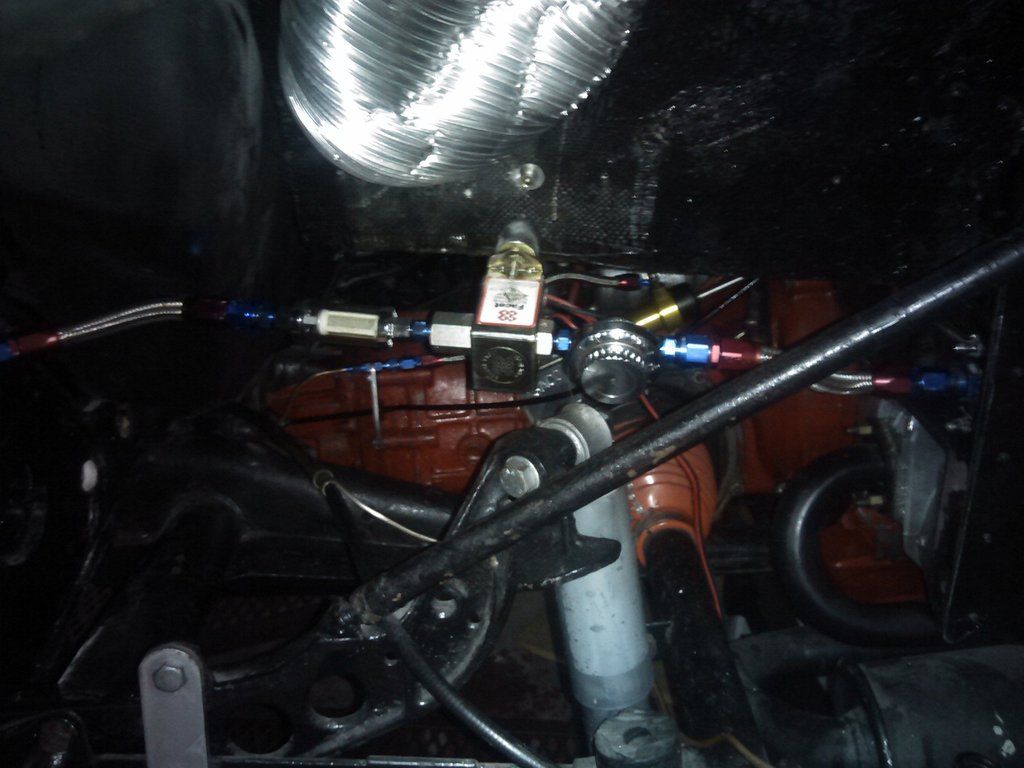 Line from tank to 90 degree bulkhead fitting is done but I think the short inlet to the filter needs to be a lot longer and curved down so it's level with the tank outlet and reduces strain on the filter. Arm rest is now complete and sport a pair of outlet sockets where the LED switches were, (now on remote). 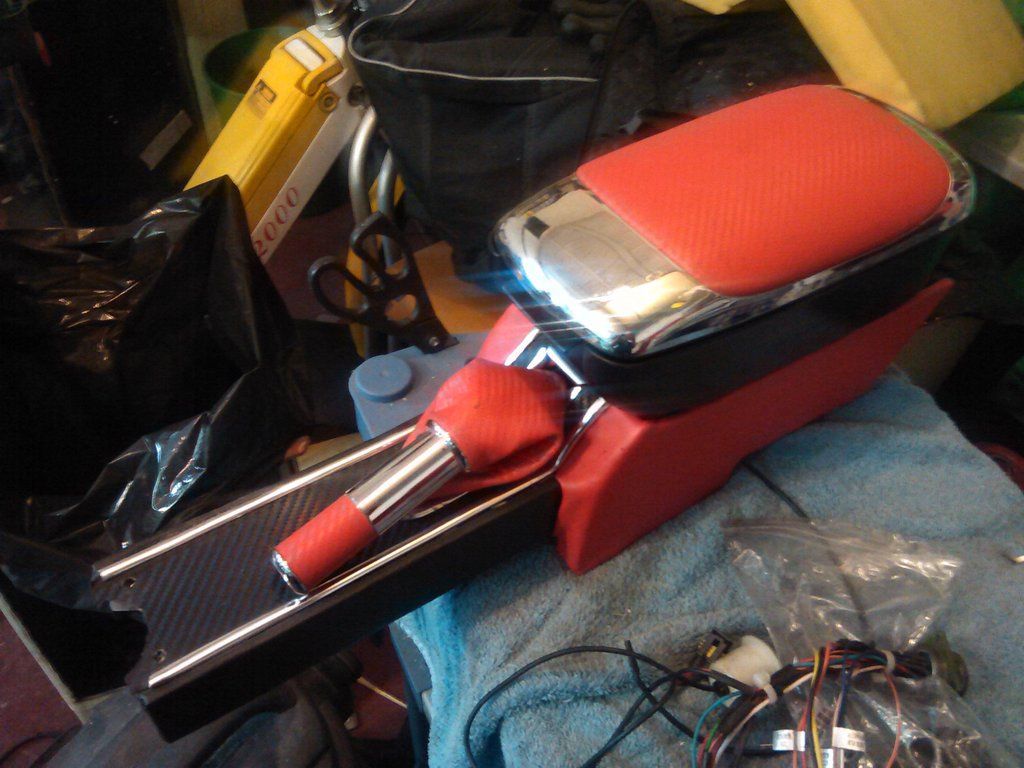 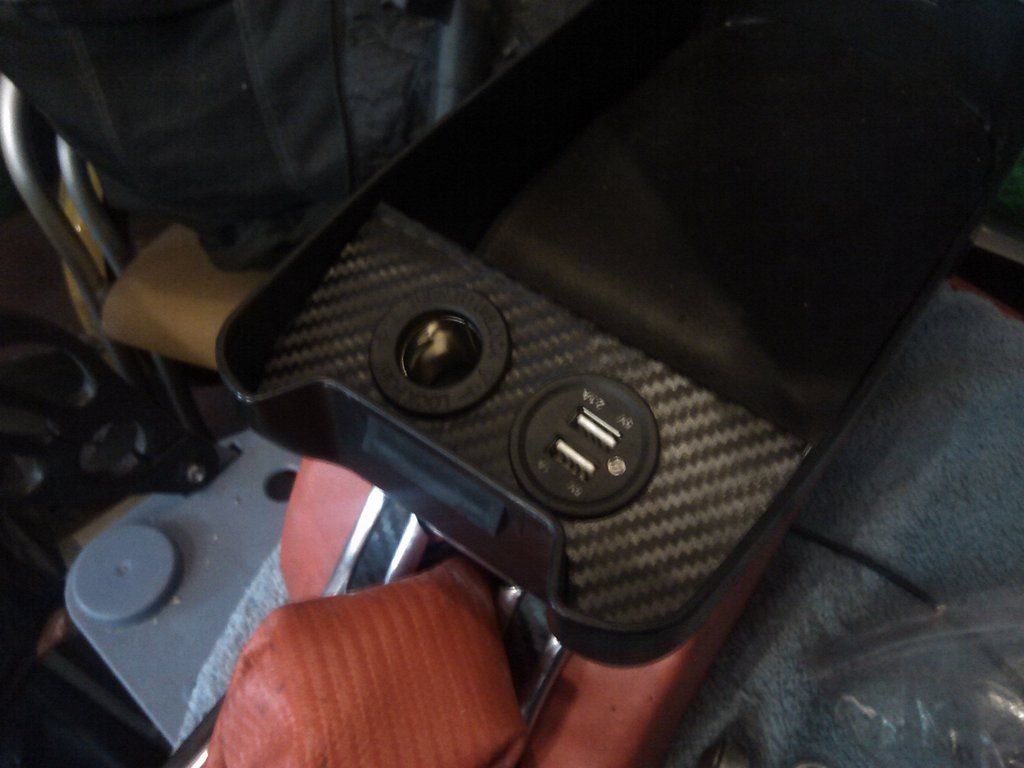 Still playing with the console fascia, still hate GRP and wish I had some decent alloy sheet but difficult to find in this area. The layout is set and I'm just playing with stiffening it up and getting the speedo cover to fit tight as it will be bonded in flush prior to the CF wrap going on. A recent $9 purchase of a 120mm sanding disc with Velcro surface has sped things up on the sanding jobs including the shroud. Having to do whole days 'proper' work on Friday, bummer, so that'll slow things down a bit but I hope to have that darn rear wheel back on for good by the weekend. |
|
|
|
Post by Peter on Oct 22, 2015 20:51:48 GMT
Another good day in the shed. The fuel lines is now complete, just need to fill in the redundant holes and make a guard for the assembly. Console is coming on and nearly ready for wrapping, speedo cover is bonded in with black hot glue, the whole panel will be wrapped and then the speedo window will be cut out so I have to make sure it is a flat from fascia to screen so it does show an edge under the wrap. Shroud has been polished and is ready assembled to re-fit.     |
|
|
|
Post by Peter on Oct 22, 2015 21:15:15 GMT
Shot of shroud repair, I used 400 rods which were too hard, 200 or maybe 300 would have been a lot better such as Lumiweld.  |
|
|
|
Post by Peter on Nov 6, 2015 17:12:03 GMT
Managed to get some Ukhozi time after repairing the BMW under tray and some electrics including the ignition switch that parted company with the lock and stranded me at a filling station and the front left indicator which required removing the whole bumper/skirt assembly. The center console is very nearly finished but now it is I'm not so sure I like it.    The corners of the sides at the bottom of the speedo need to be rounder to loose the gap, so a bit to be cut from either side of the seam and a 1 1/2" strip fitted and rounded then re-covered. I'm happy with the switches and buttons, radio and speedo but it is lacking something,maybe too much CF? Maybe the flat top area from speedo forward in black leather to match dash sides??? Still like this one but can't find the ribbed alloy needed. 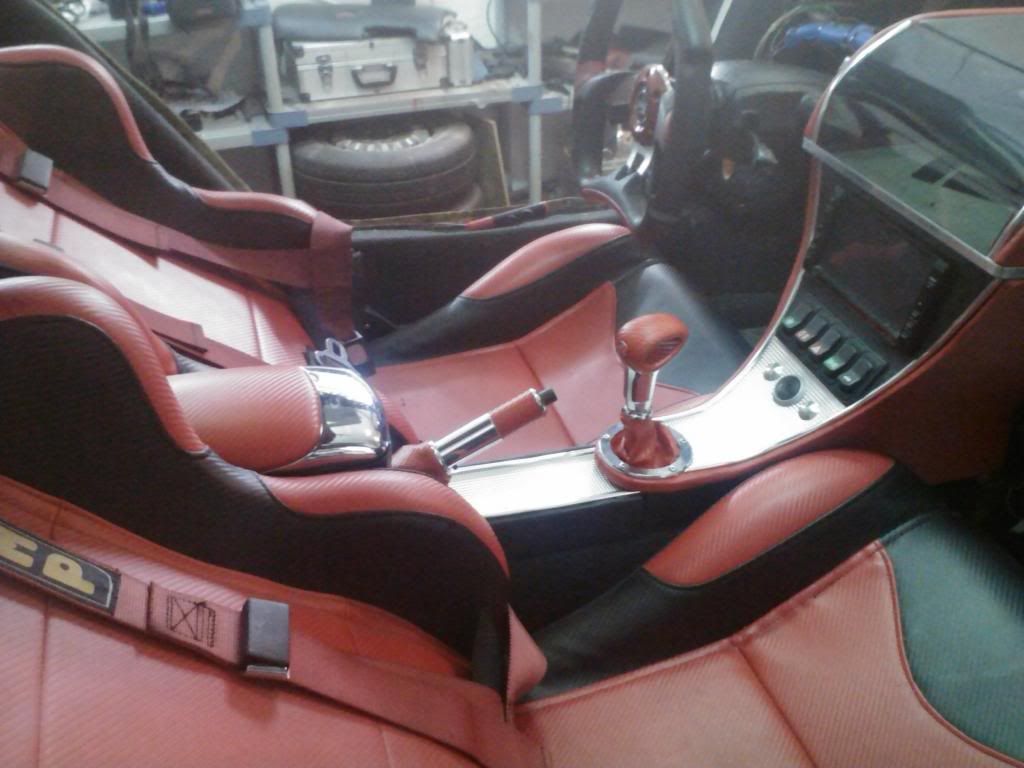 |
|
|
|
Post by Peter on Nov 9, 2015 18:36:14 GMT
Well, that was a day to remember, actually got what I wanted to do, done. Center console reshaped, looks acceptable now.  Just need to polish up the screen, loads of marks on it. Wiring for the switches and speedo identified and labelled. Speedo modified to have front and rear fog light indicators. I think the one I have coming as a spare has them bit hey ho. Started to strip and modify the dash side pods, of course they no longer fit the current center console as it no longer curves in at the screen. All looms now ready for connecting. So a good day.  |
|
|
|
Post by Gary on Nov 9, 2015 19:40:41 GMT
Nice job on the console, well worth your effort I think.
|
|
|
|
Post by Peter on Nov 9, 2015 20:44:37 GMT
Thanks Gary, I do try, in fact only last night my wife said I was very trying.
As the speedo fits in before the fascia goes on and I have to wait for the spare speedo to arrive with the additional bulbs needed that are impossible to buy, it will be next week before I can install it. At least I don't have to wait on the rest of the dash as the sides just bolt on so I can get on with wiring up without having to finish it all.
|
|
|
|
Post by Peter on Nov 10, 2015 11:05:09 GMT
Stop press, speedo arrived, . In better nick than current one and with FIVE idiot light bulbs worth at least 11 quid EACH, (these have been unobtainable for years), which means the speedo is FREE, cool. But no post Hold the page! Better late than never, post lady has been and all bar one item is here now so I can get on with the speedo calibration. and fit new heat sensors on the wife's Corsa, |
|
|
|
Post by Peter on Nov 12, 2015 18:14:32 GMT
Side pods for the dash finally done, modified with slashed ends and red end plates for a change. Not happy with them but as had been suggested, get the thing running, so on the list for taking later along with the bottom parts which will be vinyl covered expanded foam. The vents swivel and rotate so de-mist as well as in ya face. Finally got the hazard switch sorted, I had it wrong as I was looking at the connections from the wrong end. Dough! All looms done and door wiring done.   Hi-tech calibrator Bosch variable speed drill, plastic disc cut from washer fluid can, strobe rev counter and a hall effect rigger, (dead) ad a bunch of n42 magnets to stick on the disc.  On to finishing the wiring and on to the door cards. |
|
|
|
Post by Peter on Nov 18, 2015 18:05:15 GMT
Spent a whole afternoon making the covered foam under dash sections and now not too happy,, so as it's all stuck together with 3M tape and I know it will all come apart in the summer heat. I can reuse the covering and remake from ply same as top half. The idea was I was going to make plugs from scrap Styrofoam and cover with gaffer tape and then make moulds etc but I was surprised just how strong that combination is so used them straight on but as I said, not happy with the results. Also I can make the passengers side into a glove box, not that anyone will be able reach it New hall trigger trigger ordered so that's a couple of weeks away, get on with wiring and door cards I guess. Also had to order a new 12 way barrier block as I got super-glue on the middle one on the board and I can't get a couple of the screws undone and broke it. ![blushing[1]](//storage.proboards.com/658221/images/GOct95b4P66OwHKPxg2q.gif) |
|
|
|
Post by neilsmith on Nov 21, 2015 5:59:53 GMT
That dash looks amazing it must have taken many hours to get to that stage. I was going to keep my dash in the black gel coat Finnish.
Your car must be about the best one that there is out there. Do you think that you will take it to a show in England? I have never yet actually seen an 'SS' at a kit car show yet. Is there much in the way of kit car shows in Spain?
|
|
|
|
Post by Peter on Nov 21, 2015 14:45:49 GMT
That dash looks amazing it must have taken many hours to get to that stage. I was going to keep my dash in the black gel coat Finnish. Your car must be about the best one that there is out there. Do you think that you will take it to a show in England? I have never yet actually seen an 'SS' at a kit car show yet. Is there much in the way of kit car shows in Spain? Lost track of hours, it has been many months and at least two major re- thinks. Change of speedo from MG to Astra GTe meant a totally new unit had to be made then worked out that 2" off of the corner had a big improvement on access. |
|
|
|
Post by Peter on Nov 22, 2015 20:06:02 GMT
I have just added a few photos of parts of the work on the car that are complete so far and hopefully will not be too drastically altered in the near future to my Photo bucket public album, take a look. I was quite pleased to see that the concept drawing I did a long time back is very close to the actual thing as it is today, smg.photobucket.com/user/Ukhozi/library/Ukhozi%20public?sort=3&page=1 |
|
|
|
Post by Peter on Nov 23, 2015 11:03:07 GMT
Bonnet just shut on my hand which was on the opening so onto Ebay and an upgrade by 20Nm on the struts to 120Nm. Also ordered from the original supplier another meter of the red faux leather for the doors, hope it still matches after two years |
|
|
|
Post by Peter on Nov 23, 2015 11:18:40 GMT
That dash looks amazing it must have taken many hours to get to that stage. I was going to keep my dash in the black gel coat Finnish. Your car must be about the best one that there is out there. Do you think that you will take it to a show in England? I have never yet actually seen an 'SS' at a kit car show yet. Is there much in the way of kit car shows in Spain? In answer to the above; If the black gloss finish fits the décor then go for it, I tried very hard to make mine look like anything except a kit car but it does take a lot of time, re-makes and money. (pinched the theme from a Veron). There are no kit cars in Spain to speak of, a few have managed to sneak in and through the extensive paperwork and tests but not many and only one other SS that I know of. The only 'shows' we have are mainly for classics like my 1987 BMW E30 and 1987 Mercedes Cosworth and older vintage cars or customised standard cars which have to be inspected at the MoT station (ITV) and any changes such as wheels, wings, skirts, seats, etc have to be entered in the log book, at a cost of course, about 100 pounds a go. I did a few shows in England when I built the car in 1995 to 1999 then I bought it here. Unfortunately I couldn't drive it as it has to be placed on Spanish plates and I didn't have the time or money to do it, barely managed to get my Suzuki Bergman 400 done and was 300 quid. so it stood out for a few years and got ruined, so in 2005 I started a total rebuild and it's still on-going but it is getting there. At all times it has been drivable at a days notice apart from when the engine was being rebuilt by doing one thing at a time although at the moment re-wiring and trim/console are on-going and of course still on UK plates but we are not allowed to drive on UK registration for more than 30 days after importing. |
|
|
|
Post by Peter on Nov 27, 2015 19:24:49 GMT
Dam, bugger and blast  . Best laid plans of men and mice an' all that. After all that and measure trice cut twice it still didn't fit ![cursing[1]](//storage.proboards.com/658221/images/cfTn3T5UL4wuItbNCxN1.gif) After I bolted the dash sides on, I positioned it over the gear shift and over the connection board and it is all 3" short of the screen base right across the dash. Given that I can't move the main center part but I can unbolt and move the sides forwards so there would only be a gap in the middle so I'm thinking of a de-mist vent and that should bring it all back, eventually. Plan 'E' or is that 'F'? |
|
|
|
Post by Peter on Dec 2, 2015 14:47:51 GMT
Managed a good day in the 'shed' yesterday despite the cold and hacking and snuffling all the time. Changed the bonnet(hood) struts for the 120Nm ones, now perfect balance. The dash and center console is sorted, just a few alterations needed. I have abandoned the idea of one continues fascia, it was just too much, so back to the three part one with a new top in black leather-cloth, I have also bought it back further so it acts as a hood for the speedo cover, now 'T' shaped to cover the gap and moved the side pods up to the screen but this meant they had to go out sideways a bit too, so all I need to do is make a pair of 1" inserts and recover the whole thing.  The under parts are no good on the left as I need the knee room so I will just make a small round safety return there and possibly a small tray on the passengers side as a document holder, very important here as we have to carry all the crap, (one day)  Lucky I had some smoked acrylic left so I made a new full wide speedo screen, again, lower part is the same with the buttons.  Replacement hall effect sensor has arrived so I will be able to calibrate the speedo. Also an A4 sheet of none reflective film I am going to try. 1m x 1.42M red leather-cloth also here now so I can do the door cards and possible redo the center console as that is looking very second hand with all the changes over the two years. |
|
|
|
Post by Peter on Dec 7, 2015 16:40:20 GMT
Sometimes and I do mean 'sometimes', I make a cock up and have to admit I have wasted a lot of time and money on an idea and the one piece carbon fibre fascia is one of those times, it looked horrible, just OTT and lacked 'charicture' and 'balance'.  So back to the 2013 design as below but in the 2015 console and handbrake cover but the new switches and buttons. Only a photo shopped version of last years but good enough-  I have just enough ribbed alloy to do the lower part of the console and the handbrake cover, a carbon fibre covered 1/2" alloy 'T' section will divide the lower part from the screen as well as retain the lower edge of the screen, the top will once again be black leather-cloth to match the side pods and come a little over the screen as a hood and hide the top fittings of the screen, I have to remake that to reach the screen anyway after I cocked that measurement up. Not going retro with the Pioneer set up, even if it is awesome sounding so staying with the 6.5" screen as is, apart from that the whole set up is probably worth half as much as the car now. |
|
|
|
Post by Peter on Dec 9, 2015 16:18:37 GMT
Had a go at the trim yesterday and I have to say the ribbed alloy finish is way better than the black CF all over.
Side pods need about 1 1/2" extra between them and the center after I moved them outwards, so a bit to do there including moving the steering cowl cut-out but will look good in the end.
Going to recover the sides and 'puff up' the sides a bit so the center 'fascia' sites down in it better.
|
|
|
|
Post by Peter on Dec 10, 2015 22:18:13 GMT
Not a great day in the shed.
Puncture on wife's bicycle fixed.
Centre console totally stripped down and smother. all I need now is some 3mm hi-density foam to wrap in in before I cover as I want that softer look to match the seats and handbrake cover, finding it will be a pain as not many upholstery places or DIY here.
Spent ages, too long drilling out the E30 gear change bezel only to find fitting 20 or so bristles into each of the 60 or so 2mm holes will take some thinking about.
Got home to find the 6 way mini fuse holder has arrived so I can get the remote relay board up to date.
|
|
|
|
Post by Peter on Dec 12, 2015 23:32:16 GMT
Found some 3mm sticky back foam sheets and covered the sides then re-covered with the red vinyl. Fitted the fascia and wired up the door buttons and fixed the 19 way connector. Made and covered in foam the top panel.
Seem to have problems with the speedo calibrations, with 16 magnets and despite flicking switches I can't get it right maybe it needs a 29 tooth hear from the ABS
|
|


![rock[1]](http://storage.proboards.com/658221/images/WwlTZGzEzqS029BPkumN.gif)
![cheers[1]](http://storage.proboards.com/658221/images/HTahwjnPNRnE0X3XkViD.gif)

 looking at that I might just put a 90 fitting where it comes through the wall and fit the filter verticality to the wall with a clip and then another 90 to the pump raising it, so there is better clearance over the axle, Hmmmm, EBAY!
![hmmmm[1]](http://storage.proboards.com/658221/images/XKN5ScdKR1O8cJ3IeDgW.gif) "If I use stainless 'P' clips not only will it save a LOT of work but will add a degree of insulation too", So, I did.
"If I use stainless 'P' clips not only will it save a LOT of work but will add a degree of insulation too", So, I did. ![angel[1]](http://storage.proboards.com/658221/images/XtuH5rwyBaS0gOkAn3Cd.gif)


![blushing[1]](http://storage.proboards.com/658221/images/GOct95b4P66OwHKPxg2q.gif)

 . Best laid plans of men and mice an' all that. After all that and measure trice cut twice it still didn't fit
 ![cursing[1]](http://storage.proboards.com/658221/images/cfTn3T5UL4wuItbNCxN1.gif)


