|
|
Post by Peter on May 3, 2016 21:24:36 GMT
Didn't work, too crumbly, need neoprene.
|
|
|
|
Post by Peter on May 4, 2016 11:58:54 GMT
Started on the overhead part of the roof lining. This area is very difficult to get right and a solid former across the front is the best way to do it and keep in line with the top of the screen. I built in a clock/temp thing I had laying around. I will cover this in black and a couple of small sun visors fitted to it too. I will clip it with small 'fir cones' to the cage frame tubes rather than rely on tucking the covering into the door seal as usual. The rest, in off-white perforated, will be loosely stretched over the roof with a bit of foam under and a couple of spring loaded Saab grab handles (on the way) fitted into the roof bars facing inwards to make getting in and out easier without grabbing the top of the screen which can crack it. A straight panel across the rear holds the back in place above the window.  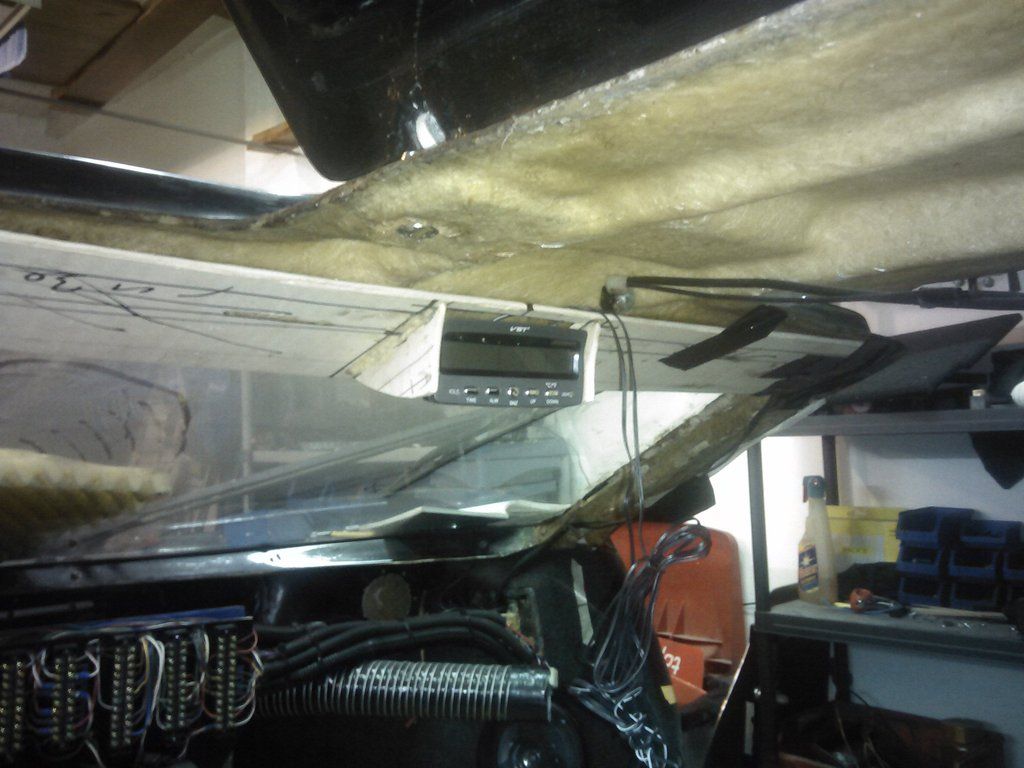 Next stop 'A' post trims. |
|
|
|
Post by Peter on May 7, 2016 16:17:15 GMT
Finaly made a seal for the filler neck from fuel resistant foam. Also finished the front inner roof section. First made a ply former with side pieces cover with thin alloy. Cover with foam and faux leather and insert a clock/temp/volt unit. 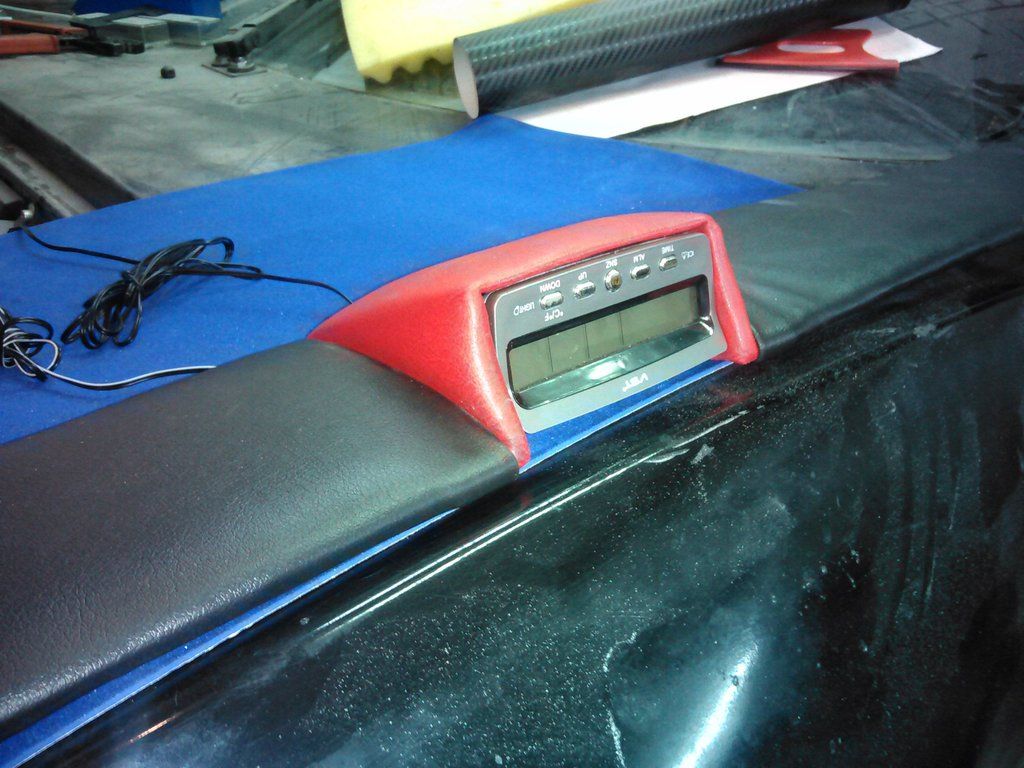 Check it works. Tralaaa. 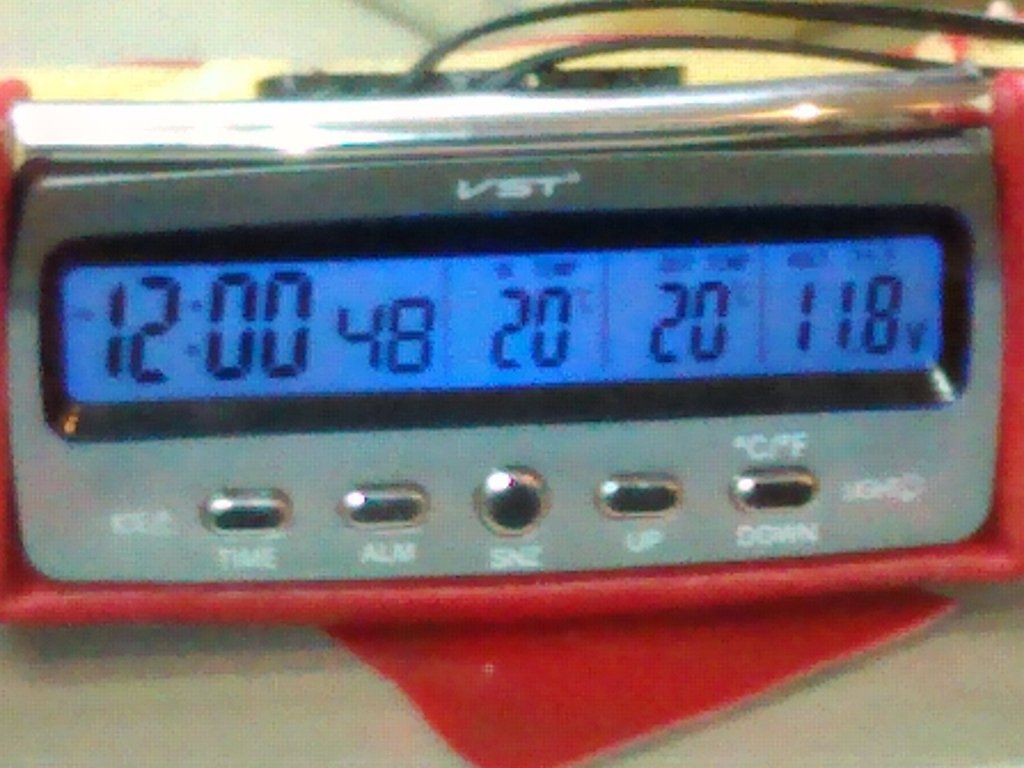 And in place.  Just waiting on folding roof handles before I can put the headlining up. |
|
|
|
Post by Peter on May 10, 2016 10:56:20 GMT
Anther part of the jigsaw puzzle arrived today, a set of SAAB grab handles, only 0.99p on Ebay (plus post) so I have a spare. These will go either side of the roof just behind the front hinge cross plate and will allow me to heave myself out without needing to use the corner of the windscreen (and cracking it). I can now fit the head lining, front cross panel with clock and the handles and that will be the roof finished. Attachment DeletedIt will look a bit like this paintshop rendition. Attachment DeletedOr, plan B, just one across the centre ![hmmmm[1]](//storage.proboards.com/658221/images/XKN5ScdKR1O8cJ3IeDgW.gif)  Thinking on the doors for a moment I realised that in the case of electrical failure i had the actuators covered from the inside with QD pins but the VW Golf latches would still be locked so I do need an interior release handle built into the design, maybe these Clio ones would do. Attachment Deleted |
|
|
|
Post by dickdastardly on May 10, 2016 14:27:00 GMT
You could always fit the exploding door hinges fitted to the McLaren Mercedes guaranteed never to get stuck in then lol
|
|
|
|
Post by Peter on May 10, 2016 16:37:44 GMT
You could always fit the exploding door hinges fitted to the McLaren Mercedes guaranteed never to get stuck in then lol Just for a giggle I looked up the cost of replacing those, I could buy another car for that! |
|
|
|
Post by Peter on May 16, 2016 21:23:53 GMT
I have no idea what went wrong with the head lining, everything fitted, looks right and functioned as intended, so well in fact I've put the seat lifters on hold. Attachment DeletedAttachment DeletedThe gap above the clock is for LED indicators for the display (show off) lights,(skirts, engine, cabin and bonnet). Just need to fit a couple of screws either end just be sure and jobs a good 'un and I can re fit the door seals. Cut out the first hardboard door card and promptly blew a relay for the left door, lucky I have a spare board with a duff receiver. |
|
|
|
Post by dickdastardly on May 17, 2016 5:42:25 GMT
One step forward two steps back lol that seems familiar to me
|
|
|
|
Post by Peter on May 17, 2016 15:15:11 GMT
One step forward two steps back lol that seems familiar to me Luckily I think I gained ground on that day, like 3 steps forward and one back, making progress that's for sure. Aching all over as I am having to do some actual work this week on the big buggy fleet so I might get to it by Friday. |
|
|
|
Post by Peter on May 20, 2016 18:20:17 GMT
One of those screaming habdab days.
Simple job, pop out the back window so I can tuck the rear of the head lining in and I saw the brake light in the roof was corroded, too badly to bother with so I ripped off the PCB with the bulbs in and slid a strip of red LEDs between the Lens and reflector, better than ever, just need to get it all back to together.
Actuator on drivers door packed up and I dreaded the motor had cooked but no, so must be the limit switches at fault, another one to put back together.
Relays for the doors packed up too so pulled out the spare only to find the latching function wouldn't programme (switch one on switches the other three off) when I changed the jumper it went to toggle, so I had toggle, momentary, toggle. So I had to swap the door relay and LED units and that meant new connections as different size terminals.
I found a four wire telephone extension cable is perfect for running from relays to overhead unit but the one I have spare was a foot too short.
And I thought all I had to do now was do the headlining, put all the parts in the car, make the door cards and fire it up, WRONG, again.
And so it went today, a genuine one step forwards and three back day.
Ahhhhgggg.
|
|
|
|
Post by dickdastardly on May 20, 2016 20:15:29 GMT
Told you so ! The joys of owning a kit car .At least we can fix them!!!!
|
|
|
|
Post by Peter on May 23, 2016 23:39:45 GMT
Today was spent getting the horrors of last week sorted out. The newly LED converted roof mounted stop light was glued up and hot glued into roof from the inside and then the headlining was fitted between the window rubber and the roof. I can't find my locking strip tool so I guess it' got stolen when I arrived in Spain along with a lot of other 'old school' stuff. ![frown2[1]](//storage.proboards.com/658221/images/4RoFPGAE9cs9iByWQb34.gif) The relay board is all working again but there were a couple of issue that needed addressing so that took ages.  The dead actuator turned out to be an internal wiring fault to the limit switches so a new wire and back together only to find I had wired the dam thing wrong ![dunce[1]](//storage.proboards.com/658221/images/FxqOrvJpqz02pFK3Dwgv.gif) , swapped the two wires from the limit switches, soon fixed and back in and working again. With that lot sorted it should be a clear run to finish the roof area and move onto the doors which I have, so far, fitted one card and with the left dash module in place I can see there is going to be quite a large foam 'wedge' to infill and be sculptured into shape. There is definitely a glimmer of light in the dark tunnel at last as all the mechanical parts and most of the electrical bits are finished. My idea of having 4 x LEDs in the overhead for the display lights may not come off and they will be fitted in the console, maybe but, there is always plane B, c, d,,,,,  anyway, I ordered 20 in five colours on Ebay for about $5 and in a couple of weeks time I can play with that. |
|
|
|
Post by Peter on May 25, 2016 14:46:23 GMT
I got all the relays working for the doors and the display lights and the door latch triggers connected and everything now works again,,,, except,,,,, the centre console buttons, I forgot that the buttons work off of a second remote hard wired in and of course a different code so now I have to buy a new remote with the same chip so the new relay can 'learn' it as well as stripping the 'finished' console down to replace it.
Head lining all tucked up into the rear window rubber and although I didn't have the right tool I managed to get the locking strip back in using a chubby screw driver, so job done but stiff hands and aching wrists.
I also feel I need a small gas strut on the front roof of the doors as the door twist so much when it closes and that makes it difficult to line up the catch too.
|
|
|
|
Post by Peter on May 29, 2016 13:36:22 GMT
I had to strip the centre console down which as I had it all ready to fit was a pain but it had to be done as the remote for the doors no longer matched the relays, still doesn't so waiting on a new relay with two remote controls, one for the key fob and one to wire in, only problem is the new one is on a 1527 chip uses 2 x 2032 button batteries so 6v not 12v direct, so I need to either fit a dropper resister or a 2 x button battery holder I can get to without stripping down the whole console.  also fitted a kind of heat sink under the relays as they were getting 'warm', at least one at a time are as at least one, sometimes two are held closed.  Both a bit untidy but I'll sort that out when I fit the new ones. Another step backwards, the poly bearing plates I made for the headlight bar have split, I didn't realise there would be that much force applied to them, I have looked at 30mm flange mounted bearings and quite surprised that I can get them foe under a tenner each so I may go that route. |
|
|
|
Post by Peter on May 31, 2016 21:38:09 GMT
Don't, seem to be getting anything done these days, relay board had been rewired so the cabled go through holes and run behind, much cleaner, from the front at least. Centre console has been recovered, squarely this time.
'Real work' this week is replacing some missing teeth on a set of gears for a PGO 250 buggy, not easy and a lot of filing, re-hardening etc.
Still awaiting on fuel filler hoses, 5 weeks now, can't refit wall and speakers before they are fitted. Also the new relay and remotes and LED warning lights are in post land limbo, somewhere.
Genuine Hella third brake light for my '87 BMW E30 arrived from Canada today, in 5 days, woooosh.
|
|
|
|
Post by Peter on Jun 5, 2016 11:56:00 GMT
One week down and very little to show for it, decided to wire the relay board with the wires hidden behind so that looks a lot neater but still waiting on the new relay and pair of remotes so I can reassemble the console and finish the relay board. display lighting. Waiting, waiting,  . Working on the dash lower pads, these are made from Styrofoam covered in gaffer tape and then covered in vinyl which is very light, impact friendly and quite strong too. The driver's side is just a pad but the passenger's side is a document holder that slides out on runners. Started on the door cards, first stage was to shut the door best I could without latches and infill the space between door card and end of the dash with Styrofoam pieces then remove the whole unit and spray with foam and leave to set, I can then carve out the shape I like and cover with vinyl. I'm not one for making moulds and casting a fibre glass panel, me and fibre glass just don't get on. The headlight pivot bar bearing idea with 5mm poly board 'horseshoes' didn't work, not strong enough and they split so I am fitting pillar bearings. Problem is I can't find 32mm bearings, only 25mm or 30mm so easiest thing is to fit nice shiny new 30mm tube and a pair of 30mm bearings, only about 20€ the lot so no biggy. I can also weld on a micro switch can and a lifter bar instead of a clamp and arm. Attachment DeletedREAL work just keeps getting in the way with more buggys to repair, two top end rebuilds and a complete crank up job this week. I am also repairing a PGO gearbox that had 9 broken teeth, quite a job MIG welding metal back on and then hand filing to shape followed by re-tempering and hardening. No, one cannot buy new ones, anyway, they are over 80€ each. 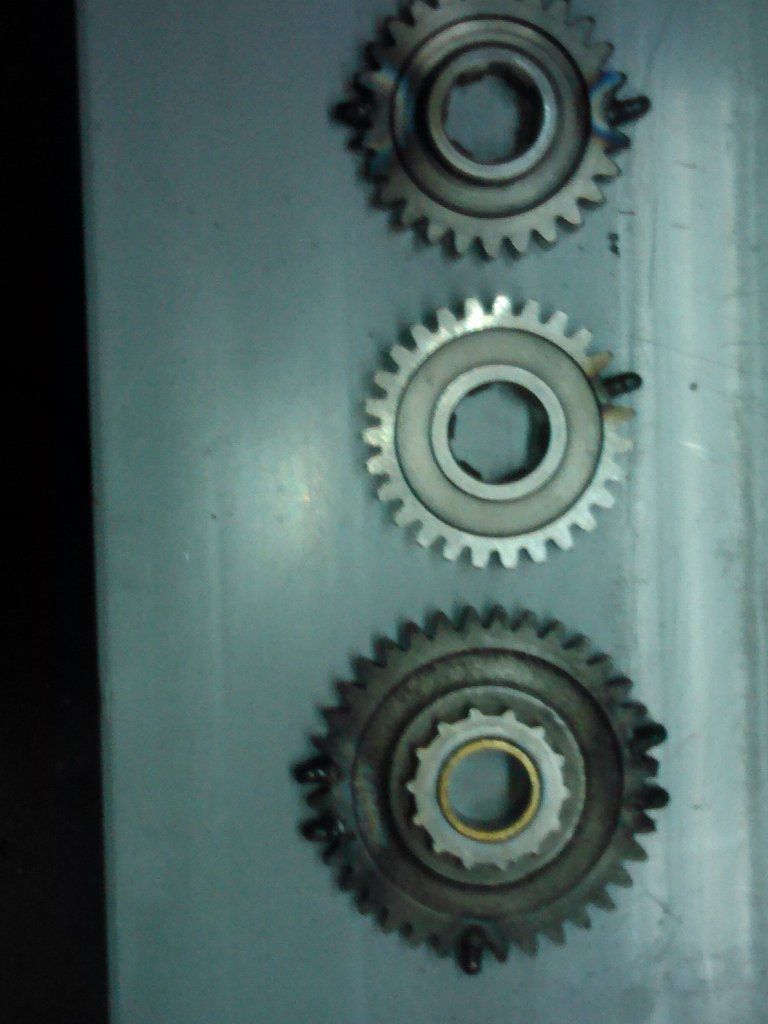 and in the box to check mesh. 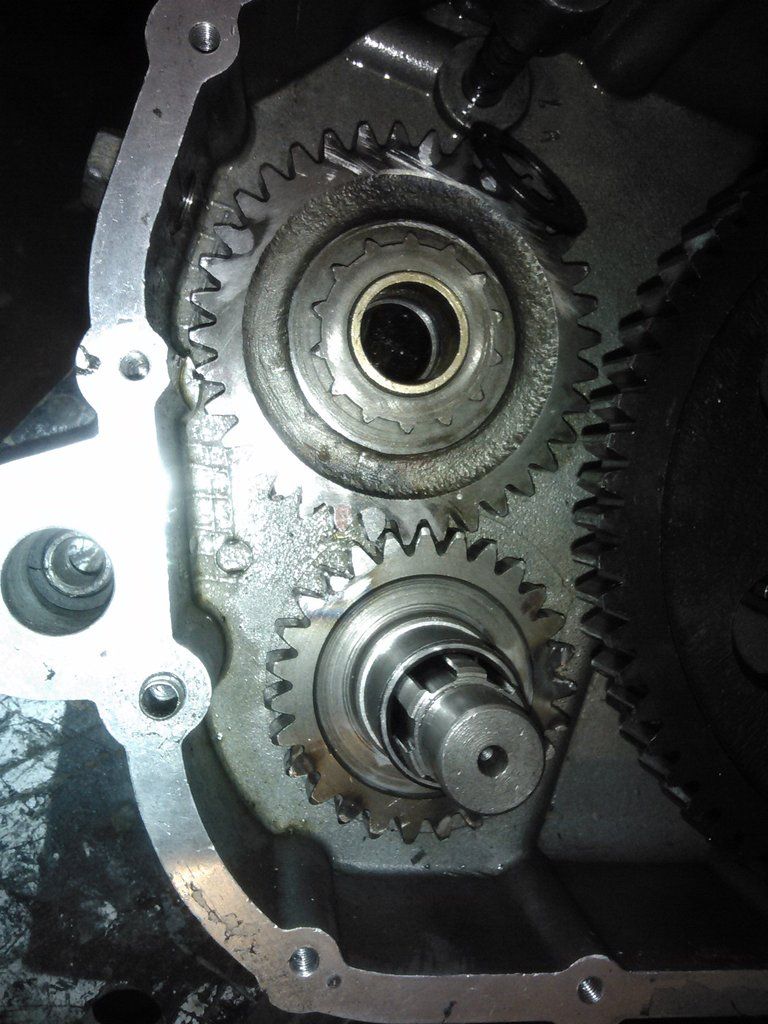 |
|
|
|
Post by Peter on Jun 8, 2016 18:51:03 GMT
Spent Tuesday pottering about after heat treating the gears and assembling the PGO gearbox.
Did further tinkering on the glovebox.
The parallel gas strut idea didn't work as it pushed the actuator up after it bottoms on the limit switch so now I'm looking to see if I can fit a small strut under the front of the doors roof if I can get one inside the seal , it should make the door close more evenly, at the moment the rear lags terribly.
|
|
|
|
Post by Peter on Jun 10, 2016 23:00:50 GMT
Well the gearbox ix all done and ready for collection but as it is cash on collection it may be a day or three and the guy wants me to help him put it in too, shite job in a PGO so not keen.
Little warning LEDs arrived today but the stuff I really want, the filler hoses and the remote relay are still, 'in the post', more paid work Monday so still not able to get down the 'shed' and Saturday is full of family stuff and the wife wants some beach time on Sunday, life just keeps getting in the bloody way.
|
|
|
|
Post by Peter on Jun 18, 2016 18:05:36 GMT
At last, ONE of the two hoses for the filler pipe arrived, seller is DHL fast tracking the missing one, "warehouse error".
Should get the dash finished this coming week, document draw to put a front on and the alloy centre line to fit.
Door card design taking shape, literally, in foam and hardboard but I think I will have to 'bite the bullet' and do it in fibre glass, hate the stuff.
|
|
|
|
Post by Peter on Jun 23, 2016 18:40:12 GMT
Headlight bearing and remote relay arrived today (and half my filler pipie) so off to buy a 110cm 30mm tube tomorrow and get stuck in.
|
|
|
|
Post by Peter on Jun 25, 2016 14:33:57 GMT
Work really is getting in the way now and the boss has 5 new buggys arriving next week to be built up and p.d.i. plus 800Lbs of parts in the container to be sorted, filed and then quite a few fitted. five older buggys to be overhauled for sale, so,,, not a lot of time in the near future for SS time. Spent two hours of my precious Friday 'shed time' hunting for 30mm steel pipe for the headlight lifter, not easy it seems, plenty of 32mm but I can't buy 32mm bearings for sensible money. In the end I bought two 1 metre lengths which I will join but even then I find the bearings are 29.98 and the 30mm pipes are really 30.02 so I need to open them up a few thou' anyway, would have been just as easy to open them to 32mm and use the existing tube, Door operating relays are all sorted and then one 30A decides to short out so I need to replace #3, problem is I super glued them all in a row so need to cut it out. ![cursing[1]](//storage.proboards.com/658221/images/cfTn3T5UL4wuItbNCxN1.gif) Dash is coming on slowly, upper parts all done but lower covered foam crash pads are taking time to get right and the 'document draw' is also time consuming. joining the two parts with 10mm alloy 'T' section and that's mostly done, bought a packet of 1/8" long screws to fix that in place, can I find them? can I bugger! Door cards have ground to a halt with the other stuff to finish now but the design has been sorted, at last But getting there, slowly. |
|
|
|
Post by Peter on Jul 4, 2016 17:38:55 GMT
Work really getting in the way now so nothing moving on the SS front for about three weeks now. plenty to do still but all fiddly stuff like trim and minor tweaks on the electrics.
|
|
|
|
Post by Peter on Aug 7, 2016 14:39:46 GMT
Seems we are all in the summer doldrums as far as our Eagles go, far too many distractions at this time of year, I am working 5 days a week and that leaves Sat & Sun to do all the stuff I did when not working which leaves no time for the SS at the moment. Managed to get a little done on the dash in as far as made the sliding draw for the document tray/glove box to work and the alloy trim around the 'waist line' screwed on and the padded under sections ready to fix on, as soon as I figure out how to do it . Promised myself a day off next week but the boss insists on running all ten vehicle nearly every day and that means I'm up to my neck in new piston rings, starter clutches and drive belts during the week but I live in hope. Next month we should have another 5 new buggys ready to legalism and add to the fleet so I will have more flexibility or more work, depends on how it goes. Keep up the good work guys and galls and let everyone else know what your doing. if not ![driver[1]](//storage.proboards.com/658221/images/7oaeflFwvH1EGzY3IURW.gif) or ![asleep[1]](//storage.proboards.com/658221/images/iHZrTdk9iI72_rat7y3M.gif) or ![cheers[1]](//storage.proboards.com/658221/images/HTahwjnPNRnE0X3XkViD.gif) |
|
|
|
Post by Peter on Aug 22, 2016 21:46:36 GMT
Work has been frantic, 11 hour days in 35c heat, I have lost 10 Kilos though, that's near enough a stone and a half in old money, still too fat though. but better than 117K Managed to get to the shed a couple of times and get some work done on the dash side pods. The dash approaches completion with the addition of the 'document drawer' just to keep the papers we are obliged to carry in the vehicle. (just big enough for a 9mm too. There will be a front panel to match the other side 'under dash' but I have decided to do all the underpart in red rather than black. Attachment DeletedAttachment DeletedAttachment Deleted |
|
|
|
Post by Peter on Aug 30, 2016 21:56:08 GMT
Managed a few hours in the shed before a work mate phoned in a panic says he had lost is car keys and could I help. After driving the 35 miles to work, on a Sunday I found his bloody keys in the door lock of the buggy garage, IDIOT. I did manage to get the relay board finished using good quality relays and Lucas holders, the radio remote door control in the console and a start on the headlight pivot bearings.    |
|
|
|
Post by Peter on Oct 14, 2016 18:06:45 GMT
Update on work, dried up a bit now but final weight lose for the summer 14 KILOS, that's over 2 STONE still 104 but going the right way and just had a full analysis check over and 100%, no problems at all. not bad at knocking 71, just wish I had two decent knees, ![unsure[1]](//storage.proboards.com/658221/images/6Gy1jIcXxHETTCw1CY9x.gif) Hoping to get to the shed now and finish the interior at least. So far only managed to get the other headlight bearing fitted onto the shaft and the drawer 'push shut-push open' thingy fitted, still need to make the under parts for the dash and wire the console connectors into the board then it's fit and I hope it will all work. |
|
|
|
Post by Peter on Oct 22, 2016 13:44:57 GMT
Managed 5 hours in the 'shed' on Friday but as you might know from previous posts my 'shed' isn't just down the road, it's 38km away, so at least 40 minuets. Got most of the wiring done and the four connectors for speedo lights, speedo data, console switches/radio and LEDs (behind console for display effect). Still trying to figure out what I need to do to hook up the Astra GTe digi-dash to the VW front wheel. I have a sensor with the usual 3 wires and I figure an ABS ring on the front hub behind the brake disc will do but still need the number of teeth (pulses) needed per rev' of the front wheel, even with a speedo adjusting module it has to somewhere near as a starting point. Under dash pieces made of gaffer tape covered foam have been made but need to redo the trim on right side as drawer and alloy trim don't work together as I need to 'push' the drawer in to release and pop open, so need to buy a new meter of 'T' trim and make it continuous from centre console to door with the draw popping out from under it. Little things at the moment but they take so much time and the big stuff like the headlight bar and doors adjusted get left so a lot of half finished areas but I'm sure once I get 'in the mood' again it will all come together quite quickly. I forgot the diodes so that I can open and close both doors together with C & D. ooops.  |
|
|
|
Post by Peter on Nov 1, 2016 13:06:24 GMT
Still nothing significant done apart from some more work on the dash side pods and glove box and I finished the three connectors for the console and dash. I changed to centre line trim on the side pods to polished alloy with one piece from centre console, around the end to the body rather than the anodised two piece I had, just needed to space the glove-box drawer runners down a bit to clear and change left side to match of course. Headlight bearings ready to fit subject to figuring out a centre joint that isn't too complex, probably just a 30mm id tube over the joint and through bolts Can't use a single one piece tube as it has to fit with the bearings on from inside through the wall of the boot and then be joined. I have convinced myself that 'satin black' is the finish for most of the body having been passed by a Gallardo in Marbella in that finish, looked awesome, sounded awesome too. Attachment Deleted |
|
|
|
Post by Peter on Nov 5, 2016 13:34:07 GMT
Just another but done, little by little it S getting done.
had a problem that other might want to take note of; I bought a batch of chrome mounted LED warning lights with leads.
Problem is they soldered the leads on and then put shrink sleeve over BOTH leads and 4mm of soldered joints so the slightest movement and the two wires touched, which is (was) a pain when the whole assemble is installed and I had to take them all out and split the leads and shrink sleeve each one and then over both and redo the whole thing again.
Anyway, the armrest with USB & 12V sockets and 4 x warning LEDs for the display lighting is finally FIXED to the mounting brackets and much to my surprise it fitted first time.
|
|
|
|
Post by Peter on Nov 12, 2016 16:01:33 GMT
Little help from David (Islandman) on the Nova forum), I changed the relays on the doors from latching to locking, this means when I press the button that relay stays working (subject to limit switches) until I press it again thereby stopping the annoying chunk, chunk, chunk when the limit switch fails to stop the motor and the relay no longer stays in the 'on' state getting warm. thanks David.
|
|


![hmmmm[1]](http://storage.proboards.com/658221/images/XKN5ScdKR1O8cJ3IeDgW.gif)


![frown2[1]](http://storage.proboards.com/658221/images/4RoFPGAE9cs9iByWQb34.gif)

![dunce[1]](http://storage.proboards.com/658221/images/FxqOrvJpqz02pFK3Dwgv.gif) , swapped the two wires from the limit switches, soon fixed and back in and working again.
, swapped the two wires from the limit switches, soon fixed and back in and working again. anyway, I ordered 20 in five colours on Ebay for about $5 and in a couple of weeks time I can play with that.
![cursing[1]](http://storage.proboards.com/658221/images/cfTn3T5UL4wuItbNCxN1.gif)
![driver[1]](http://storage.proboards.com/658221/images/7oaeflFwvH1EGzY3IURW.gif) or
or ![asleep[1]](http://storage.proboards.com/658221/images/iHZrTdk9iI72_rat7y3M.gif) or
or ![cheers[1]](http://storage.proboards.com/658221/images/HTahwjnPNRnE0X3XkViD.gif)
![unsure[1]](http://storage.proboards.com/658221/images/6Gy1jIcXxHETTCw1CY9x.gif)
